
 A
Sad Restoration Story
A
Sad Restoration Story
Macy's Garage, Ltd.
America's BEST
Triumph Shop!
The title of this story can be interpreted two different ways. It's
either a sad story about a restoration, or it's a story about a sad
restoration. The actuality is that it's both, and unfortunately it's
a story we hear and see all too often regarding TR's that were "restored" somewhere
other than here at Macy's Garage.
 Imagine how fortunate
you would have been if your Father had purchased a new TR3A in 1959, and took
your mother and you to England to pick up the car at the Standard-Triumph
factory. Then following the trans-Atlantic flight and all of the
excitement of receiving the new family sports car at the factory, you
toured Europe in your Triumph for 3 weeks before flying home to await the
arrival of that special little car. As great as that experience was,
imagine how lucky you felt when this same TR was presented to you a few
years later as a gift following your high school graduation. You
drove that car all through college and well into your new adult life,
until the day it had become so used up that it entered a long slumber and
slowly started to rot. You promised yourself that some day you were
going to fix it up and drive it again, but then the years passed by so
fast.
Imagine how fortunate
you would have been if your Father had purchased a new TR3A in 1959, and took
your mother and you to England to pick up the car at the Standard-Triumph
factory. Then following the trans-Atlantic flight and all of the
excitement of receiving the new family sports car at the factory, you
toured Europe in your Triumph for 3 weeks before flying home to await the
arrival of that special little car. As great as that experience was,
imagine how lucky you felt when this same TR was presented to you a few
years later as a gift following your high school graduation. You
drove that car all through college and well into your new adult life,
until the day it had become so used up that it entered a long slumber and
slowly started to rot. You promised yourself that some day you were
going to fix it up and drive it again, but then the years passed by so
fast.
Now one day you realize that it's time to bring your TR3 back to life, and
you start looking for someone to restore it. Imagine again how
fortunate you would feel to walk into a business that restores old cars,
and find that it is owned by a transplanted Englishman! Who better
to restore your precious little British car than someone who was born and
raised in England? You must certainly be feeling like you and your
TR3 were both born under a lucky star. And this is the point where the wheels
came off of the apple cart.
The shop owner was better at telling tales about things he used to do back
in England that in actually doing quality work here in the USA, and his
knowledge of TR's was superficial at best. The restoration drug on a
couple of years and ended up costing more than $75,000, which isn't an
unreasonable amount for a quality restoration of a car that needs
everything, but it's about 4 times as much as it should have been for the
hack-job that was received. The photos below will show just a small
sampling of the technical errors and poor workmanship we discovered.
It doesn't stop here (there's plenty more), but this is enough to give you
the idea. Unfortunately, there's no shortage of work like this that
people have actually paid for on lots of other cars.
This car would barely run when the "restoration" was finished, and so it
sat unused for a couple more years. Eventually the owner found
Macy's Garage, and saved up enough money to have us make the repairs
necessary to make the car run reliably. It still isn't pretty, but
it's finally able to be used as dependable transportation once
again. And the best part is that the smile has now been restored to the owner's face!
|

Grill badges proudly display all of the European countries
that were visited when the car was new in 1959. |
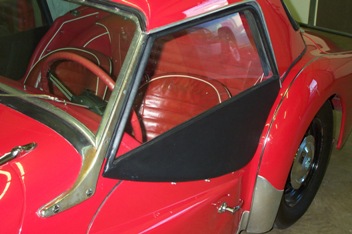
Sidecurtains were "rebuilt" with one solid window that cannot
be opened. They keep the rain out, as well as any fresh air! Also
note that the windshield frame and posts were not re-chromed. |
|
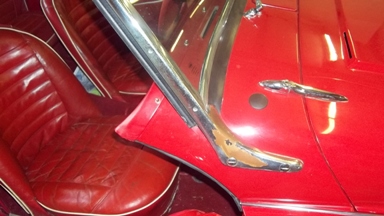
Another view of the neglected chrome plating. The car also retains
it's original seats. While it's nice that the original seats could
still be used, both fresh chrome and new seats should have been included
considering the $75K price tag. |
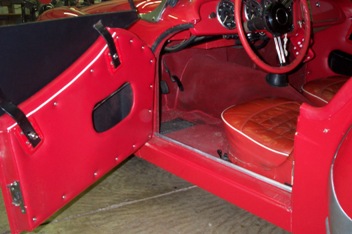
More interior snafus. There's way too much padding on
the door panels which causes the screws to pull in too deeply. The
screws used are also one size too large, and have Phillips heads instead of
the original slotted style. Let me also point out the red painted
sidecurtain brackets. If you are going to take the time to paint
something, why not use the original color paint? |
|

I know you can't see the fine details in this small photo,
but both the chrome bezels around the gauges and the spring for the
adjustable steering wheel are heavily rusted. Both are things you
should never see in such an expensive restoration. |

The cowl vent lid would not stay open, which compounded the
problem of the non-opening sidecurtain windows. The vent door link at
the top had been fabricated at "The Limey's" shop, and the lower link is a
correct length original that we installed from our extensive used parts
inventory. The vent door stays open now! |
|
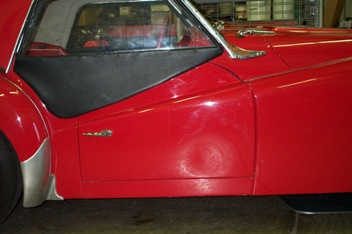
We show this photo to point out the extremely wide door gap
at the front of the door, and the very tight gap at the rear. All of
the panel gaps throughout this car are atrocious! We work
extremely hard here to assure that all of the body gaps on our restorations are
even and precise. The dent in the door is an "oil can" that wasn't
shrunk and removed prior to paint, and it will pop in and out until the
paint is stripped, the metal is worked, and then the door is repainted. |
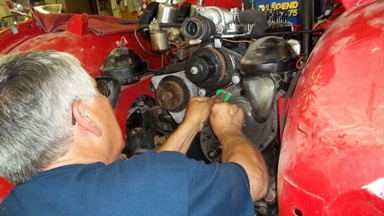
A big part of the reason that the car didn't run well was
because the camshaft of the "rebuilt" engine was installed one tooth off.
We had our suspicions that this was the case when we revved-up the engine
with air cleaners off, and a mist of gasoline could be felt blowing back out
of the carburetors. Pulling down the front of the engine and
performing a mini cam degree process confirmed our hunch and repaired the
problem. It still has a couple of cylinders pumping oil, but now it
will at least get out of its own way! |
|
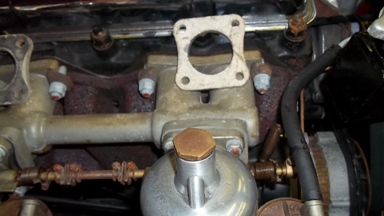
Another contributor to the poor running, especially on hot
days, was the absence of the carburetor heat insulators. Both carburetors
were bolted directly to the intake manifold with a single thin gasket.
Needless to say, it was very difficult to get the car restarted after the
hot engine had been shut down for 10-15 minutes. |
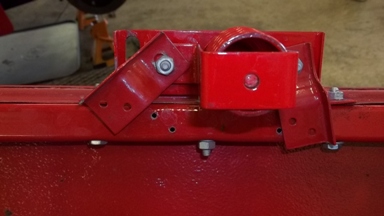
While the front apron was off to repair the mis-timed
camshaft, we found that the screws for the bonnet popper supports were left
off. It's no wonder that the bonnet popper was bent under the aluminum
tie bar and the bonnet prop rod was difficult to keep seated in it's slot. |
|
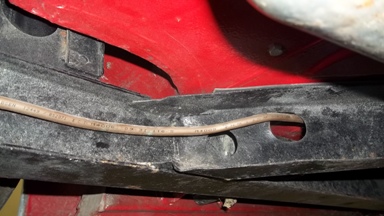
This is the fuel line, just ahead of the left rear wheel.
First, this is missing a rubber grommet to keep from wearing a hole in the
line by metal to metal contact with the frame. The second issue is
that it passes through the wrong hole and will prevent the front spring
pivot bolt from being withdrawn if the rear spring ever requires removal. |
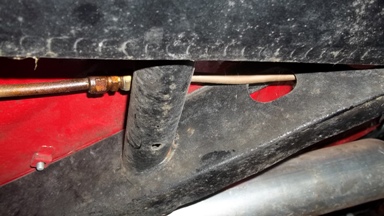
Another problem with the main fuel line is that it is
supposed to pass under the body mount tube, and you can see the small hole
in the bottom of the tube which is supposed to hold a clip. Without
the clip and being located above the tube, the fuel line and union rattle
continuously against the bottom of the floor. |
|
More plumbing problems, this time it's the rear brake lines
which are routed under the rear leaf springs. These lines are supposed
to turn up immediately to get them up where they are less likely to be
snagged and ripped away by anything which might be driven over. This
could make a bad situation much worse if running over road debris causes you
to lose the brakes! |

And yet more plumbing issues. This is the brake line
which runs from the front of the car to the rear axle. There are
several comments I could make about this, but the single point I'd like to
make here is that if a "professional" restoration shop coils up a line because they
are incapable of cutting one that's too long and re-flaring it, then they
aren't really capable of performing a complete restoration on any car.
It doesn't get much more amateur than this! |
|

Sometime after you have stripped and painted the bottom of
the car is not the time to discover that you should have welded some extra
holes shut. They left quite a mess here which has started to rust the
floors again. The saddest part of this is that two of the four holes
are supposed to be there with rubber plugs in them, and the other two could
have been "repaired" with rubber plugs as well. Also note
that the brake line has been run through the spring pivot bolt hole just
like the fuel line on the other side. At least they used a rubber
grommet this time! |
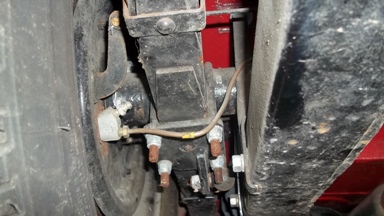
The clutch didn't feel right, and here's the bulk of the
problem. The clutch slave cylinder has been installed on the wrong
side of the bracket in such a manner that to change it required the clutch
hydraulic system to be drained and re-bled.
|
|

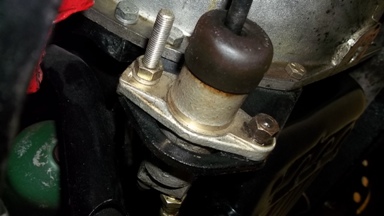
We had plenty of vibrations and clunking noises from under
the car, and we traced most of it to a loose driveshaft yoke on the rear of
the gearbox. The large castellated nut did have a cotter pin installed
half way in, but it was 2+ turns away from being tight. Sloppy,
sloppy, sloppy! |

Here's the rest of the clunk noises and vibrations. A
correct 3/8" driveshaft bolt with a shoulder is shown on the left, and the
incorrect and much smaller 5/16" fully threaded bolt(s) which were installed
front and rear are shown on the right. We all just stand there and
shake our heads in disbelief when we see things like this. |
|
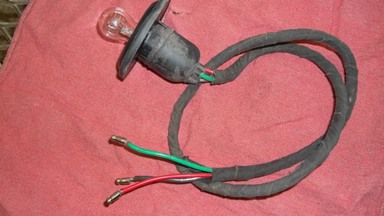
All of the guys got a big chuckle over this one. The
pigtails for both front parking lights were made from solid strand building
wire like that which would be run through metal conduit! |
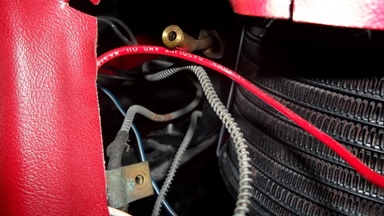
Here's some more of the solid building wire behind the
instrument panel. Look closely and you can see the 110 volt rating
printed on the red insulation. We had to pull the center instrument
panel to repair some other wiring problems. |