Macy’s Garage

© 2026 - Macy’s Garage, Ltd.

Blog
WHAT we’re doing, and HOW we’re doing it!
June 29, 2026
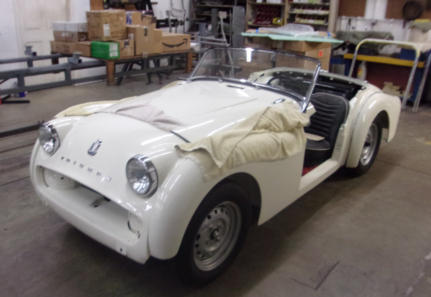
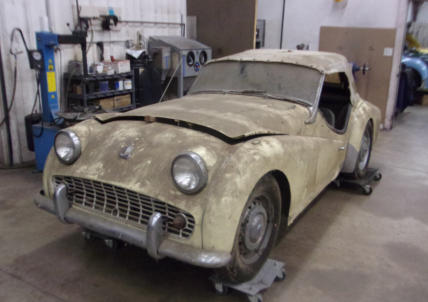
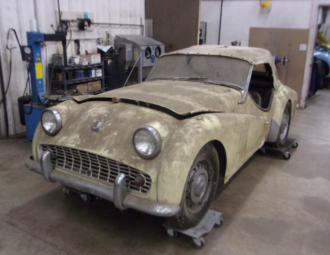
Triumphs were the cars that people fell in love with and tended to keep even when they could no longer be driven. Reasons for that were many, but time to work on them, poor parts availability, and tight budgets were often the reason for parking them away until conditions improved. This TR3A has remained in the same family for 4 decades with continuous dreams of the day it could be driven and enjoyed again. Needless to say, this is the way we like to get them too. No one has been attempting to repair or “improve” it for such a long time that the Gremlins we’ll need to find and chase out are well known, and we probably won’t waste much time un-doing previously botched “repairs”. We won’t be doing bodywork or paint to this car so as to retain all of the patina that has been created during the 40+ years of rest. The plans are to work through all of the mechanicals to make it safe and reliable to drive again, and replace the interior for passenger comfort. The timeline and cost for this sort of service is well below what’s required for a complete frame up restoration, and the owners won’t be wasting a lot of time cleaning and waxing the car when they get it back….just hop in and drive!June 22, 2026
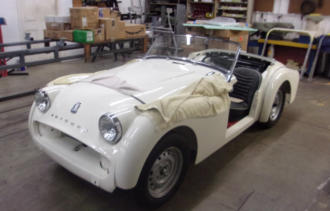
Another recent arrival is this TR3A from FL. It’s also another chapter in an all too familiar story, the Triumph that’s spent the last 15+ years in some other “shop” that was never able to finish the car. It’s hard to imagine why the owner was willing to wait on this place to complete his car, and lose all of the years of driving enjoyment he could have had. It’s also difficult to comprehend why any professional shop or even a casual backyard restorer would allow a car to take-up valuable floor space for so long without generating a return. Fortunately, the owner FINALLY had enough, and sent the car here for completion. Not surprisingly, we’ve found several areas where we had to back-up and re-do previous work, but nothing major (yet). It’s a safe bet that we’ve already accomplished more in 10 days than the last shop completed in the last 10 years! It’s also no surprise that the team here who repair and restore the Triumph TR’s exclusively will accomplish more than those who only know enough to be dangerous!June 15, 2026
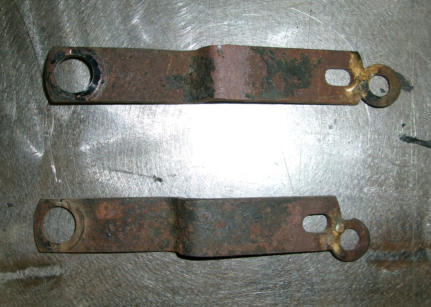
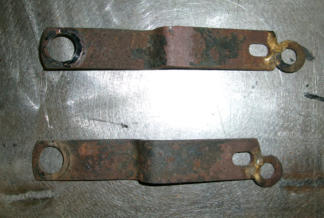
Folks, we have some words of wisdom for you today that should be on a BIG sign in EVERY garage: If you have to modify an original part to make it fit, then you’re doing something wrong! Now fitting difficulties are to be expected with modern reproduction or replacement parts, and in those cases you should modify the repop part but never the original part you are trying to attach it to. If it’s too bad to fix easily, return it to the vendor so they know there’s a problem. What we have here are a pair of radiator steady braces from a TR4A. At some point in time, someone had trouble installing them (?) and added washers to lengthen the bars. It’s hard to imagine how anyone could screw this up, but here’s the evidence that anything is possible. Whomever did this might find it strange that we were able to remove the washer additions and attach both ends of the braces to the correct locations, using the proper stepped rubber washers in the large holes (on the left), so that the radiator was somewhat insulated from body and chassis vibrations, just as the Triumph engineers intended!June 8, 2026
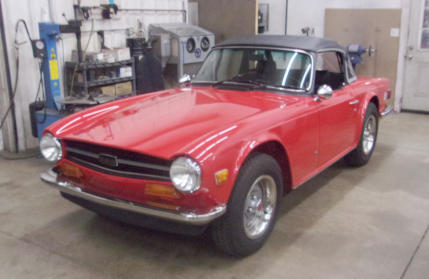
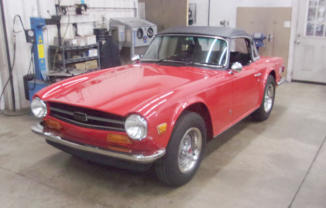
We completed a full frame-up restoration on this one-owner TR6 in the spring of 2019. Six years later it’s back for a general check-up and looking just as good as the day it left here 6- years ago. The care and attention to detail that we put into these cars shows in our top-tier work and is proven with lasting results. Quickie and low budget work will not hold up over time, resulting in cars which appear to need restored again after just a few short years. Not only does the added cost for repeated work add up to the price tag of doing it correctly the first time, but you also lose driving time while it’s down for the second and third attempts. It’s probably safe to say that parts, materials, and labor will also cost more later than they did during the first “restoration”, so are you really saving anything by taking short cuts, using low quality parts and materials, or making choices based primarily on budgets?June 1, 2026
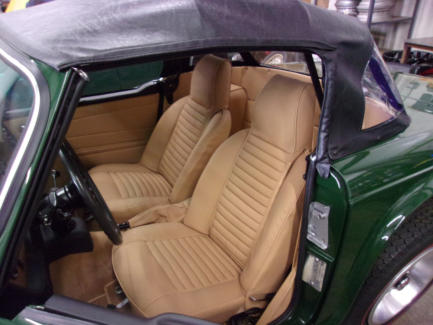
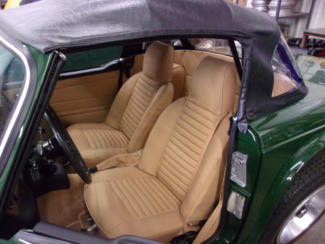
This might be hard for some of you younger folks to believe, but once upon a time you could walk into a car dealership and order EXACTLY what you wanted. Everything was priced “ala- cart” without today’s “packages” that require you to buy an interior light group to get a heated rear window, etc. Same with paint and interior colors. You could choose any of several paint or interior colors that you liked, not being limited to the slim few that are offered only on the model you are interested in. Having a car restored today is sorta like the good old days, where anything you want is available, even colors from other car companies. We have done Triumphs using Porsche, Ferrari, and Mercedes-Benz paint colors, and interior choices are only limited by what vinyl and leather colors are available. Want red piping on your black seats to go in your red TR3? Not a problem, and we can easily make that happen. (BTW, that combination looks stunning!) Now this TR6 paint is a true TR6 color, but the interior shade wasn’t available on this exact year. When making his selection, the owner had the choice of several BRG’s for paint, and 3-4 different shades of tan/brown for the interior. We think he chose wisely, something which isn’t possible today when buying “off the lot”!May 26, 2026
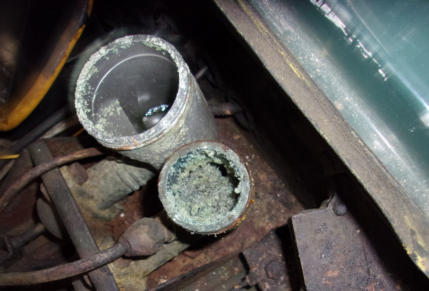
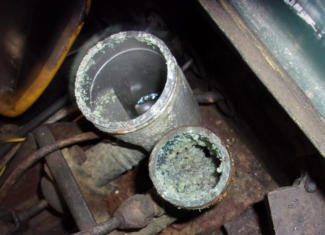
Whenever a car sits neglected for years, the first things which must be addressed are the fluids: brake (and clutch) fluid, fuel, oils in the engine, transmission, and rear differential. Don’t forget about the engine coolant either! Along with these fluids, we always plan on replacing ALL of the rubber components (hoses) that contain those fluids. It might seem strange that rusted steel parts are not at the top of the “concerns” list, but the fluids are the worst. All of those fluids contain chemicals, and when left alone for a few years those chemicals (mostly corrosive) will eat away at everything they touch. Take a look at the science project growing inside of these TR4 brake and clutch master cylinders. Also note the rust forming on the outside of the steel brake line and clutch lines. The outside of these lines were only exposed to the atmosphere. Imagine what the inside of each steel line on the car looks like, and how thin that metal might be now after years of attack from both inside and out. Considering the safety function the brakes have on you and your passengers, do you really think a simple wheel/master cylinder rebuild will be enough? Better to be safe and plan on replacing 100% of the steel lines right from the start!May 18, 2026
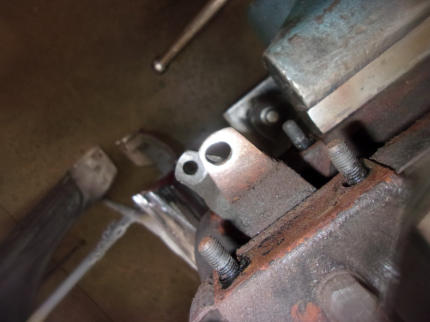
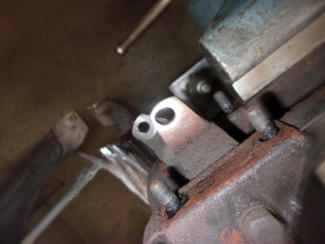
This week’s picture shows the top of the clutch and brake pedals, where the master cylinder push rods attach. Note the elongated hole (white arrow) at the top of the clutch pedal, and then compare that to the other hole (yellow arrow) at the top of the brake pedal. See the difference? The clutch hole will almost always be worn like this, but very rarely the brake pedal. This is because the clutch is normally used at least 4 times (going up through the gears) to each stop at a traffic light or a stop sign. As the clutch pedal wears, it adds “slop” in the clutch “linkage”, making clutch adjustments necessary to take up some of this lost motion. Eventually, you’ll run out of pedal travel and adjustment, causing many to replace a clutch which really isn’t bad. Only after you install the new clutch and still have a problem will you possibly notice that the trouble started here at the top of the pedal. The fix for this is to remove the pedal, weld the hole completely shut, then re-drill a new hole of the proper size. Take a look at the linkage pin too, as they usually wear away along with the pedal hole. Removing all of this free-play from the linkage is much easier than replacing a “good” clutch, so always check here first!May 11, 2026
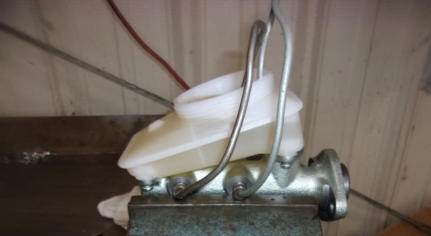
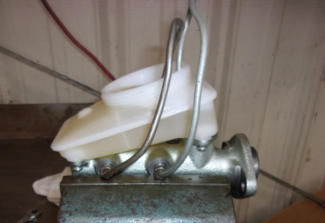
Opening the hydraulic brake (or clutch) system always means that air will enter which needs to be “bled” out. As air bubbles always rise to the top, it can often be a lengthy and frustrating process to chase them out completely. No where is this more difficult than when installing a new or rebuilt master cylinder on the TR250 and TR6 cars. This is because when mounted in the car, the plastic reservior sits level and the lower cylinder is positioned at an angle, up in the front. A more favorable position to keep air from getting trapped at the front, is to position the cylinder more level as shown here in the vise. But then how can you pump the air out and keep it out? By fabricating some little “jumper” tubes to route the expelled fluid and air back into the reservoir. Make sure the fluid level in the reservior is above the ends of the tubes so that air is not drawn back in on the return stroke, and any air pushed out will quickly rise to the top and out of the fluid. Leave the jumpers in place while the master cylinder is bolted into the car, and then quickly remove them and connect the vehicle lines. Without the piston being pumped, air will not be drawn into the cylinder, and whatever happens to get into the lines around the fittings can be easily bled out conventionally through the rest of the system.May 4, 2026
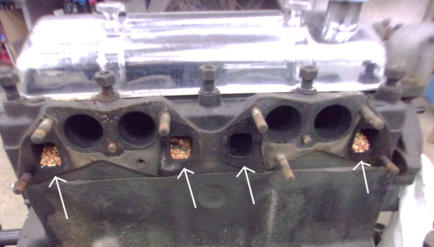
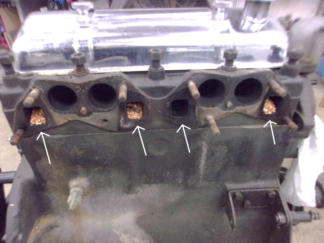
Staying with the “mouse” issue from last week, this is the engine from that same car, after it’s out and the intake/exhaust manifolds have been removed. The square holes in the head are the exhaust ports. Industrious little buggars aren’t they? How did they get clear up here you might ask? Through the exhaust system. They will enter through the tail pipe end or a muffler hole and follow the maze until they can go no farther, depositing their food supply at the end of the tunnel with plans to nibble away at it during the long cold winter. But why only 3 of the 4 exhaust ports? Because the exhaust valve on the #2 cylinder is open, and the tiny seeds all dropped into the cylinder, on top of the piston. No wonder the engine was locked up and the owner was unable to break it loose after months of dousing with penetrating oil! Try as you might, you’re not going to compress a cylinder full of debris like this! The lesson here is twofold: 1.) Pack your tailpipes with steel wool or something that mice can’t chew or remove (but remember to remove it yourself when storage days have ended), and 2.) Never attempt to start an engine following lengthy storage until you’ve had a look inside the cylinders with a bore scope. Just because it will turn over doesn’t mean it’s safe to start and run!April 27, 2026
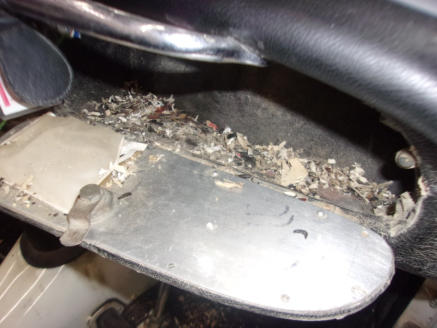
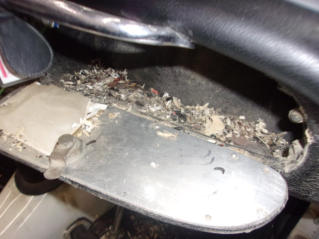
Whenever a Triumph arrives here “fresh” from storage, our noses usually alert us as to whether a barn was involved in the storage or not. And if a barn was involved, the smell is anything but “fresh”! Finding the smelly remains of a mouse nest is normally not limited to a single location. Finding the first spot doesn’t mean that the hunt is over. Any confined space is fair game for these little rascals, even seat padding where no space really exists before they dig it out. Now there are all kinds of stories and myths out there on how to repel mice from old cars, but the best defense is to store them in a building where they can’t get in to begin with! Once upon a time, I tried the Irish Spring soap idea with mixed results. I bought several bars and put them in and around the car. Next spring when it was time to bring the car out of storage, almost half of each bar had been nibbled away by the mice. Yes, they actually ate the soap! But the good news was that they left the car alone, no chewed wiring or upholstery, and no nests to be found anywhere inside the car. To some extent Irish Spring did work, just not in the manner expected. Needless to say my friend’s barn was never used for Triumph storage again!April 20, 2026
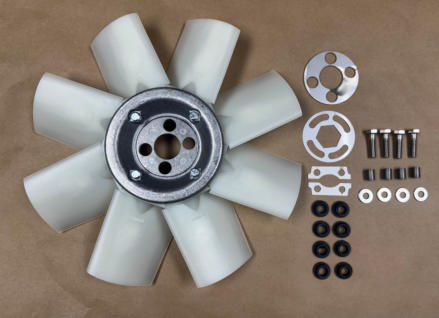
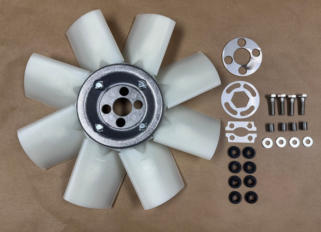
Last week we touched on the theory that some used parts should be replaced while you’re there. That would mean anything which is hard to get to. If it’s an easy replacement, then go ahead and re-use any part which looks good, because it’s no big deal to change it later if needed. There’s no shortage however of parts where replacement should be automatic, like gearbox bearings. Do you really want to pull and disassemble your gearbox again to replace that “smooth feeling” old bearing you left in two years ago and is now making noise? Here’s another example, our 4-cylinder Hurricane fan blade. We don’t automatically sell you all of the hardware shown at the right because it is technically possible to install these using all of your old original components (provided your rubber bushings are still in good shape). But do you really want to pull the radiator and front apron (TR2-3B) to get to it when the rubber does rot out? Most of the time, old tab washers will be missing ears and the large round washer to secure the crank bolt is usually mangled and difficult to install, so our new stainless steel hardware kit is a joy to work with. Still optional, but certain headache relief both now & future.April 13, 2026
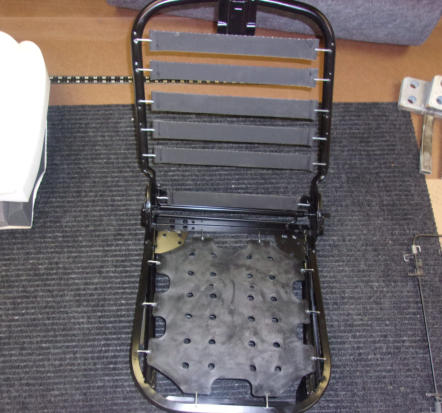
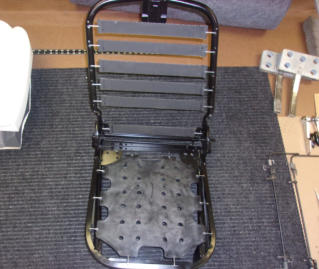
Often when ordering new seat upholstery, the un-seen components aren’t given a second thought. It’s easy to look at worn out seats and decide to replace the visible parts, but what about the pieces which are never seen? Unless you find yourself sitting on the floor through a rubber diaphragm that is ripped and torn, you might be tempted to cut corners and “skip” replacing that one piece that holds all of your weight. Same with foam rubber padding, which is expensive and often re-used with new covers. And the rubber straps across the back are horribly expensive for what they are, and probably replaced less that 50% of the time new covers are installed. But stop and think about the job these pieces have, providing comfort and support to your body while driving. Then consider that these support components are already 20-50 years old. Do you really think that they will provide service for the life of the new seat covers, or would you rather disassemble your seats again in another 5-10 years to replace the parts you skipped this time around? For us, and our clients who’ve had it explained this way, the decision becomes one of those classic “no-brainers”. Replace it all at the same time and be done with it. Your back-side will thank you for it!April 6, 2026
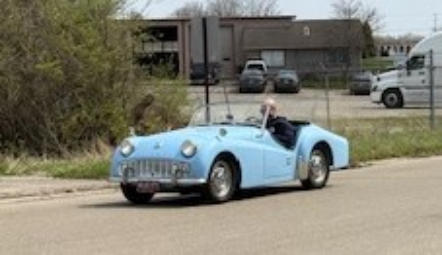
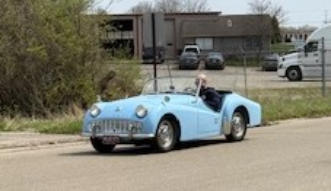
We’re now well past the six weeks of Winter that Puxitawny Phil predicted back on Feb. 2, and Spring has finally sprung! Time to resume test driving Triumphs which stopped back in November after an early snow caused highway departments to cover the roads with salt. That put an immediate halt to our test drives, but now we can get back to it for cars which need final tweaks before returning home, just in time for Spring and Summer driving FUN! This local TR3B is particularly satisfying to see back on the road, because the owner took it apart for a frame-up restoration at least 22 years ago (it was already apart when we first met him back in 2004). Over the years he’s slowly pecked away at it, requesting our help for some of the major tasks he couldn’t handle, but progress was extremely slow until he called last fall and asked if we could finish the car for him. So here we are 6 months later and Snap-Crackle-Pop!, the restoration is complete and ready for the long awaited enjoyment phase! Happy TR Motoring Paul!
BLOG
2026-Q2
America’s BEST Triumph Shop






Macy’s Garage

© 2026 - Macy’s Garage, Ltd.

Blog
WHAT we’re doing, and HOW we’re doing it!
June 29, 2026
Triumphs were the cars that people fell in love with and tended to keep even when they could no longer be driven. Reasons for that were many, but time to work on them, poor parts availability, and tight budgets were often the reason for parking them away until conditions improved. This TR3A has remained in the same family for 4 decades with continuous dreams of the day it could be driven and enjoyed again. Needless to say, this is the way we like to get them too. No one has been attempting to repair or “improve” it for such a long time that the Gremlins we’ll need to find and chase out are well known, and we probably won’t waste much time un-doing previously botched “repairs”. We won’t be doing bodywork or paint to this car so as to retain all of the patina that has been created during the 40+ years of rest. The plans are to work through all of the mechanicals to make it safe and reliable to drive again, and replace the interior for passenger comfort. The timeline and cost for this sort of service is well below what’s required for a complete frame up restoration, and the owners won’t be wasting a lot of time cleaning and waxing the car when they get it back….just hop in and drive!June 22, 2026
Another recent arrival is this TR3A from FL. It’s also another chapter in an all too familiar story, the Triumph that’s spent the last 15+ years in some other “shop” that was never able to finish the car. It’s hard to imagine why the owner was willing to wait on this place to complete his car, and lose all of the years of driving enjoyment he could have had. It’s also difficult to comprehend why any professional shop or even a casual backyard restorer would allow a car to take-up valuable floor space for so long without generating a return. Fortunately, the owner FINALLY had enough, and sent the car here for completion. Not surprisingly, we’ve found several areas where we had to back-up and re-do previous work, but nothing major (yet). It’s a safe bet that we’ve already accomplished more in 10 days than the last shop completed in the last 10 years! It’s also no surprise that the team here who repair and restore the Triumph TR’s exclusively will accomplish more than those who only know enough to be dangerous!June 15, 2026
Folks, we have some words of wisdom for you today that should be on a BIG sign in EVERY garage: If you have to modify an original part to make it fit, then you’re doing something wrong! Now fitting difficulties are to be expected with modern reproduction or replacement parts, and in those cases you should modify the repop part but never the original part you are trying to attach it to. If it’s too bad to fix easily, return it to the vendor so they know there’s a problem. What we have here are a pair of radiator steady braces from a TR4A. At some point in time, someone had trouble installing them (?) and added washers to lengthen the bars. It’s hard to imagine how anyone could screw this up, but here’s the evidence that anything is possible. Whomever did this might find it strange that we were able to remove the washer additions and attach both ends of the braces to the correct locations, using the proper stepped rubber washers in the large holes (on the left), so that the radiator was somewhat insulated from body and chassis vibrations, just as the Triumph engineers intended!June 8, 2026
We completed a full frame-up restoration on this one-owner TR6 in the spring of 2019. Six years later it’s back for a general check-up and looking just as good as the day it left here 6-years ago. The care and attention to detail that we put into these cars shows in our top-tier work and is proven with lasting results. Quickie and low budget work will not hold up over time, resulting in cars which appear to need restored again after just a few short years. Not only does the added cost for repeated work add up to the price tag of doing it correctly the first time, but you also lose driving time while it’s down for the second and third attempts. It’s probably safe to say that parts, materials, and labor will also cost more later than they did during the first “restoration”, so are you really saving anything by taking short cuts, using low quality parts and materials, or making choices based primarily on budgets?June 1, 2026
This might be hard for some of you younger folks to believe, but once upon a time you could walk into a car dealership and order EXACTLY what you wanted. Everything was priced “ala-cart” without today’s “packages” that require you to buy an interior light group to get a heated rear window, etc. Same with paint and interior colors. You could choose any of several paint or interior colors that you liked, not being limited to the slim few that are offered only on the model you are interested in. Having a car restored today is sorta like the good old days, where anything you want is available, even colors from other car companies. We have done Triumphs using Porsche, Ferrari, and Mercedes-Benz paint colors, and interior choices are only limited by what vinyl and leather colors are available. Want red piping on your black seats to go in your red TR3? Not a problem, and we can easily make that happen. (BTW, that combination looks stunning!) Now this TR6 paint is a true TR6 color, but the interior shade wasn’t available on this exact year. When making his selection, the owner had the choice of several BRG’s for paint, and 3- 4 different shades of tan/brown for the interior. We think he chose wisely, something which isn’t possible today when buying “off the lot”!May 26, 2026
Whenever a car sits neglected for years, the first things which must be addressed are the fluids: brake (and clutch) fluid, fuel, oils in the engine, transmission, and rear differential. Don’t forget about the engine coolant either! Along with these fluids, we always plan on replacing ALL of the rubber components (hoses) that contain those fluids. It might seem strange that rusted steel parts are not at the top of the “concerns” list, but the fluids are the worst. All of those fluids contain chemicals, and when left alone for a few years those chemicals (mostly corrosive) will eat away at everything they touch. Take a look at the science project growing inside of these TR4 brake and clutch master cylinders. Also note the rust forming on the outside of the steel brake line and clutch lines. The outside of these lines were only exposed to the atmosphere. Imagine what the inside of each steel line on the car looks like, and how thin that metal might be now after years of attack from both inside and out. Considering the safety function the brakes have on you and your passengers, do you really think a simple wheel/master cylinder rebuild will be enough? Better to be safe and plan on replacing 100% of the steel lines right from the start!May 18, 2026
This week’s picture shows the top of the clutch and brake pedals, where the master cylinder push rods attach. Note the elongated hole (white arrow) at the top of the clutch pedal, and then compare that to the other hole (yellow arrow) at the top of the brake pedal. See the difference? The clutch hole will almost always be worn like this, but very rarely the brake pedal. This is because the clutch is normally used at least 4 times (going up through the gears) to each stop at a traffic light or a stop sign. As the clutch pedal wears, it adds “slop” in the clutch “linkage”, making clutch adjustments necessary to take up some of this lost motion. Eventually, you’ll run out of pedal travel and adjustment, causing many to replace a clutch which really isn’t bad. Only after you install the new clutch and still have a problem will you possibly notice that the trouble started here at the top of the pedal. The fix for this is to remove the pedal, weld the hole completely shut, then re-drill a new hole of the proper size. Take a look at the linkage pin too, as they usually wear away along with the pedal hole. Removing all of this free-play from the linkage is much easier than replacing a “good” clutch, so always check here first!May 11, 2026
Opening the hydraulic brake (or clutch) system always means that air will enter which needs to be “bled” out. As air bubbles always rise to the top, it can often be a lengthy and frustrating process to chase them out completely. No where is this more difficult than when installing a new or rebuilt master cylinder on the TR250 and TR6 cars. This is because when mounted in the car, the plastic reservior sits level and the lower cylinder is positioned at an angle, up in the front. A more favorable position to keep air from getting trapped at the front, is to position the cylinder more level as shown here in the vise. But then how can you pump the air out and keep it out? By fabricating some little “jumper” tubes to route the expelled fluid and air back into the reservoir. Make sure the fluid level in the reservior is above the ends of the tubes so that air is not drawn back in on the return stroke, and any air pushed out will quickly rise to the top and out of the fluid. Leave the jumpers in place while the master cylinder is bolted into the car, and then quickly remove them and connect the vehicle lines. Without the piston being pumped, air will not be drawn into the cylinder, and whatever happens to get into the lines around the fittings can be easily bled out conventionally through the rest of the system.May 4, 2026
Staying with the “mouse” issue from last week, this is the engine from that same car, after it’s out and the intake/exhaust manifolds have been removed. The square holes in the head are the exhaust ports. Industrious little buggars aren’t they? How did they get clear up here you might ask? Through the exhaust system. They will enter through the tail pipe end or a muffler hole and follow the maze until they can go no farther, depositing their food supply at the end of the tunnel with plans to nibble away at it during the long cold winter. But why only 3 of the 4 exhaust ports? Because the exhaust valve on the #2 cylinder is open, and the tiny seeds all dropped into the cylinder, on top of the piston. No wonder the engine was locked up and the owner was unable to break it loose after months of dousing with penetrating oil! Try as you might, you’re not going to compress a cylinder full of debris like this! The lesson here is twofold: 1.) Pack your tailpipes with steel wool or something that mice can’t chew or remove (but remember to remove it yourself when storage days have ended), and 2.) Never attempt to start an engine following lengthy storage until you’ve had a look inside the cylinders with a bore scope. Just because it will turn over doesn’t mean it’s safe to start and run!April 27, 2026
Whenever a Triumph arrives here “fresh” from storage, our noses usually alert us as to whether a barn was involved in the storage or not. And if a barn was involved, the smell is anything but “fresh”! Finding the smelly remains of a mouse nest is normally not limited to a single location. Finding the first spot doesn’t mean that the hunt is over. Any confined space is fair game for these little rascals, even seat padding where no space really exists before they dig it out. Now there are all kinds of stories and myths out there on how to repel mice from old cars, but the best defense is to store them in a building where they can’t get in to begin with! Once upon a time, I tried the Irish Spring soap idea with mixed results. I bought several bars and put them in and around the car. Next spring when it was time to bring the car out of storage, almost half of each bar had been nibbled away by the mice. Yes, they actually ate the soap! But the good news was that they left the car alone, no chewed wiring or upholstery, and no nests to be found anywhere inside the car. To some extent Irish Spring did work, just not in the manner expected. Needless to say my friend’s barn was never used for Triumph storage again!April 20, 2026
Last week we touched on the theory that some used parts should be replaced while you’re there. That would mean anything which is hard to get to. If it’s an easy replacement, then go ahead and re-use any part which looks good, because it’s no big deal to change it later if needed. There’s no shortage however of parts where replacement should be automatic, like gearbox bearings. Do you really want to pull and disassemble your gearbox again to replace that “smooth feeling” old bearing you left in two years ago and is now making noise? Here’s another example, our 4-cylinder Hurricane fan blade. We don’t automatically sell you all of the hardware shown at the right because it is technically possible to install these using all of your old original components (provided your rubber bushings are still in good shape). But do you really want to pull the radiator and front apron (TR2-3B) to get to it when the rubber does rot out? Most of the time, old tab washers will be missing ears and the large round washer to secure the crank bolt is usually mangled and difficult to install, so our new stainless steel hardware kit is a joy to work with. Still optional, but certain headache relief both now & future.April 13, 2026
Often when ordering new seat upholstery, the un-seen components aren’t given a second thought. It’s easy to look at worn out seats and decide to replace the visible parts, but what about the pieces which are never seen? Unless you find yourself sitting on the floor through a rubber diaphragm that is ripped and torn, you might be tempted to cut corners and “skip” replacing that one piece that holds all of your weight. Same with foam rubber padding, which is expensive and often re-used with new covers. And the rubber straps across the back are horribly expensive for what they are, and probably replaced less that 50% of the time new covers are installed. But stop and think about the job these pieces have, providing comfort and support to your body while driving. Then consider that these support components are already 20-50 years old. Do you really think that they will provide service for the life of the new seat covers, or would you rather disassemble your seats again in another 5-10 years to replace the parts you skipped this time around? For us, and our clients who’ve had it explained this way, the decision becomes one of those classic “no-brainers”. Replace it all at the same time and be done with it. Your back-side will thank you for it!April 6, 2026
We’re now well past the six weeks of Winter that Puxitawny Phil predicted back on Feb. 2, and Spring has finally sprung! Time to resume test driving Triumphs which stopped back in November after an early snow caused highway departments to cover the roads with salt. That put an immediate halt to our test drives, but now we can get back to it for cars which need final tweaks before returning home, just in time for Spring and Summer driving FUN! This local TR3B is particularly satisfying to see back on the road, because the owner took it apart for a frame-up restoration at least 22 years ago (it was already apart when we first met him back in 2004). Over the years he’s slowly pecked away at it, requesting our help for some of the major tasks he couldn’t handle, but progress was extremely slow until he called last fall and asked if we could finish the car for him. So here we are 6 months later and Snap- Crackle-Pop!, the restoration is complete and ready for the long awaited enjoyment phase! Happy TR Motoring Paul!

America’s BEST Triumph Shop