Macy’s Garage

© 2026 - Macy’s Garage, Ltd.

Blog
WHAT we’re doing, and HOW we’re doing it!
September 28, 2026
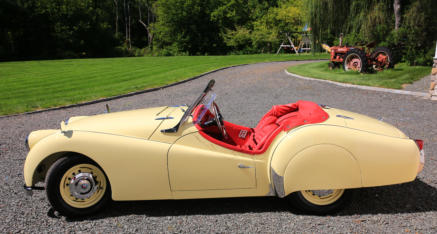
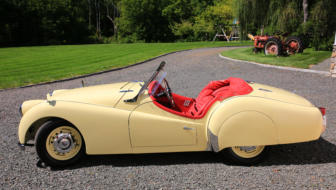
Every year, we receive several inquiries from folks wanting to purchase a Triumph that has already been restored here by Macy’s Garage. We have to tell them that the best way to get ahold of a TR that was restored here is to have us do one special for them, as owners who’ve been through the process rarely offer their cars for sale on the open market. It does occasionally happen. So for those few infrequent times, we’ve added a restored cars area to our Cars 4 Sale web page. This 1959 TR3A is on there now, with links to more photos and contact information for the owner. The only reason this car is available today, is that it’s actually the second Triumph we’ve restored for him. The TR250 that we did first is also his first choice whenever the mood strikes for a Triumph drive, so the TR3A sits, largely unused. He feels that it should go to a good home where it can be driven and enjoyed as much as he enjoys driving his Macy’s Garage TR250. Follow the link above to our Cars 4 Sale page for more information.September 21, 2026
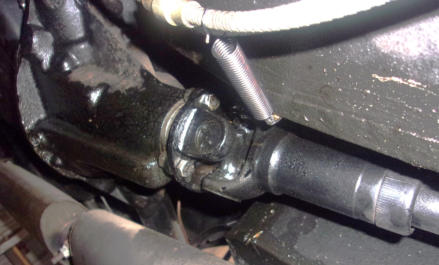
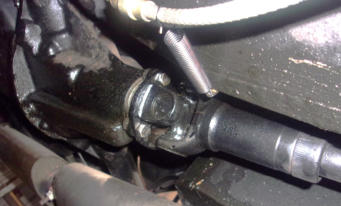
This is not the first time we’ve seen this, so it’s worthy of showing here. This is a solid rear axle (TR2-4A solid), with the driveshaft attached. Notice that the driveshaft “slip” yoke is installed at the rear. It is supposed to be toward the front, at the rear of the gearbox. The reason the TR driveshafts have this slip yoke is because the solid rear axles move through a slight arc as the rear axle moves up and down with suspension travel. (It’s not as critical with the IRS cars because the differential remains stationary through the suspension travel.) As the solid rear axle travels through the arc, the distance between the pinion and the rear transmission flange changes, and that changes the driveshaft length slightly. With the gearbox end being stationary, the arc is greater at the rear, so mounting the driveshaft as pictured here will increase the amount of distance the slip joint needs to move (and increase wear). When mounted to the front, the slip joint barely moves at all, and wear to the internal splines is minimized. This can also be a cause for vibration, so it should always be installed correctly!September 14, 2026
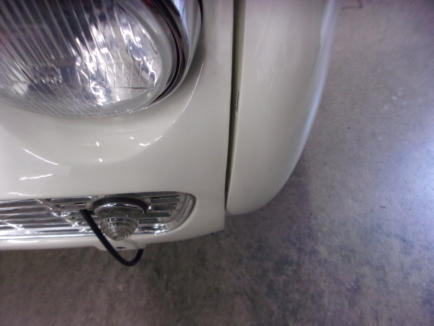
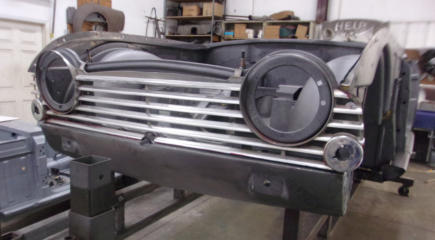
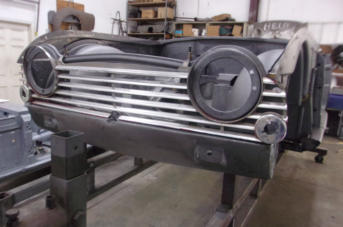
We have mentioned this process several times in the past, but we keep seeing restorers repeatedly make the same mistake so it bears repeating again. You MUST test fit components over and over again throughout the bodywork process, for the time to find out that a part doesn’t fit correctly is LONG BEFORE any paint is applied. This TR4A had a nasty dent in the lower valance below the grille (worked-out prior to this photo), so we were suspicious as to what else might have been pushed out of shape by the “minor” bump to the front. Fitting the grille at this early stage revealed a very minor distortion of the upper valance (behind the grile) that would have made final assembly “difficult” without damaging the new paint. A minor push now moved everything back into place and will simplify the assembly process without paint damage later.September 8, 2026
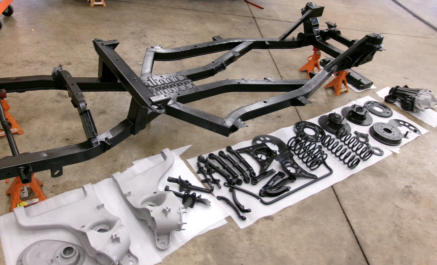
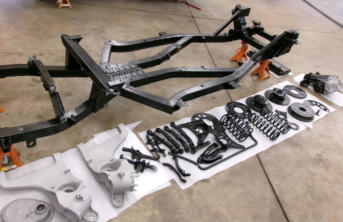
Lots of guys will start their frame-up restoration here, beginning with the frame and suspension. But if you’re a frequent visitor to our Blog pages, or have read any of the info under the Info tab, you’ll know that this TR6 restoration is well-along in the process. All of the metalwork and paint prep have been completed, and the sheet metal is now ready to roll into the paint booth for the pretty color coats to be applied. The engine and gearbox overhauls are done, and it’s time to build a TR6 from a very large pile of parts. Restorations are expensive, and we are mindful of cost saving steps we can take, as long as it doesn’t sacrifice the safety, reliability, or the quality of the finished project. An example of this is shown here, the frame and suspension parts. All of these parts are heavy duty iron, steel, and thick aluminum, none of which can be damaged by sandblasting. We have a local sandblast company that takes this all in as a lot, and not only cleans and blasts all of the parts, but also primes, paints, and or powder coats all of the pieces. We get the chassis “kit” returned to us just as shown here, all ready for new bushings and assembly. And they do it all in less time than we could just paint the blasted parts here.August 31, 2026
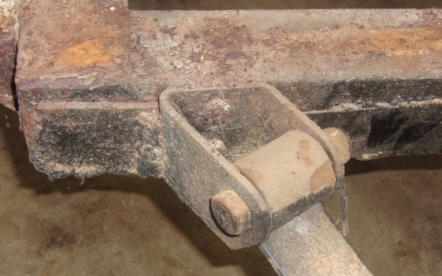
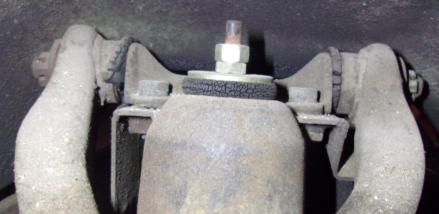
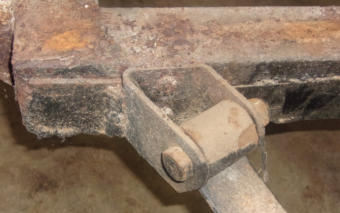
An often forgotten fact is that the rubber components of your Triumph will deteriorate just as fast as bare metal will rust. It doesn’t matter if you are driving your car regularly or have it sitting in long term storage, the rubber bits are going to age-out all by themselves. Therefore, whenever you happen to be changing a tire, or under the car for an oil change or any other maintenance, take a moment to inspect any and all rubber parts you can find You’re likely to see something like this. The top shock absorber bushing (center) is severely checked and cracked, signaling that its life expectancy is over. The two visible upper wishbone bushings are not only dried out and cracked, but have been ripped apart by the twisting motion of the suspension movement. None of this is bad enough that the suspension will detach from the frame (yet), but you want to replace all of these bushings before they start clunking and making hard metallic sounds. When those noises start you are wearing metal against metal, possibly damaging parts which are both expensive and not readily available. August 24, 2026 This is a somewhat rare TR, a 4A with the solid rear axle instead of the more common IRS. Triumph designed a new frame to accomodate the IRS, but the US dealers thought it wouldn’t sell and demanded a “cheaper” solid axle option. In the end, only about 25% of buyers opted for the solid axle cars with leaf springs on the rear. But the new style frame was still utilized, and adapter bracketry fastened the leaf springs onto the IRS frame. These IRS style frames rusted quickly in this trailing arm/leaf spring mount area, and continued to do so throughout the TR4A, TR5/250, and TR6 models. As with most of these frames today, someone has welded patches over large rust holes in these trailing arm mount sections. We have no idea when this was done, but perhaps the nice frame replacement sections we have now were not available at the time. It worked, and someone got a few more years of used out of the car, but it certainly isn’t something we want to place a totally restored car on top of today. We also won’t be welding the “removeable” front spring bracket onto the new frame section as done here with the patch either!August 17, 2026
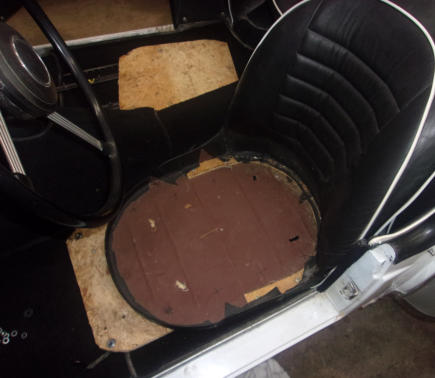
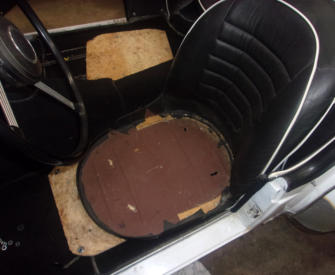
Once again, we can offer more proof that we haven’t “seen it all”. This TR3A is from a one owner WI family that’s here for an engine overhaul. The seats and interior have to come out to remove the gearbox mount and be able to “pull” the engine, and that’s when we discovered this strange mess. The bottoms of the seat pans had evidently rusted out (which is common) and been replaced at some point, but the new bottoms were formed with thinner sheet metal and tiny rolled beads which probably wasn’t strudy enough. The solution at the time was to bolt a piece of OSB onto the seat slides, and then bolt the seat pans to the OSB. We’ve never seen a configuration like this before, but evidently it has “worked” since implementation. The base seat cushion was also made from OSB and foam (no springs), but this is a common modification from the days when new springs weren’t available, or even today when folks balk at the price tag for a new set of springs.August 10, 2026
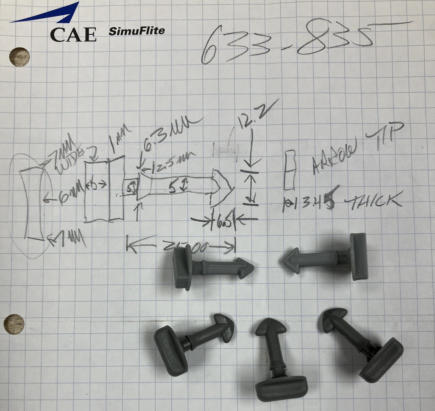
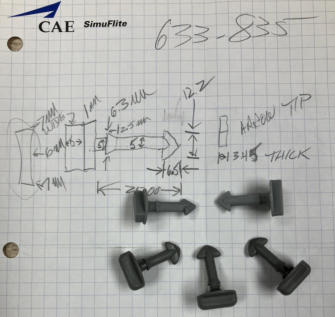
This week we have another example of our in-house production capabilities. This strange looking fastener is used on all TR6’s to hold the spare tire cover in place in the trunk. Yes, gravity will do the same thing, but with an occasional rattle depending on just how rough the road is. Normally we just purchase these from one of the usual suppliers, but everyone has had them on back-order for several months. Because we had several TR6’s finishing at nearly the same time (see July 6 at the bottom of this page), and all of them needed this little piece, we had no choice other than to create them ourselves. The process began with a rough sketch and caliper measurements of an original fastener, and then transfering it into our CAD program. Unlike the heater blower fan from last week, this was actually simple enough we could do the engineering here. Once the 3D drawing was complete, it had to go into another “slicer” program to be made ready for one of our 3D printers. Test pieces were printed and tried on actual cars, and then revisions made and more test parts created until we had pieces which would actually work. Countless hours were consumed during this engineering process, and that cost will never be recovered from a part which sells for only $1.65. (Whenever there is an established price for an unobtanium part, that’s what we’ll sell it for). If we were a “we work on anything” shop who only sees a TR6 every few years, we couldn’t afford to make a single part like this and eat the development costs, but when we have multiple TR6 cars in here on a continuous basis, we’ll do what we have to to keep the repairs and restorations moving forward.August 3, 2026
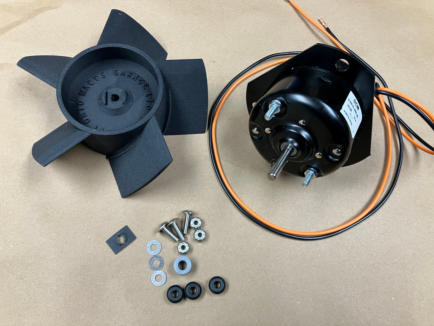
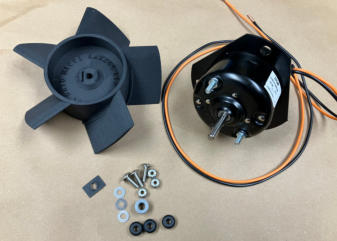
We’re always working on projects to create Triumph parts which are no longer available, and this week we are happy to announce several new additions to our ebay store. TR4-TR6 heater blower fan blades and electric motors. The fan blades are 3D printed here using a high- temperature PLA plastic, which is also reinforced with fiberglass. We can get along OK here with some simple CAD work, but anything this complex had to be hired out to a real CAD designer. Triumph used the same single speed motor for both single speed blowers in the TR4- 4A, and then choked it down with a resistor to get a second (slower) speed for the TR250 and TR6. We were able to locate true single and dual speed motors, and create the bracketry and spacing to effortlessly mount into the original Smiths heaters. A single speed motor is shown here (2-wires), and the 2-speed motor will have 3-wires. Mounting hardware is included. The trolublesome resistor is no longer necessary (250-6), and the motor wires directly to the 2-speed switch. Our fans fit our new motors and the original Smiths motors, and original fans also fit our new replacement motors. All of these components (individually or in combination) are available in our ebay store. Just follow the PARTS link above and search for Heater, or any of the part numbers MCY219, MCY221, MCY222, MCY223, or MCY224.July 27, 2026
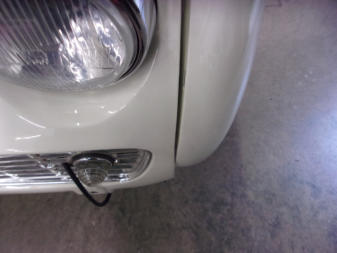
This is more of the car we showed you back on June 22, and you can actually see this problem from a different angle in that photo as well. This car spent 15 years at another shop, and we’re finding plenty of reasons as to why it was taking so long. The previous shop painted themselves into a corner, and didn’t know how (or want) to go back and fix their mistake(s). If you look at the apron where indicated by the red arrow, you can see where the apron suddenly bends forward, and the line of the apron stops following the line of the front apron. By the time you get to the bottom of the apron and fender, the apron juts out a good 3/4” ahead of the fender, and unfortunately the other side is just as bad. Any bets on how well the front bumper irons will fit? We won’t get into the doors and trunk (boot) lid hitting the body. Folks, the time to fix all this and make sure the panels meet as they should is BEFORE any paint is applied, not years later! Most of our full restoration clients understand why we must assemble and disassemble panels to test-fit multiple times while a car is in our metal and paint shops, but a picture like this is worth 1000 words for the occasional guy who doesn’t “get-it”. And as for any “professional” shop who would plow forward like this without multiple tests to make certain that these problems won’t appear later, well, you should probably find another line of work!July 20, 2026
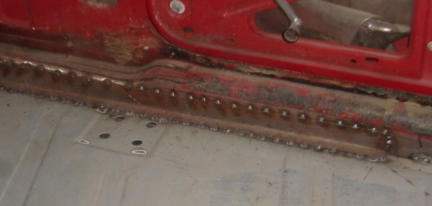
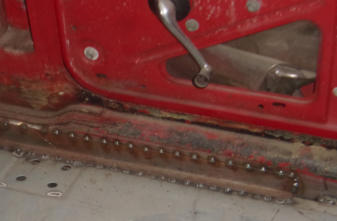
Someone spent an awful amount of time installing new floor pans in this TR4A before it arrived here. It was a good attempt for an owner in a home garage, but we sincerely hope that a paid shop didn’t do it this way. To start with, there are two different types of floor pans available for the TR4-TR6. Yes, they are the same parts (R&L) for both models. The best fitting are the BMHIT floor pans (usually black E-cote at this time), and then there’s a cheaper set from a place in Detroit, (normally greenish-gray primer). The cheaper set is missing much of the attachment metal around the perimeter, and they are difficult to even get into position, much less secure properly. These are the lesser pans. As far as installing new metal, be it internal or external, rule #1 is NEVER lay one piece of metal over the top of another one. This creats a moisture trap, and in a few years you’ll likely experience accelerated rust in these same places. Rule #2 is to weld new metal SOLIDLY, not by spaced tacks as we see here. Tack welding like this just leaves more spaces for the moisture to enter into the trap! Fortunately the car is here now for a complete frame-up restoration, and we’ll be removing this failed attempt and repairing the floors correctly. It hurts to back-up and re-do anything, but we’ll spend less time than was wasted the first time, and it’ll also be quicker than trying to correct all the errors.July 13, 2026
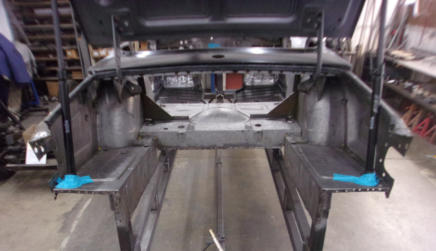
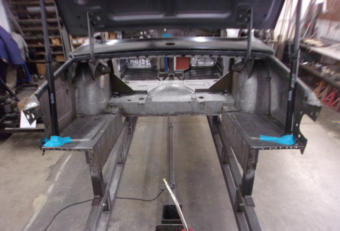
The rear half of the Triumph bodies (TR2-TR6) are a complicated assemblage of several parts that form multiple pockets and seams which hold moisture and promote rust. Then there’s the possibile collision damage to add into the mix, so any problems back here can be a nightmare to repair for anyone without copious experience and correct fixtures to hold it all in alignment. Basically, we are the only shop on this side of the Atlantic with any prayer of getting a mess like this back together quickly and correctly. This TR6 needed the spare tire floor and both pieces of the inner valance, plus outer rear valance and both rear body mounts. Then you have to know how to modify the new reproduction parts to make them fit together correctly because they aren’t 100% straight from the box. Having done this same repair many times, and assisted by our rotisserie body jig, this isn’t a big deal for our metal shop to bring it all back together and create an invisible and structurally solid repair. Note the trunk lid is already mounted onto the hinges, and we’ll reference that to verify upper alignment throughout the process.July 6, 2026
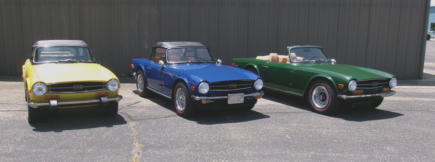
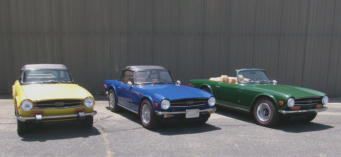
This is the first time in our history when we’ve had three complete restorations finish up at the same time. While we’re always working on 8-10 complete jobs at all times, they usually come together singularly, matching the way we start new projects, one-at-a-time. Occasionally we’ll have two wrap up together, but this is the first time we’ve ever had three finish in unison. As every car has different needs and will take a different amount of time to complete, this time the combination includes a couple of cars that were really nice, so they finished ahead of schedule. It’s still a lengthy project when 15-20,000 individual components have to be disassembled, cleaned, inspected, and then restored or replaced before a complete and total re-assembly. Then there’s the waiting list before we can ever get your car in the door, so if you are contemplating restoration or repairs to your Triumph, don’t delay to call and get it scheduled!
BLOG
2026-Q3
America’s BEST Triumph Shop












Macy’s Garage

© 2026 - Macy’s Garage, Ltd.

Blog
WHAT we’re doing, and HOW we’re doing it!
September 28, 2026
Every year, we receive several inquiries from folks wanting to purchase a Triumph that has already been restored here by Macy’s Garage. We have to tell them that the best way to get ahold of a TR that was restored here is to have us do one special for them, as owners who’ve been through the process rarely offer their cars for sale on the open market. It does occasionally happen. So for those few infrequent times, we’ve added a restored cars area to our Cars 4 Sale web page. This 1959 TR3A is on there now, with links to more photos and contact information for the owner. The only reason this car is available today, is that it’s actually the second Triumph we’ve restored for him. The TR250 that we did first is also his first choice whenever the mood strikes for a Triumph drive, so the TR3A sits, largely unused. He feels that it should go to a good home where it can be driven and enjoyed as much as he enjoys driving his Macy’s Garage TR250. Follow the link above to our Cars 4 Sale page for more information.September 21, 2026
This is not the first time we’ve seen this, so it’s worthy of showing here. This is a solid rear axle (TR2-4A solid), with the driveshaft attached. Notice that the driveshaft “slip” yoke is installed at the rear. It is supposed to be toward the front, at the rear of the gearbox. The reason the TR driveshafts have this slip yoke is because the solid rear axles move through a slight arc as the rear axle moves up and down with suspension travel. (It’s not as critical on the IRS cars because the differential remains stationary through the suspension travel.) As the solid rear axle travels through the arc, the distance between the pinion and the rear transmission flange changes, and that changes the driveshaft length slightly. With the gearbox end being stationary, the arc is greater at the rear, so mounting the driveshaft as pictured here will increase the amount of distance the slip joint needs to move (and increase wear). When mounted to the front, the slip joint barely moves at all, and wear to the internal splines is minimized. This can also be a cause for vibration, so it should always be installed correctly!September 14, 2026
We have mentioned this process several times in the past, but we keep seeing restorers repeatedly make the same mistake so it bears repeating again. You MUST test fit components over and over again throughout the bodywork process, for the time to find out that a part doesn’t fit correctly is LONG BEFORE any paint is applied. This TR4A had a nasty dent in the lower valance below the grille (worked-out prior to this photo), so we were suspicious as to what else might have been pushed out of shape by the “minor” bump to the front. Fitting the grille at this early stage revealed a very minor distortion of the upper valance (behind the grile) that would have made final assembly “difficult” without damaging the new paint. A minor push now moved everything back into place and will simplify the assembly process without paint damage later.September 8, 2026
Lots of guys will start their frame-up restoration here, beginning with the frame and suspension. But if you’re a frequent visitor to our Blog pages, or have read any of the info under the Info tab, you’ll know that this TR6 restoration is well-along in the process. All of the metalwork and paint prep have been completed, and the sheet metal is now ready to roll into the paint booth for the pretty color coats to be applied. The engine and gearbox overhauls are done, and it’s time to build a TR6 from a very large pile of parts. Restorations are expensive, and we are mindful of cost saving steps we can take, as long as it doesn’t sacrifice the safety, reliability, or the quality of the finished project. An example of this is shown here, the frame and suspension parts. All of these parts are heavy duty iron, steel, and thick aluminum, none of which can be damaged by sandblasting. We have a local sandblast company that takes this all in as a lot, and not only cleans and blasts all of the parts, but also primes, paints, and or powder coats all of the pieces. We get the chassis “kit” returned to us just as shown here, all ready for new bushings and assembly. And they do it all in less time than we could just paint the blasted parts here.August 31, 2026
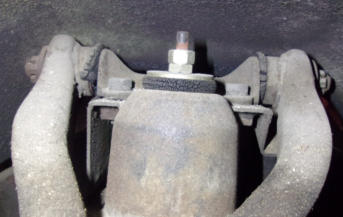
An often forgotten fact is that the rubber components of your Triumph will deteriorate just as fast as bare metal will rust. It doesn’t matter if you are driving your car regularly or have it sitting in long term storage, the rubber bits are going to age-out all by themselves. Therefore, whenever you happen to be changing a tire, or under the car for an oil change or any other maintenance, take a moment to inspect any and all rubber parts you can find You’re likely to see something like this. The top shock absorber bushing (center) is severely checked and cracked, signaling that its life expectancy is over. The two visible upper wishbone bushings are not only dried out and cracked, but have been ripped apart by the twisting motion of the suspension movement. None of this is bad enough that the suspension will detach from the frame (yet), but you want to replace all of these bushings before they start clunking and making hard metallic sounds. When those noises start you are wearing metal against metal, possibly damaging parts which are both expensive and not readily available.August 24, 2026
This is a somewhat rare TR, a 4A with the solid rear axle instead of the more common IRS. Triumph designed a new frame to accomodate the IRS, but the US dealers thought it wouldn’t sell and demanded a “cheaper” solid axle option. In the end, only about 25% of buyers opted for the solid axle cars with leaf springs on the rear. But the new style frame was still utilized, and adapter bracketry fastened the leaf springs onto the IRS frame. These IRS style frames rusted quickly in this trailing arm/leaf spring mount area, and continued to do so throughout the TR4A, TR5/250, and TR6 models. As with most of these frames today, someone has welded patches over large rust holes in these trailing arm mount sections. We have no idea when this was done, but perhaps the nice frame replacement sections we have now were not available at the time. It worked, and someone got a few more years of used out of the car, but it certainly isn’t something we want to place a totally restored car on top of today. We also won’t be welding the “removeable” front spring bracket onto the new frame section as done here with the patch either!August 17, 2026
Once again, we can offer more proof that we haven’t “seen it all”. This TR3A is from a one owner WI family that’s here for an engine overhaul. The seats and interior have to come out to remove the gearbox mount and be able to “pull” the engine, and that’s when we discovered this strange mess. The bottoms of the seat pans had evidently rusted out (which is common) and been replaced at some point, but the new bottoms were formed with thinner sheet metal and tiny rolled beads which probably wasn’t strudy enough. The solution at the time was to bolt a piece of OSB onto the seat slides, and then bolt the seat pans to the OSB. We’ve never seen a configuration like this before, but evidently it has “worked” since implementation. The base seat cushion was also made from OSB and foam (no springs), but this is a common modification from the days when new springs weren’t available, or even today when folks balk at the price tag for a new set of springs.August 10, 2026
This week we have another example of our in-house production capabilities. This strange looking fastener is used on all TR6’s to hold the spare tire cover in place in the trunk. Yes, gravity will do the same thing, but with an occasional rattle depending on just how rough the road is. Normally we just purchase these from one of the usual suppliers, but everyone has had them on back-order for several months. Because we had several TR6’s finishing at nearly the same time (see July 6 at the bottom of this page), and all of them needed this little piece, we had no choice other than to create them ourselves. The process began with a rough sketch and caliper measurements of an original fastener, and then transfering it into our CAD program. Unlike the heater blower fan from last week, this was actually simple enough we could do the engineering here. Once the 3D drawing was complete, it had to go into another “slicer” program to be made ready for one of our 3D printers. Test pieces were printed and tried on actual cars, and then revisions made and more test parts created until we had pieces which would actually work. Countless hours were consumed during this engineering process, and that cost will never be recovered from a part which sells for only $1.65. (Whenever there is an established price for an unobtanium part, that’s what we’ll sell it for). If we were a “we work on anything” shop who only sees a TR6 every few years, we couldn’t afford to make a single part like this and eat the development costs, but when we have multiple TR6 cars in here on a continuous basis, we’ll do what we have to to keep the repairs and restorations moving forward.August 3, 2026
We’re always working on projects to create Triumph parts which are no longer available, and this week we are happy to announce several new additions to our ebay store. TR4- TR6 heater blower fan blades and electric motors. The fan blades are 3D printed here using a high-temperature PLA plastic, which is also reinforced with fiberglass. We can get along OK here with some simple CAD work, but anything this complex had to be hired out to a real CAD designer. Triumph used the same single speed motor for both single speed blowers in the TR4-4A, and then choked it down with a resistor to get a second (slower) speed for the TR250 and TR6. We were able to locate true single and dual speed motors, and create the bracketry and spacing to effortlessly mount into the original Smiths heaters. A single speed motor is shown here (2-wires), and the 2-speed motor will have 3-wires. Mounting hardware is included. The trolublesome resistor is no longer necessary (250-6), and the motor wires directly to the 2-speed switch. Our fans fit our new motors and the original Smiths motors, and original fans also fit our new replacement motors. All of these components (individually or in combination) are available in our ebay store. Just follow the PARTS link above and search for Heater, or any of the part numbers MCY219, MCY221, MCY222, MCY223, or MCY224.July 27, 2026
This is more of the car we showed you back on June 22, and you can actually see this problem from a different angle in that photo as well. This car spent 15 years at another shop, and we’re finding plenty of reasons as to why it was taking so long. The previous shop painted themselves into a corner, and didn’t know how (or want) to go back and fix their mistake(s). If you look at the apron where indicated by the red arrow, you can see where the apron suddenly bends forward, and the line of the apron stops following the line of the front apron. By the time you get to the bottom of the apron and fender, the apron juts out a good 3/4” ahead of the fender, and unfortunately the other side is just as bad. Any bets on how well the front bumper irons will fit? We won’t get into the doors and trunk (boot) lid hitting the body. Folks, the time to fix all this and make sure the panels meet as they should is BEFORE any paint is applied, not years later! Most of our full restoration clients understand why we must assemble and disassemble panels to test-fit multiple times while a car is in our metal and paint shops, but a picture like this is worth 1000 words for the occasional guy who doesn’t “get-it”. And as for any “professional” shop who would plow forward like this without multiple tests to make certain that these problems won’t appear later, well, you should probably find another line of work!July 20, 2026
Someone spent an awful amount of time installing new floor pans in this TR4A before it arrived here. It was a good attempt for an owner in a home garage, but we sincerely hope that a paid shop didn’t do it this way. To start with, there are two different types of floor pans available for the TR4-TR6. Yes, they are the same parts (R&L) for both models. The best fitting are the BMHIT floor pans (usually black E-cote at this time), and then there’s a cheaper set from a place in Detroit, (normally greenish-gray primer). The cheaper set is missing much of the attachment metal around the perimeter, and they are difficult to even get into position, much less secure properly. These are the lesser pans. As far as installing new metal, be it internal or external, rule #1 is NEVER lay one piece of metal over the top of another one. This creats a moisture trap, and in a few years you’ll likely experience accelerated rust in these same places. Rule #2 is to weld new metal SOLIDLY, not by spaced tacks as we see here. Tack welding like this just leaves more spaces for the moisture to enter into the trap! Fortunately the car is here now for a complete frame-up restoration, and we’ll be removing this failed attempt and repairing the floors correctly. It hurts to back-up and re-do anything, but we’ll spend less time than was wasted the first time, and it’ll also be quicker than trying to correct all the errors.July 13, 2026
The rear half of the Triumph bodies (TR2-TR6) are a complicated assemblage of several parts that form multiple pockets and seams which hold moisture and promote rust. Then there’s the possibile collision damage to add into the mix, so any problems back here can be a nightmare to repair for anyone without copious experience and correct fixtures to hold it all in alignment. Basically, we are the only shop on this side of the Atlantic with any prayer of getting a mes like this back together quickly and correctly. This TR6 needed the spare tire floor and both pieces of the inner valance, plus outer rear valance and both rear body mounts. Then you have to know how to modify the new reproduction parts to make them fit together correctly because they aren’t 100% straight from the box. Having done this same repair many times, and assisted by our rotisserie body jig, this isn’t a big deal for our metal shop to bring it all back together and create an invisible and structurally solid repair. Note the trunk lid is already mounted onto the hinges, and we’ll reference that to verify upper alignment throughout the process.July 6, 2026
This is the first time in our history when we’ve had three complete restorations finish up at the same time. While we’re always working on 8- 10 complete jobs at all times, they usually come together singularly, matching the way we start new projects, one-at-a-time. Occasionally we’ll have two wrap up together, but this is the first time we’ve ever had three finish in unison. As every car has different needs and will take a different amount of time to complete, this time the combination includes a couple of cars that were really nice, so they finished ahead of schedule. It’s still a lengthy project when 15-20,000 individual components have to be disassembled, cleaned, inspected, and then restored or replaced before a complete and total re-assembly. Then there’s the waiting list before we can ever get your car in the door, so if you are contemplating restoration or repairs to your Triumph, don’t delay to call and get it scheduled!

America’s BEST Triumph Shop