Macy’s Garage

© 2026 - Macy’s Garage, Ltd.

Blog
WHAT we’re doing, and HOW we’re doing it!
March 30, 2026
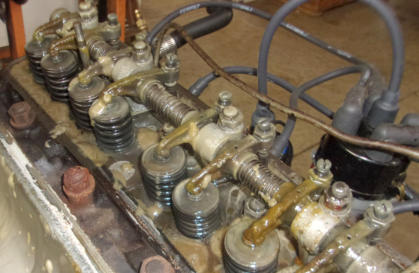
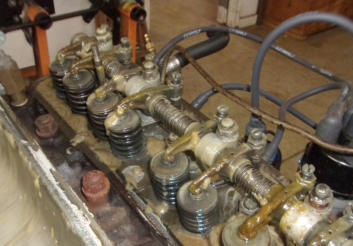
There’s a very old and very common saying that oil and water don’t mix. But whenever you pull your dip stick, drain the oil, or remove the valve cover and see this white foamy substance, you’ll know that oil and water CAN mix! And this is exactly what it looks like. Add enough heat and the whipping motion from a spinning crankshaft and flailing connecting rods, oil and water will combine to make this off-white foam coating over everything inside of the engine. It’s not good for lubrication, and continued running will destroy most moving parts which need good oil for lubrication. Normally, oil and water are kept separate in an automobile engine, and when you see this you’ll know that something has failed and allowed them to combine. In most instances the combination happened because of a bad head gasket, or possibly even a cracked cylinder head or engine block. With the TR2-TR4A 4-cyl engines, there’s also the possibility of a bad “figure 8” gasket at the bottom of the cylinder liners. In any case, a simple oil change is not going to solve the problem so roll up your sleeves and plan on a complete engine overhaul to locate the initial cause, as well as any subsequent damage which might have ocurred. Fortunately, the owner of this TR3A knew who to call, the team here at Macy’s Garage who have more Triumph TR engine overhaul experience than anyone else in North America.March 23, 2026
Whenever we receive a car that’s been at some other shop first, we never know what we’re going to find. We’d almost prefer to get a car straight from a barn or fresh out of long term storage. That way, there are no assumptions about prior work being done correctly and no surprises later which cause us to back-up and fix things which were previously done incorrectly. Examples like this prove why it only costs more to send your car to Macy’s Garage if it’s been at another shop first. We almost always have to repair something (or many somethings) that you’ve already paid the other shop to screw up. This TR6 is a typical example of these situations. The car had been to TWO different shops for “restoration” without much progress over several years. Finally the car was sent here (missing many “lost” parts) to complete the job. The engine had been “rebuilt” by a previous shop, so the first thing we did was bore scope the engine and get it to at least run in the shop. Until we assembled more of the car and could actually drive it, it seemed safe to proceed. Finalizing the assembly and getting into the test drives, the car ran fine up to 3000 RPM, then fell flat on it’s nose. We suspected that the camshaft was installed off one tooth, and disassembly of the front of the car and a proper camshaft degree procedure confirmed our suspicions. After reassembly, the car now runs as well as a healthy TR6 should! And best of all, the multi-year restoration is finally complete!March 16, 2026
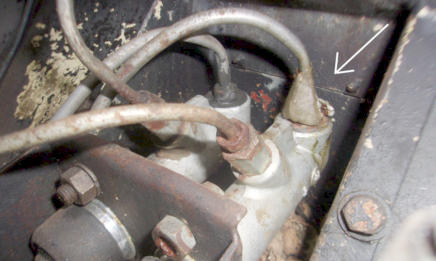
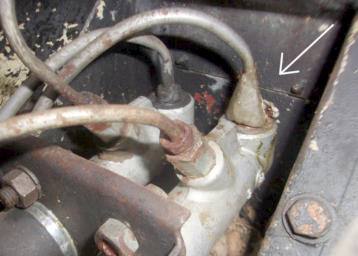
If we were ever tempted to think we’ve seen it all, another TR rolls in which confirms that we haven’t! Using JB weld or some other epoxy to “fix” a brake fluid leak certainly falls into the “what were they thinking” category. While these are the clutch and brake master cylinder supply lines and not under pressure, trusting it to keep the systems full of fluid is not something we’d want to risk long term. There’s little doubt that the expiration date has expired on this one! Brakes are the first area we always want to address to bring a car back from long term storage. It makes no sense to make it run if you can’t get it stopped. Over the years, we’ve personally seen or heard first hand accounts of guys who got the engine to run first, then couldn’t resist the temptation to see if it would move. Many times this short trip down the driveway or around the block met with disasterous results and we’d hate to see a good car get totaled or have someone injured. For those same reasons, brakes MUST be repaired CORRECTLY, and that’s 100% of the time. You can do as little or as much as you’d like to your brake system, depending on how much value you place on your car, your family, or even your own life. Being a professional shop however, facing serious liability exposure as well as the guilt from having someone get hurt or killed, prior brake repairs like this are not something we can allow to continue “as-is”.March 9, 2026
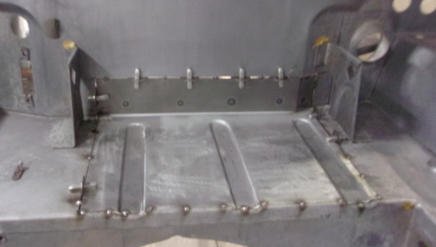
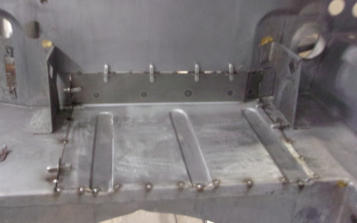
Here is the completed TR6 battery shelf from last week, tack welded into position and ready for final welding. This area is identical on all TR4’s starting in late 1961, and run through to the final TR6 produced in 1976. As such, we’ve had plenty of practice in fabricating these! It looks like a simple piece to make, but the stretching operation to create the ribs does require a little trick, especially with the ribs having a “closed” end which doesn’t pass through to the back side of the panel. Even if you use the special “drawing” steel that we use, attempting to press or roll a closed end bead into flat sheet metal will cause the entire panel to twist and wad up. The trick is to run these areas through the English wheel or power hammer first, and “pre-stretch” the metal that will become the beads. This too will wrinkle-up the panel, but it mostly straightens back out when you roll the beads into it. Follow up with the planishing hammer to smooth out any remaining wrinkles or twists, then head over to the sheet metal break to form the rear corner and lock the bottom section flat. With the right combination of skill, equipment, and experience, a perfect and invisible repair can be made in a short amount of time.March 2, 2026
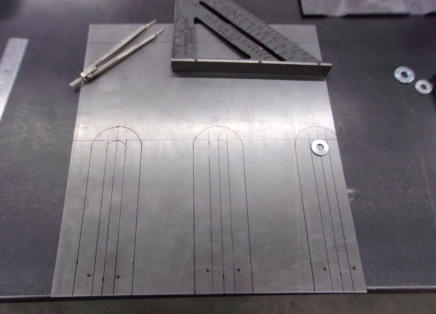
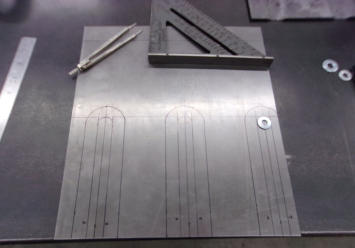
Rust beneath a lead-acid car battery is the most common rust you’ll find on an old car. It’s an easy fix for cars with a bolt-in shelf to hold the battery, and then it gets more difficult from there. Triumph had a somewhat removeable metal tray welded into the firewall of the TR2-TR3B cars, and replacements are readily available to facilitate the repair. But starting with the TR4, things became much more difficult. With the TR4-TR6 models, the battery “shelf” was part of the firewall assembly, with no factory seam to split and replace a section. Repair panels have also not been available, so we had to learn and perfect a method to repair this trouble spot ourselves. It all began with flat new sheet metal and drawing tools, and the pattern for the stiffening and drainage ribs are laid out. From here we move over to the English wheel and bead roller and create the ribs as close to factory dimensions as possible. True, it will never be seen with a battery sitting on top (and hopefully a plastic battery tray as well), but remember that the primary reason Triumph added these ribs was to strengthen the area, and provide several drainage pathways. They really do need to be there! Stop back next week and we’ll show you the completed panel, positioned and tacked into the firewall, ready for final welding.February 23, 2026
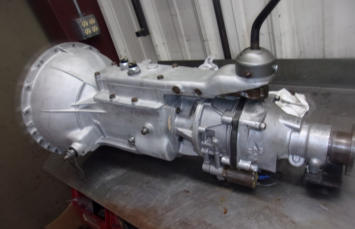
If you’ve never driven a TR with overdrive, you don’t know what you’re missing. And once you have a properly functioning overdrive in your TR, you’ll never have another without it! Whenever I acquire a new TR for my collection, if it doesn’t have an overdrive you can bet that it’s the first thing I add. Now I know a lot of you will say “I never take my Triumph out on the highway”, or something similar, but I’ll also tell you that neither do I unless it’s for a very short time and unavoidable. You see, an overdrive isn’t just about cruising along at 70+ MPH and lowering the strain on the engine and the noise levels inside. For that, a 5-speed conversion would work but the gear ratio spacing isn’t optimal for the Triumph power curves. With an overdrive, you pick up either 2 or 3 extra gears (depending on A or J type o/d) and believe me there are times when I use them all! The cost of a 5-speed conversion or an overdrive conversion is about the same, so why not opt for the original spec and keep the correct gear ratios? If your car does not currently have an overdrive, we’re able to source factory rebuilt units and perform the conversion here. And if you have overdrive and it isn’t working correctly, we can repair and rebuild them to enhance your Triumph driving pleasure.February 16, 2026
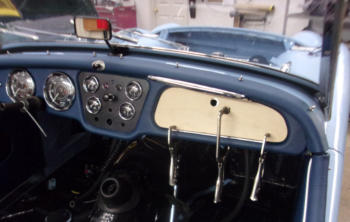
Following along with the test-fitting subject from last week, here is another example from the same TR3B, although taken prior to last week’s photo. Many of the TR2-TR3B cars we see here or at shows have dash rail and door top cappings that don’t align or touch or rub, looking bad or damaging the leather or vinyl covering. Test fitting now guarantees that all components line-up correctly, and if you have a situation like this it’s O.K. to trim away some of the base capping material, and be sure to add extra clearance for today’s thicker leather and vinyl. So why don’t these original parts fit better? Perhaps they didn’t fit well when new, but in this case we know that this owner also had a parts car. There’s no telling where these parts might have come from, but back when the wrecking yards were well supplied with derelict sidescreen TR’s, it wouldn’t have been unusual to pull a “nicer” capping from a junk yard car to replace a worn or damaged part on your own TR3 (as long as the color matched). In most cases, when test fitting the cappings, it’s not unusual to work on them for several hours, removing twists and dents, or re-welding loose button caps on the TR3A-TR3B door tops. Only after all 8 pieces have been repaired, fitted, and adjusted will we come anywhere near them with the vinyl, leather, and glue!February 9, 2026
To achieve the fit and finish that is expected today of a quality restoration, just about every piece must be test fit and adjusted multiple times. True, today’s highest quality restorations are much nicer than what rolled off of the asembly line 50-60-70 years ago, but it’s hard to judge which flaws might have been original and which are due to poor workmanship of the restorer. So, the highest level of fit and finish is what’s generally expected today, especially if it’s a TR that was restored here at Macy’s Garage! Take the relatively simple task of installing the glove box door. Most of the upholstered wood panels have deteriorated to the point where they need to be replaced. The replacements we make are exact duplicates of the originals (of which we have several samples), but look at the hole for the glove box lock. Had we simply pulled a new wood piece from our stock and covered it in vinyl before trying to fit it to the car, we’d have had a new problem to resolve. Test fitting early and often saves trouble later when it’s more difficult to adjust. So why didn’t the wood piece fit? It boils down to today’s vinyl being thicker than what Triumph used originally. This shrinks the size of the opening (and increases the size of the door facing), shifting the door to where it shouldn’t be. A belt sander now made this a simple fix.February 2, 2026
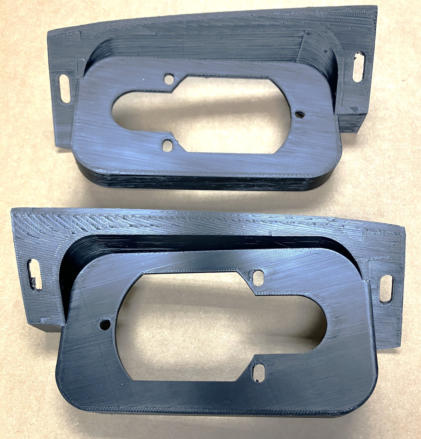
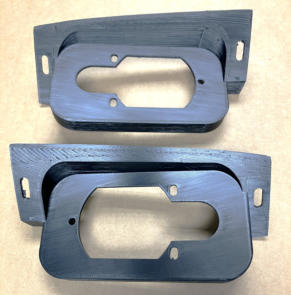
Welcome back following our January break! Mission accomplished and fingers crossed, it looks like we successfully split our web editing software into two smaller files without crashing it. We’ve also been busy creating new Triumph parts that are not available elsewhere. The two brackets shown in this week’s photo are front turn signal lamp brackets for late 1974-1976 TR6. We have a car here that was missing these brackets (both sides!), and none were to be had anywhere. Even used brackets seem unobtainable, so we had to roll up our sleeves (again) and make them here. Borrowing one from another car in the shop, we were able to create a CAD file and then print them on one of our three 3-D printers. Yes they are now plastic where as the originals were steel, but even plastic is better than the wonky strap brackets that were previously used on the car in question. We chose a reinforced High Temperature filament to create these new brackets, so there is no need to anticipate a shortened life expectancy from not using metal. With the engineering and production solved, we are now able to offer these brackets in our eBay store for all late TR6 owners who might also need one (or a pair).
BLOG
2026-Q1
America’s BEST Triumph Shop


Macy’s Garage

© 2026 - Macy’s Garage, Ltd.

Blog
WHAT we’re doing, and HOW we’re doing it!
March 30, 2026
There’s a very old and very common saying that oil and water don’t mix. But whenever you pull your dip stick, drain the oil, or remove the valve cover and see this white foamy substance, you’ll know that oil and water CAN mix! And this is exactly what it looks like. Add enough heat and the whipping motion from a spinning crankshaft and flailing connecting rods, oil and water will combine to make this off- white foam coating over everything inside of the engine. It’s not good for lubrication, and continued running will destroy most moving parts which need good oil for lubrication. Normally, oil and water are kept separate in an automobile engine, and when you see this you’ll know that something has failed and allowed them to combine. In most instances the combination happened because of a bad head gasket, or possibly even a cracked cylinder head or engine block. With the TR2-TR4A 4-cyl engines, there’s also the possibility of a bad “figure 8” gasket at the bottom of the cylinder liners. In any case, a simple oil change is not going to solve the problem so roll up your sleeves and plan on a complete engine overhaul to locate the initial cause, as well as any subsequent damage which might have ocurred. Fortunately, the owner of this TR3A knew who to call, the team here at Macy’s Garage who have more Triumph TR engine overhaul experience than anyone else in North America.March 23, 2026
Whenever we receive a car that’s been at some other shop first, we never know what we’re going to find. We’d almost prefer to get a car straight from a barn or fresh out of long term storage. That way, there are no assumptions about prior work being done correctly and no surprises later which cause us to back-up and fix things which were previously done incorrectly. Examples like this prove why it only costs more to send your car to Macy’s Garage if it’s been at another shop first. We almost always have to repair something (or many somethings) that you’ve already paid the other shop to screw up. This TR6 is a typical example of these situations. The car had been to TWO different shops for “restoration” without much progress over several years. Finally the car was sent here (missing many “lost” parts) to complete the job. The engine had been “rebuilt” by a previous shop, so the first thing we did was bore scope the engine and get it to at least run in the shop. Until we assembled more of the car and could actually drive it, it seemed safe to proceed. Finalizing the assembly and getting into the test drives, the car ran fine up to 3000 RPM, then fell flat on it’s nose. We suspected that the camshaft was installed off one tooth, and disassembly of the front of the car and a proper camshaft degree procedure confirmed our suspicions. After reassembly, the car now runs as well as a healthy TR6 should! And best of all, the multi-year restoration is finally complete!March 16, 2026
If we were ever tempted to think we’ve seen it all, another TR rolls in which confirms that we haven’t! Using JB weld or some other epoxy to “fix” a brake fluid leak certainly falls into the “what were they thinking” category. While these are the clutch and brake master cylinder supply lines and not under pressure, trusting it to keep the systems full of fluid is not something we’d want to risk long term. There’s little doubt that the expiration date has expired on this one! Brakes are the first area we always want to address to bring a car back from long term storage. It makes no sense to make it run if you can’t get it stopped. Over the years, we’ve personally seen or heard first hand accounts of guys who got the engine to run first, then couldn’t resist the temptation to see if it would move. Many times this short trip down the driveway or around the block met with disasterous results and we’d hate to see a good car get totaled or have someone injured. For those same reasons, brakes MUST be repaired CORRECTLY, and that’s 100% of the time. You can do as little or as much as you’d like to your brake system, depending on how much value you place on your car, your family, or even your own life. Being a professional shop however, facing serious liability exposure as well as the guilt from having someone get hurt or killed, prior brake repairs like this are not something we can allow to continue “as-is”.March 9, 2026
Here is the completed TR6 battery shelf from last week, tack welded into position and ready for final welding. This area is identical on all TR4’s starting in late 1961, and run through to the final TR6 produced in 1976. As such, we’ve had plenty of practice in fabricating these! It looks like a simple piece to make, but the stretching operation to create the ribs does require a little trick, especially with the ribs having a “closed” end which doesn’t pass through to the back side of the panel. Even if you use the special “drawing” steel that we use, attempting to press or roll a closed end bead into flat sheet metal will cause the entire panel to twist and wad up. The trick is to run these areas through the English wheel or power hammer first, and “pre- stretch” the metal that will become the beads. This too will wrinkle-up the panel, but it mostly straightens back out when you roll the beads into it. Follow up with the planishing hammer to smooth out any remaining wrinkles or twists, then head over to the sheet metal break to form the rear corner and lock the bottom section flat. With the right combination of skill, equipment, and experience, a perfect and invisible repair can be made in a short amount of time.March 2, 2026
Rust beneath a lead-acid car battery is the most common rust you’ll find on an old car. It’s an easy fix for cars with a bolt-in shelf to hold the battery, and then it gets more difficult from there. Triumph had a somewhat removeable metal tray welded into the firewall of the TR2-TR3B cars, and replacements are readily available to facilitate the repair. But starting with the TR4, things became much more difficult. With the TR4-TR6 models, the battery “shelf” was part of the firewall assembly, with no factory seam to split and replace a section. Repair panels have also not been available, so we had to learn and perfect a method to repair this trouble spot ourselves. It all began with flat new sheet metal and drawing tools, and the pattern for the stiffening and drainage ribs are laid out. From here we move over to the English wheel and bead roller and create the ribs as close to factory dimensions as possible. True, it will never be seen with a battery sitting on top (and hopefully a plastic battery tray as well), but remember that the primary reason Triumph added these ribs was to strengthen the area, and provide several drainage pathways. They really do need to be there! Stop back next week and we’ll show you the completed panel, positioned and tacked into the firewall, ready for final welding.February 23, 2026
If you’ve never driven a TR with overdrive, you don’t know what you’re missing. And once you have a properly functioning overdrive in your TR, you’ll never have another without it! Whenever I acquire a new TR for my collection, if it doesn’t have an overdrive you can bet that it’s the first thing I add. Now I know a lot of you will say “I never take my Triumph out on the highway”, or something similar, but I’ll also tell you that neither do I unless it’s for a very short time and unavoidable. You see, an overdrive isn’t just about cruising along at 70+ MPH and lowering the strain on the engine and the noise levels inside. For that, a 5-speed conversion would work but the gear ratio spacing isn’t optimal for the Triumph power curves. With an overdrive, you pick up either 2 or 3 extra gears (depending on A or J type o/d) and believe me there are times when I use them all! The cost of a 5-speed conversion or an overdrive conversion is about the same, so why not opt for the original spec and keep the correct gear ratios? If your car does not currently have an overdrive, we’re able to source factory rebuilt units and perform the conversion here. And if you have overdrive and it isn’t working correctly, we can repair and rebuild them to enhance your Triumph driving pleasure.February 16, 2026
Following along with the test-fitting subject from last week, here is another example from the same TR3B, although taken prior to last week’s photo. Many of the TR2-TR3B cars we see here or at shows have dash rail and door top cappings that don’t align or touch or rub, looking bad or damaging the leather or vinyl covering. Test fitting now guarantees that all components line-up correctly, and if you have a situation like this it’s O.K. to trim away some of the base capping material, and be sure to add extra clearance for today’s thicker leather and vinyl. So why don’t these original parts fit better? Perhaps they didn’t fit well when new, but in this case we know that this owner also had a parts car. There’s no telling where these parts might have come from, but back when the wrecking yards were well supplied with derelict sidescreen TR’s, it wouldn’t have been unusual to pull a “nicer” capping from a junk yard car to replace a worn or damaged part on your own TR3 (as long as the color matched). In most cases, when test fitting the cappings, it’s not unusual to work on them for several hours, removing twists and dents, or re-welding loose button caps on the TR3A-TR3B door tops. Only after all 8 pieces have been repaired, fitted, and adjusted will we come anywhere near them with the vinyl, leather, and glue!February 9, 2026
To achieve the fit and finish that is expected today of a quality restoration, just about every piece must be test fit and adjusted multiple times. True, today’s highest quality restorations are much nicer than what rolled off of the asembly line 50-60-70 years ago, but it’s hard to judge which flaws might have been original and which are due to poor workmanship of the restorer. So, the highest level of fit and finish is what’s generally expected today, especially if it’s a TR that was restored here at Macy’s Garage! Take the relatively simple task of installing the glove box door. Most of the upholstered wood panels have deteriorated to the point where they need to be replaced. The replacements we make are exact duplicates of the originals (of which we have several samples), but look at the hole for the glove box lock. Had we simply pulled a new wood piece from our stock and covered it in vinyl before trying to fit it to the car, we’d have had a new problem to resolve. Test fitting early and often saves trouble later when it’s more difficult to adjust. So why didn’t the wood piece fit? It boils down to today’s vinyl being thicker than what Triumph used originally. This shrinks the size of the opening (and increases the size of the door facing), moving the door around where it shouldn’t be. A belt sander now made this a simple fix.February 2, 2026
Welcome back following our January break! Mission accomplished and fingers crossed, it looks like we successfully split our web editing software into two smaller files without crashing it. We’ve also been busy creating new Triumph parts that are not available elsewhere. The two brackets shown in this week’s photo are front turn signal lamp brackets for late 1974-1976 TR6. We have a car here that was missing these brackets (both sides!), and none were to be had anywhere. Even used brackets seem unobtainable, so we had to roll up our sleeves (again) and make them here. Borrowing one from another car in the shop, we were able to create a CAD file and then print them on one of our three 3-D printers. Yes they are now plastic where as the originals were steel, but even plastic is better than the wonky strap brackets that were previously used on the car in question. We chose a reinforced High Temperature filament to create these brackets, so there is no need to anticipate a shortened life expectancy from not using metal. With the engineering and production solved, we are now able to offer these brackets in our eBay store for all late TR6 owners who might also need one (or a pair).

America’s BEST Triumph Shop