Macy’s Garage

© 2026 - Macy’s Garage, Ltd.

Blog
WHAT we’re doing, and HOW we’re doing it!
September 24, 2018
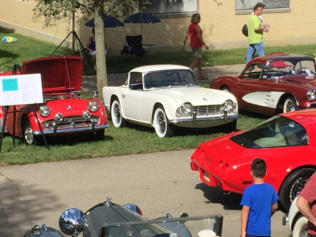
We took Tonda’s early TR4 (CT288L) to The Dayton Concours d’Elegance at Carillon Park on September 16. The classes at this type of large multi-make shows are always a little strange, and this one was no exception. We were placed in a “Pre-1963 Sports Car” class, along with a mostly original TR3A which had been merged with the accessory department at a Western Auto store back in the day, several Corvettes, a Triumph 1800 Roadster that we restored several years ago, and an Aston-Martin DB2. We don’t have any expectations of winning at a show like this, and as soon as all of the cars had arrived I predicted that the Aston-Martin would be the class winner, because it was an Aston-Martin! After finishing their duties, the judges came back, bringing friends to see this incredible 100 point TR4. At that time they confessed that our TR4 had tied for first with the Aston, both cars being judged as perfect cars. But to break the tie, they decided that the more exotic DB2 should be the first place car, just as I had predicted several hours earlier. With no expectations otherwise, we weren’t disappointed. It was a good day because we had received an enormous amount of positive comments throughout the day, and we were able to bring a smile to the faces of all those who have fond memories of the TR’s that once played a part in their lives!September 17, 2018
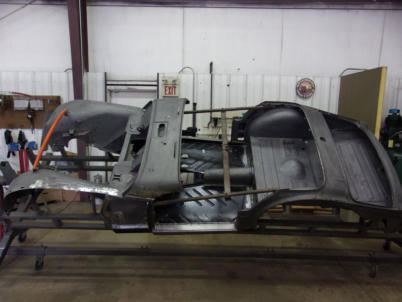
What a difference a week makes! In just 4 work days (30 hours), our Ace Metal Fabricators were able to stitch a pile of TR3 pieces from last week’s photo into a complete body tub with new floors and inner and outer sills. We have already had the doors bolted onto this body tub, which is a critical step anytime the A or B posts become disconnected from the inner sill, either by rusting away on their own or intentionally removed during inner sill replacement. In this case, we had both going on as the bottoms of the A and B posts were half rotted away, which meant that they all had to be repaired before they could be welded back onto the new inner sills. There were also some extensive repairs needed to the lower firewall, side bulkhead sealer plates, and the rear edge of the rear seat riser, all locations which needed to be solid so that the new floors could be attached. Because of all the peripheral damage to adjacent panels, we’re never able to provide a cost estimate to “just replace the floor pans”. It’s never as simple as it sounds!September 10, 2018
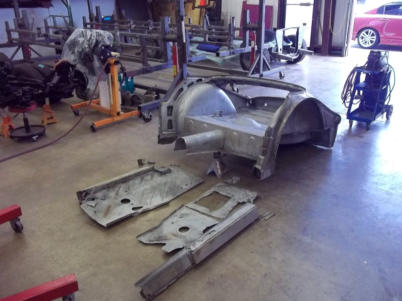
Yes, there is a TR3 hiding here, and we do have the front half as well! This is what a client brought to us after he decided to install his own floor pans. He started the project by cutting through the original floors and outer sills (which also were bad), and then decided that perhaps cutting the car into two big pieces wasn’t such a good idea. Fortunately he gathered up all of the pieces and brought them to us so that we could put Humpty Dumpty back together again. We began by carting the whole mess over to Pro Strip (formerly Redi-Strip) in Indianapolis to be given a bath in their 4 different chemical tanks and remove the old paint, bondo, and rust. Once it came back to us we could quickly assess what was good and what was not, and then we proceeded to trim back more of the bad stuff and evaluate just how much good remained. Check back in with us next week, and we’ll show you a photo of just how quickly we were able to start making a TR3 out of what would have been a hopeless case to just about anyone else!September 4, 2018
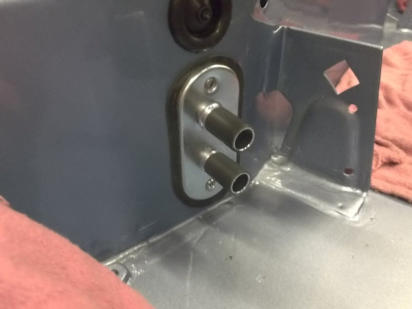
When you have a singular focus in any endeavor, you should be very good at spotting trouble, as we are with the TR2-TR6 cars. Take this heater hose bulkhead fitting, used on the TR4-TR6. We noticed a recurring problem when installing the heater hoses to the engine side of this fitting, that being that we would tighten the original wire style hose clamps as tight as they would go, but we could still turn the hoses and pull them off of the bulkhead fitting. They needed to be much tighter! Our first thought was that the clamps were just a little bit too large, but the next smaller size clamp was far too small. We could have installed modern USA style worm drive clamps, but those just don’t look right on a proper British sports car! We thought that possibly the fitting was a touch too small, but we measured some original fittings and decided that wasn’t the case. Whatever the cause, we had to solve the problem. We found that by installing 2 short pieces of a thick wall heat shrink tube to the bulkhead fitting, we were now able to fully tighten the wire clamps and have the hoses stay on the fitting as they should. Problem solved!August 27, 2018
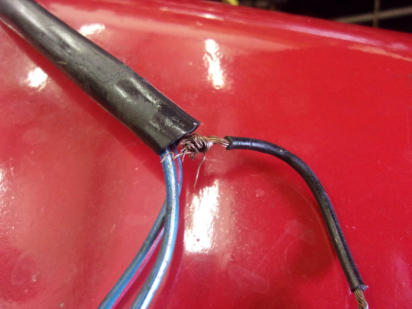
We’ve all heard most of the Lucas jokes, and probably repeated a few of them whenever British car guys gather. Many of you have even believed some of them, and spent time, money, and effort to “improve” your electrical system and save yourself from the horrors which might befall your LBC when you take old Joe Lucas along for a drive. To all of this I politely say BUNK! Joe Lucas wasn’t such a bad guy, nor were the electrical products which came from the Lucas factory. The problem always has been, and always will be, modifications and poor maintenance by the owners and mechanics who have “worked” on them. Take this poorly executed splice to a headlamp pigtail in the photo. Is it Lucas’ fault that the ground connection will vibrate and make/break, causing the headlights to be dim, flicker, and/or go out? When we restore a TR here, or repair one that gets a new wiring harness, we almost always install an authentic reproduction wiring harness just like the original Lucas harness it will replace. We don’t see the need to “upgrade” to some fancy new wiring harness with extra circuits and a bunch of relays, unless the owner is planning to add to the electrical needs of the car with heated seats and a kicker 1000W stereo system. We are happy to report that all of the electrical components work perfectly fine with original style harnesses when we are done, that is until the owners cut into them to start adding accessories!August 21, 2018
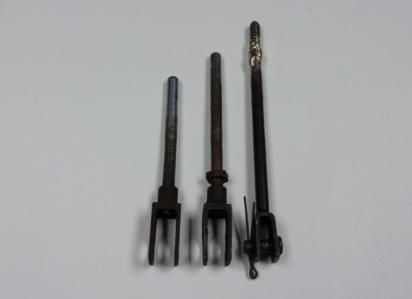
Triumph built a lot of TR’s from 1953-1976, and they really did have it figured out! If you find that you have to modify an original part to make it work, it’s a safe bet that you are doing something wrong. Take the 3 clutch slave cylinder push rods in the photo. The center rod is the correct length, as supplied by Triumph. The rod on the left has been shortened, and the one on the right has been lengthened, and crudely so at that! Some previous owner (or mechanic) found it necessary to shorten the left rod because he had the slave cylinder mounted on the wrong side of the bracket. 4-cyl TR’s are supposed to have the slave cylinder on the front side of the bracket, closer to the radiator. For 6-cyl TR’s, the slave cylinder goes to the rear of the bracket, closer to the rear differential. Get the slave cyl on the wrong side of the bracket, and many succumb to the temptation to change the rod length. And then there’s the lengthened TR6 rod on the right, which was mounted correctly, but in this case the clutch fork pin was broken off at an angle. This added free play, which was “cleverly” taken up by the additional length. Cleverly that is, until the pin sheared off the rest of the way and left the owner stranded without an operating clutch!August 14, 2018
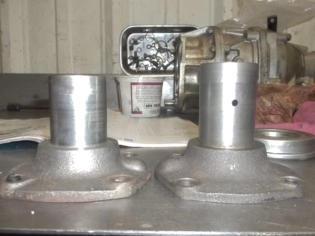
If you read the fine print in the Moss catalog, you might learn some interesting bits of information. Take the notes regarding the front transmission bearing cover for example. There are two different lengths to these covers, one with a 2-⅜” length for the clutch release bearing to slide on, and another shorter cover which measures only 1-11/32” long. The longer cover is intended to be used with the “early” TR2-TR4 3-finger style clutch pressure plates, and the short version is for the later TR4A-TR6 diaphragm style clutches. The two clutch types each use different release bearings and the sleeves they ride on as well. Mix up any of the 3 components of either set or use the wrong “set” with the incorrect style clutch, and you are very likely to have a clutch which never works like it’s supposed to, if it works at all. We presently have a TR3A here which had a TR6 gearbox installed at some time in the past. The owner was having occasional problems getting the car in gear, and we pulled the top cover and noted that the synchro rings were worn out. When we removed the gearbox from the car, we also noted that it still had the short TR6 front cover, along with the TR6 release bearing and sleeve. In addition to the worn synchro rings, we also think that the wrong release bearing and sleeve were getting jammed occasionally on the short front cover. We rebuilt the gearbox and swapped out the incorrect clutch components with the right parts, and now the car shifts like a dream!August 7, 2018
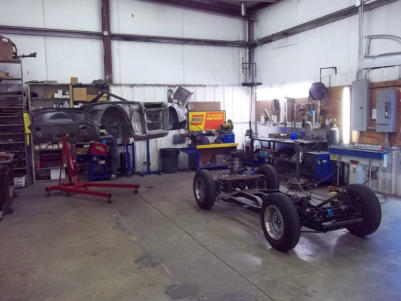
When a car goes through the metalwork phase and we repair all of the rust and dents, the next step is to start massaging the panel gaps. This part of the job needs to be done on the chassis, which has not yet been restored. We’ll have the car together and back apart again several times from this point, so to make the job a little easier we have created an extension arm for our engine hoist that hooks onto the inner cage bracing we use to keep it all in alignment. This way, one man can pull or install a bare body tub (shell) in a quick and efficient manner. I’d also like to point out that this is not a “staged” photo, but that our workshop is normally this clean and organized. Not too shabby for a shop with 8 guys working on 16-20 TR’s at all times! You could say that we are neat-freaks, but the reality is that we pay attention to the details, which is why our cars are always extraordinary examples of the Triumph marque. It’s also necessary to stay extremely organized, when parts are all similar and those from one car could easily be scrambled with parts from another!July 31, 2018
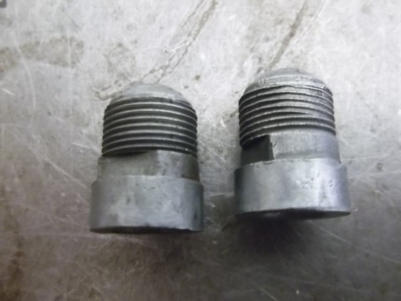
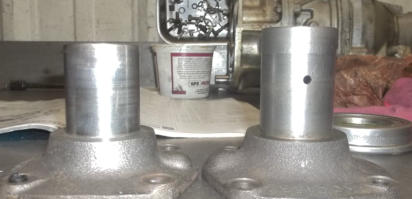
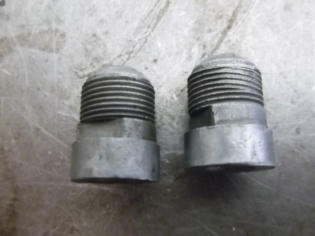
Here’s a good example of why a specialist is the best decision for restoring your car, and another example of why Macy’s Garage is the BEST with TR’s in North America. We can stock parts, because we work on nothing but TR2-TR6 cars, and we know that we won’t have to wait on the next XYZ to show up at our door to have a chance to use them. A few of you might recognize this small but important part. It is the drive cable ferrule from a TR4A windshield wiper motor, and it is used from the early TR3’s through the TR4’s. Now most wiper motor parts for this range are N/A, but this is a piece you can presumably purchase if the catalog companies happen to have them in stock. Now this isn’t a piece which normally wears out, but as you can see in the part on the right, prior mechanics or restorers have a high odds of stripping the threads as they can be difficult to get started and it’s only soft aluminum. Someone had been here before us and done just that, but fortunately we have a huge inventory of new and used TR parts on hand, and it was just a short amount of time before we had a replacement in hand, without waiting on the UPS truck to arrive.July 24, 2018
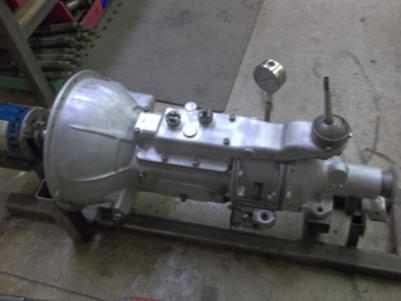
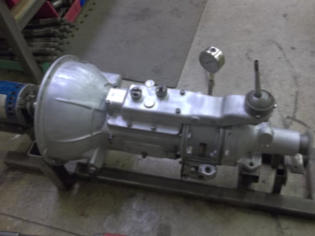
We rebuild all of our own gearboxes and overdrive units here at Macy’s Garage, both for our complete frame-up restorations and for gearboxes that were previously removed and brought/shipped here for service. Every one of the overdrive gearboxes we repair are given a dance on our test rig before being installed into a car or sent back to the owner for installation. As heavy as they are, we want to be certain that they build up the proper amount of pressure and engage/disengage as they should before anyone has to wrestle them back into a car!July 16, 2018
Lower fender (wing) repairs for TR2-TR3B are quite common, as it was a normal occurrence for water and dirt to make it past the inner “seal” and lay up against the unseen bare metal in this location. There is a pre-made patch panel available for this area but it is very expensive at $240.00 (today), it doesn’t fit perfectly, and it is much larger than is normally required. With all of that in mind, we usually create our own and replace just what’s necessary. Almost every time, the lower mounting flange will have to be fabricated, and in many cases it is the only piece that needs to be repaired. As such, we’ve gotten very good at making a replacement part that looks and fits exactly like the original. This goes right along with our blog photo from two weeks ago, where we showed that we make replacement parts that perfectly replicate the original areas being repaired. Our goal is that if the cars ever need to be stripped and painted or restored again in another 40-50 years, no one will look at our work (if they can even find it) and ask “why did they do that?”, as we so often do now with cars that have been previously “restored”.July 9, 2018
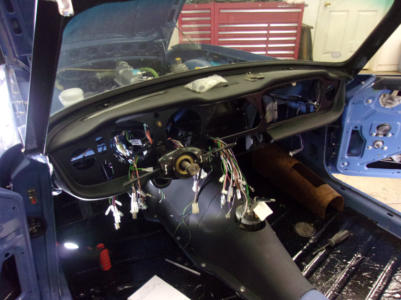
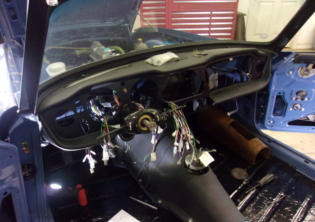
While it may sound simple enough to install a new wooden dash overlay in your TR4A or TR6, this is what it’s going to look like when you get about half-way through the job. All of the switches and gauges install through the wood, and thus must be disconnected and reconnected once the wood overlay has been changed. Now this photo is actually a complete restoration going back together, but the process is the same for changing a complete wiring harness or “simply” changing that piece of wood on the dash. Now if your wood dash could use an update, and the thought of all these loose wires scares you, give us a call. We’ll change out your wood dash overlay, even without restoring the whole car for you!July 2, 2018
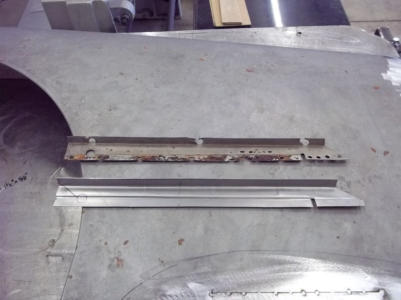
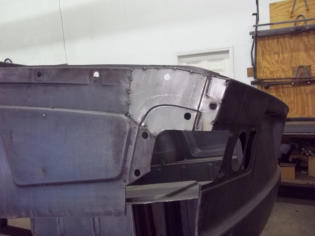
When fabricating patches for rusty and weak areas, they should ALWAYS be made to replicate the bad section EXACTLY. Even in an area such as this TR6 rear corner which is never seen, it is important to replicate the details such as this stepped area, or you will have trouble fitting the taillight and rear fender later. Taking shortcuts here and installing a flat patch or plastering over weak and rusty metal will only cost you time later during final assembly when you have to be more careful and deal with painted parts. Now it does require special equipment to do this correctly, like a bead roller in this case, but Mark’s a tool junkie and never misses a chance to buy new equipment, so we do have everything that we need to do this kind of work at the highest levels of quality.
BLOG
2018-Q3
America’s BEST Triumph Shop


Macy’s Garage

© 2026 - Macy’s Garage, Ltd.

Blog
WHAT we’re doing, and HOW we’re doing it!
September 24, 2018
We took Tonda’s early TR4 (CT288L) to The Dayton Concours d’Elegance at Carillon Park on September 16. The classes at this type of large multi-make shows are always a little strange, and this one was no exception. We were placed in a “Pre-1963 Sports Car” class, along with a mostly original TR3A which had been merged with the accessory department at a Western Auto store back in the day, several Corvettes, a Triumph 1800 Roadster that we restored several years ago, and an Aston-Martin DB2. We don’t have any expectations of winning at a show like this, and as soon as all of the cars had arrived I predicted that the Aston-Martin would be the class winner, because it was an Aston-Martin! After finishing their duties, the judges came back, bringing friends to see this incredible 100 point TR4. At that time they confessed that our TR4 had tied for first with the Aston, both cars being judged as perfect cars. But to break the tie, they decided that the more exotic DB2 should be the first place car, just as I had predicted several hours earlier. With no expectations otherwise, we weren’t disappointed. It was a good day because we had received an enormous amount of positive comments throughout the day, and we were able to bring a smile to the faces of all those who have fond memories of the TR’s that once played a part in their lives!September 17, 2018
What a difference a week makes! In just 4 work days (30 hours), our Ace Metal Fabricators were able to stitch a pile of TR3 pieces from last week’s photo into a complete body tub with new floors and inner and outer sills. We have already had the doors bolted onto this body tub, which is a critical step anytime the A or B posts become disconnected from the inner sill, either by rusting away on their own or intentionally removed during inner sill replacement. In this case, we had both going on as the bottoms of the A and B posts were half rotted away, which meant that they all had to be repaired before they could be welded back onto the new inner sills. There were also some extensive repairs needed to the lower firewall, side bulkhead sealer plates, and the rear edge of the rear seat riser, all locations which needed to be solid so that the new floors could be attached. Because of all the peripheral damage to adjacent panels, we’re never able to provide a cost estimate to “just replace the floor pans”. It’s never as simple as it sounds!September 10, 2018
Yes, there is a TR3 hiding here, and we do have the front half as well! This is what a client brought to us after he decided to install his own floor pans. He started the project by cutting through the original floors and outer sills (which also were bad), and then decided that perhaps cutting the car into two big pieces wasn’t such a good idea. Fortunately he gathered up all of the pieces and brought them to us so that we could put Humpty Dumpty back together again. We began by carting the whole mess over to Pro Strip (formerly Redi-Strip) in Indianapolis to be given a bath in their 4 different chemical tanks and remove the old paint, bondo, and rust. Once it came back to us we could quickly assess what was good and what was not, and then we proceeded to trim back more of the bad stuff and evaluate just how much good remained. Check back in with us next week, and we’ll show you a photo of just how quickly we were able to start making a TR3 out of what would have been a hopeless case to just about anyone else!September 4, 2018
When you have a singular focus in any endeavor, you should be very good at spotting trouble, as we are with the TR2-TR6 cars. Take this heater hose bulkhead fitting, used on the TR4-TR6. We noticed a recurring problem when installing the heater hoses to the engine side of this fitting, that being that we would tighten the original wire style hose clamps as tight as they would go, but we could still turn the hoses and pull them off of the bulkhead fitting. They needed to be much tighter! Our first thought was that the clamps were just a little bit too large, but the next smaller size clamp was far too small. We could have installed modern USA style worm drive clamps, but those just don’t look right on a proper British sports car! We thought that possibly the fitting was a touch too small, but we measured some original fittings and decided that wasn’t the case. Whatever the cause, we had to solve the problem. We found that by installing 2 short pieces of a thick wall heat shrink tube to the bulkhead fitting, we were now able to fully tighten the wire clamps and have the hoses stay on the fitting as they should. Problem solved!August 27, 2018
We’ve all heard most of the Lucas jokes, and probably repeated a few of them whenever British car guys gather. Many of you have even believed some of them, and spent time, money, and effort to “improve” your electrical system and save yourself from the horrors which might befall your LBC when you take old Joe Lucas along for a drive. To all of this I politely say BUNK! Joe Lucas wasn’t such a bad guy, nor were the electrical products which came from the Lucas factory. The problem always has been, and always will be, modifications and poor maintenance by the owners and mechanics who have “worked” on them. Take this poorly executed splice to a headlamp pigtail in the photo. Is it Lucas’ fault that the ground connection will vibrate and make/break, causing the headlights to be dim, flicker, and/or go out? When we restore a TR here, or repair one that gets a new wiring harness, we almost always install an authentic reproduction wiring harness just like the original Lucas harness it will replace. We don’t see the need to “upgrade” to some fancy new wiring harness with extra circuits and a bunch of relays, unless the owner is planning to add to the electrical needs of the car with heated seats and a kicker 1000W stereo system. We are happy to report that all of the electrical components work perfectly fine with original style harnesses when we are done, that is until the owners cut into them to start adding accessories!August 21, 2018
Triumph built a lot of TR’s from 1953-1976, and they really did have it figured out! If you find that you have to modify an original part to make it work, it’s a safe bet that you are doing something wrong. Take the 3 clutch slave cylinder push rods in the photo. The center rod is the correct length, as supplied by Triumph. The rod on the left has been shortened, and the one on the right has been lengthened, and crudely so at that! Some previous owner (or mechanic) found it necessary to shorten the left rod because he had the slave cylinder mounted on the wrong side of the bracket. 4-cyl TR’s are supposed to have the slave cylinder on the front side of the bracket, closer to the radiator. For 6-cyl TR’s, the slave cylinder goes to the rear of the bracket, closer to the rear differential. Get the slave cyl on the wrong side of the bracket, and many succumb to the temptation to change the rod length. And then there’s the lengthened TR6 rod on the right, which was mounted correctly, but in this case the clutch fork pin was broken off at an angle. This added free play, which was “cleverly” taken up by the additional length. Cleverly that is, until the pin sheared off the rest of the way and left the owner stranded without an operating clutch!August 14, 2018
If you read the fine print in the Moss catalog, you might learn some interesting bits of information. Take the notes regarding the front transmission bearing cover for example. There are two different lengths to these covers, one with a 2-⅜” length for the clutch release bearing to slide on, and another shorter cover which measures only 1-11/32” long. The longer cover is intended to be used with the “early” TR2-TR4 3-finger style clutch pressure plates, and the short version is for the later TR4A-TR6 diaphragm style clutches. The two clutch types each use different release bearings and the sleeves they ride on as well. Mix up any of the 3 components of either set or use the wrong “set” with the incorrect style clutch, and you are very likely to have a clutch which never works like it’s supposed to, if it works at all. We presently have a TR3A here which had a TR6 gearbox installed at some time in the past. The owner was having occasional problems getting the car in gear, and we pulled the top cover and noted that the synchro rings were worn out. When we removed the gearbox from the car, we also noted that it still had the short TR6 front cover, along with the TR6 release bearing and sleeve. In addition to the worn synchro rings, we also think that the wrong release bearing and sleeve were getting jammed occasionally on the short front cover. We rebuilt the gearbox and swapped out the incorrect clutch components with the right parts, and now the car shifts like a dream!August 7, 2018
When a car goes through the metalwork phase and we repair all of the rust and dents, the next step is to start massaging the panel gaps. This part of the job needs to be done on the chassis, which has not yet been restored. We’ll have the car together and back apart again several times from this point, so to make the job a little easier we have created an extension arm for our engine hoist that hooks onto the inner cage bracing we use to keep it all in alignment. This way, one man can pull or install a bare body tub (shell) in a quick and efficient manner. I’d also like to point out that this is not a “staged” photo, but that our workshop is normally this clean and organized. Not too shabby for a shop with 8 guys working on 16-20 TR’s at all times! You could say that we are neat-freaks, but the reality is that we pay attention to the details, which is why our cars are always extraordinary examples of the Triumph marque. It’s also necessary to stay extremely organized, when parts are all similar and those from one car could easily be scrambled with parts from another!July 31, 2018
Here’s a good example of why a specialist is the best decision for restoring your car, and another example of why Macy’s Garage is the BEST with TR’s in North America. We can stock parts, because we work on nothing but TR2-TR6 cars, and we know that we won’t have to wait on the next XYZ to show up at our door to have a chance to use them. A few of you might recognize this small but important part. It is the drive cable ferrule from a TR4A windshield wiper motor, and it is used from the early TR3’s through the TR4’s. Now most wiper motor parts for this range are N/A, but this is a piece you can presumably purchase if the catalog companies happen to have them in stock. Now this isn’t a piece which normally wears out, but as you can see in the part on the right, prior mechanics or restorers have a high odds of stripping the threads as they can be difficult to get started and it’s only soft aluminum. Someone had been here before us and done just that, but fortunately we have a huge inventory of new and used TR parts on hand, and it was just a short amount of time before we had a replacement in hand, without waiting on the UPS truck to arrive.July 24, 2018
We rebuild all of our own gearboxes and overdrive units here at Macy’s Garage, both for our complete frame-up restorations and for gearboxes that were previously removed and brought/shipped here for service. Every one of the overdrive gearboxes we repair are given a dance on our test rig before being installed into a car or sent back to the owner for installation. As heavy as they are, we want to be certain that they build up the proper amount of pressure and engage/disengage as they should before anyone has to wrestle them back into a car!July 16, 2018
Lower fender (wing) repairs for TR2-TR3B are quite common, as it was a normal occurrence for water and dirt to make it past the inner “seal” and lay up against the unseen bare metal in this location. There is a pre- made patch panel available for this area but it is very expensive at $240.00 (today), it doesn’t fit perfectly, and it is much larger than is normally required. With all of that in mind, we usually create our own and replace just what’s necessary. Almost every time, the lower mounting flange will have to be fabricated, and in many cases it is the only piece that needs to be repaired. As such, we’ve gotten very good at making a replacement part that looks and fits exactly like the original. This goes right along with our blog photo from two weeks ago, where we showed that we make replacement parts that perfectly replicate the original areas being repaired. Our goal is that if the cars ever need to be stripped and painted or restored again in another 40-50 years, no one will look at our work (if they can even find it) and ask “why did they do that?”, as we so often do now with cars that have been previously “restored”.July 9, 2018
While it may sound simple enough to install a new wooden dash overlay in your TR4A or TR6, this is what it’s going to look like when you get about half-way through the job. All of the switches and gauges install through the wood, and thus must be disconnected and reconnected once the wood overlay has been changed. Now this photo is actually a complete restoration going back together, but the process is the same for changing a complete wiring harness or “simply” changing that piece of wood on the dash.July 2, 2018
When fabricating patches for rusty and weak areas, they should ALWAYS be made to replicate the bad section EXACTLY. Even in an area such as this TR6 rear corner which is never seen, it is important to replicate the details such as this stepped area, or you will have trouble fitting the taillight and rear fender later. Taking shortcuts here and installing a flat patch or plastering over weak and rusty metal will only cost you time later during final assembly when you have to be more careful and deal with painted parts. Now it does require special equipment to do this correctly, like a bead roller in this case, but Mark’s a tool junkie and never misses a chance to buy new equipment, so we do have everything that we need to do this kind of work at the highest levels of quality.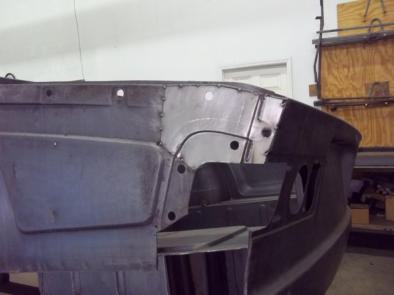


America’s BEST Triumph Shop