Macy’s Garage

© 2026 - Macy’s Garage, Ltd.

Blog
WHAT we’re doing, and HOW we’re doing it!
June 30, 2025
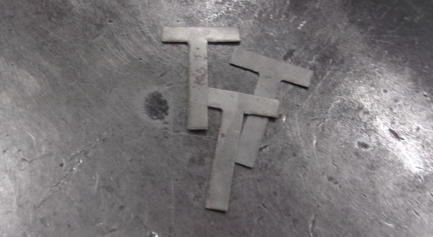
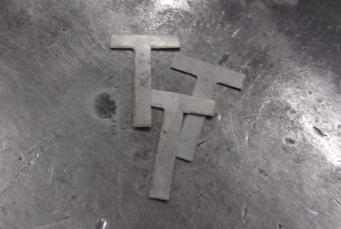
Plenty of folks associate outstanding restorations with the money spent, but truth be told we’ve seen plenty of “high dollar cars” that look like crap to knowledgeable eyes. While most are wowed by shiny chrome and paint, it’s actually attention paid to the smallest details that turns a nice car into an outstanding one. And that’s where we really shine in the Triumph world, just as there are others who have “mastered” other various makes across the vintage car spectrum. It’s knowing about and replicating the tiniest details that always makes the biggest impact. Take these metal tabs which Triumph used to secure the wiring harness to the bodies of all TR2-TR6 models. They were plain (painted) steel on the sidescreen cars (TR2-TR3B), and then covered with a soft black sleeve from TR4 and on. After being folded and unfolded around the wiring a few times, the thin steel has a tendency to crack and break off. Needless to say, just about every car we restore is missing a few and has a couple more ready to fail. As these are welded onto the bare body tub before paint, they aren’t anything which has a part number or can be ordered. But in order to provide the highest quality Triumph restorations we are known for, we have these made in batches of 500 by our local laser cutter, always on hand and ready for installation during the metal work phase of our complete restorations.June 23, 2025
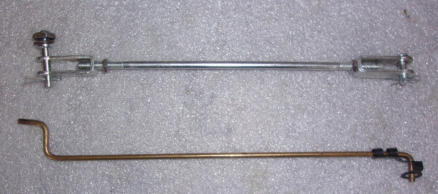
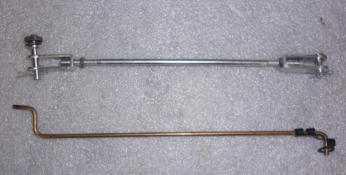
Top object in the photo is a jet connecting rod assembly for the SU carburetors on a TR2-TR4. The lower item is someone’s “fix” from a very long time ago. While the lower rod did the job and pulled the rear jet down whenever the choke cable did the same to the front carb, the makeshift rod provided no adjustment as designed into the original style rod. We can only speculate as to whether this solid rod was installed during one of those long past times when practically NO repair parts were available for these “old” cars, or whether it might have been an act of frugality. Whatever the case, the current owner got a good laugh over what her father had done to keep the car running over 30 years ago. It also goes to show that when restoring any vintage vehicle, you can’t simply put it back together the way you found it. Chances are pretty good that someone else has been there before you.June 16, 2025
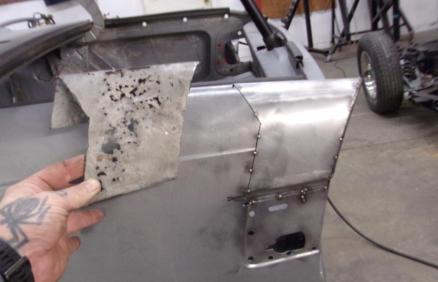
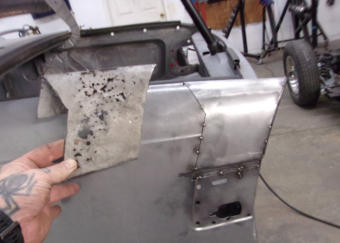
Photos like this from our metal shop just never get old! Just as little as 20-25 years ago, it was common to “repair” a spot like this by simply smearing ‘bondo’ over the rusted area, and hope that the little curly Q’s of filler that squeesed through the holes would help to hold it all in place. Many folks would even tap (or beat) the area down, so they could have a thicker layer of filler on top, allowing it to be sanded down to the appropriate level. While this might have looked better for a short time, it did not totally seal the area from moisture attacking from below, and within a short amount of time the smooth painted top surface would begin to bubble and crack, making it necessary to start the whole process all over again. If you were really lucky, the repeat damage wouldn’t begin to show until the car was in the hands of the next owner, who is looking only at the shiny paint and thought he was buying a nice ‘rust-free’ car. But we have since learned that the only true lasting repair is to cut out all of the rusted and weak metal, then replace it with a patch that is the perfect shape of the damaged area. This patch must be butt-welded into position (so that there is no overlapping metal to trap moisture between layers) and solidly welded to seal the paint from the effects of moisture working through from below.June 9, 2025
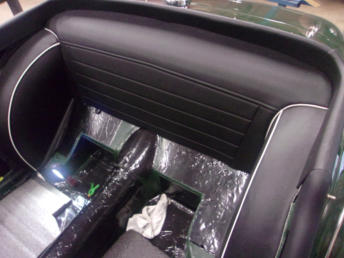
There’s nothing you can do that elevates the look and feel of an old car than a new interior. It’s always exciting to see new trim go into a car near the end of a restoration, as the look of the entire car gets elevated more in a couple of days than it has through the entire process. And let’s face it, the interior is the part of the vehicle that you interact with the most while driving. Everything you see and feel through the driving experience comes from the interior, and that rust on the bumper or scratch in the paint is unseen as you cruise down the road. But sit on ripped/torn seet upholstery and worn out springs and foam, no doubt you’ll notice that with every mile you travel. For this reason we perform plenty of interior upgrades on cars which aren’t getting the full restoration treatment, but looking for the most improvement bang for the owner’s buck! Now today’s interior kits are good, and we use them extensively instead of stitching everything from scratch, but like most reproduction parts they’ll still need some “adjustments” to acheive the exquisite results shown here.June 2, 2025
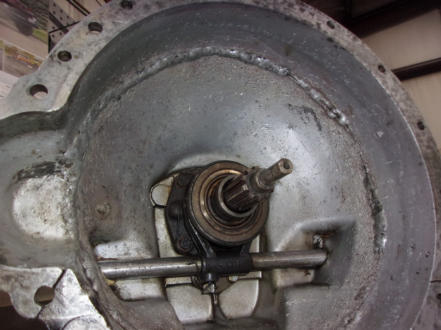
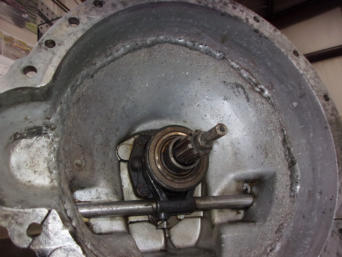
There once was a time when the parts inventory at current (and past) Triumph dealers was waning, or focused more on current models than past “oldies”, but we doubt that empty gearbox cases were ever a highly stocked item. They generally did not suffer wear or damage, and believe it or not, there were plenty of derilect TR’s sitting in wrecking yards or behind old barns that used gearboxes could be had for a song. Now we have seen a few that were cracked or broken in small areas, and a decent welder had patched it up well enough to go back to work, but NEVER have we seen one that was this ‘knackered’ and welded back together! We wonder how it was that a bellhousing was completely severed all around, with no additional chunks broken out in the process? We also wonder how they were able to guarantee alignment of the two pieces, unless the break was just jagged enough that the components fit together like a key in a lock. We thoroughly checked the clutch disc and input bearings for wear, and everything appeared normal enough that the front/rear alignment must be spot-on, so we changed all the oil seals and re-installed the gearbox just as the owner had requested.May 27, 2025
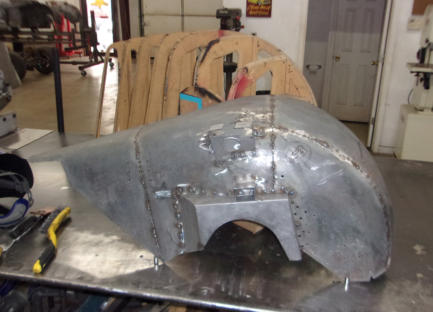
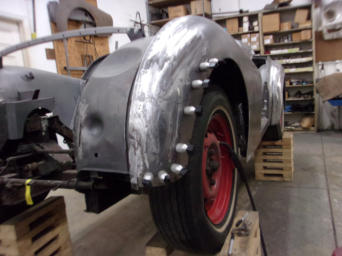
Previously, we have shown the wooden bucks (red arrow) that we use to create new TR2-TR3B inner front fenders from new flat steel. But they are also useful for repairing original parts as well. This particular inner fender (wheelarch) was all nice solid metal, just crinkled up and crudely beaten back somewhat into shape. In this case, we sliced the original apart in approximately the same places that we would seam a new part, straightened all of the component pieces individually with the help of our English Wheel and planishing hammer, then used the wooden buck to position all the pieces and weld them back together again. After solidly TIG welding all of the pieces together and grinding the welds smooth, the repaired inner fender will look (and fit) as good as new and the repairs will be impossible to see. Just as a side note, these seams are nearly identical to the seems we’ve found on TS1LO and other very early TR2’s, and replicates the way that Triumph created these parts before they had the large tooling needed to stamp them as a single piece.May 19, 2025
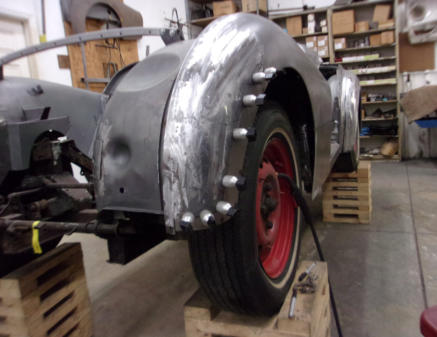
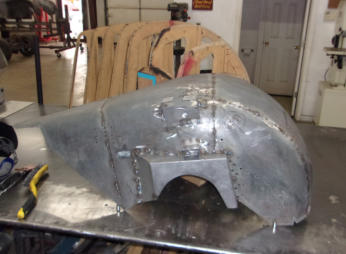
Back on November 11, 2024 (Blog 2024Q4) we showed you photos of a mostly disassembled TR2 body shell, a home restoration project that got way out of hand. We also showed this project on Nov. 18 and 25, 2024, as well as just two weeks ago on May 5, 2025. Today we can proudly proclaim that Humpty Dumpty has been put back together again, (along with several other smaller tweaks and modifications to the metalwork) and the car is happily back home in its own garage. The owner will be completing the final bodywork and paint preparation, and may even paint the car himself. The goal for completion of this 30 year project is summer of 2026, in time for the owner’s 85th birthday! Having owned and driven this very same car way back in college as the third owner, then finding and re-acquiring it as the 9th owner, it’s nice to see it over the hump and within spitting distance of completion.May 12, 2025
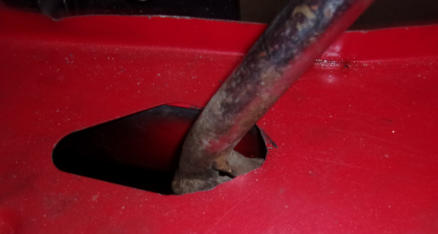
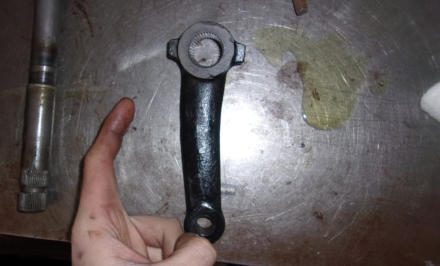
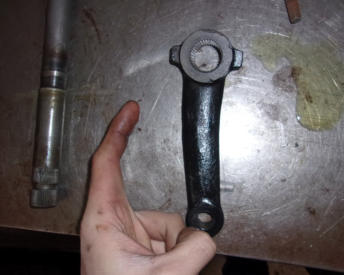
Here’s yet another example of a situation where having intimate knowledge of the Triumph TR2- TR6 range of cars pays off. Many vehicles through the years have steering components that are supposed to have strange curves and shapes to them, so someone with minimal to no TR experience might think this is how it’s supposed to be. But we work on NOTHING but TR2-TR6 cars, so we recognized immediately that this TR2-TR3B steering “drop arm” (pitman arm in USA terms) is bent, probably from an accident sometime during the last 63-73 years. It also helps that we rebuild more TR2-TR3B steering boxes than anyone in the USA, and possibly the entire world. Since we posted a “how to” page on rebuilding these steering boxes on our website over 16 years ago, most guys (and many shops) have said “screw this” and sent their boxes to us for overhaul, averaging 2 per month during that entire time. Having seen more than our fair share of these, a bent arm like this one jumps out immediately. And the best advantage of all to our specialization is that although new replacements are not available, we have plenty of good and straight used arms in stock to quickly replace this damaged one!May 5, 2025
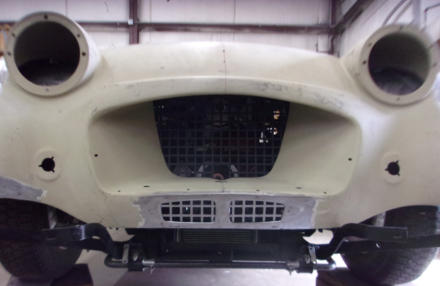
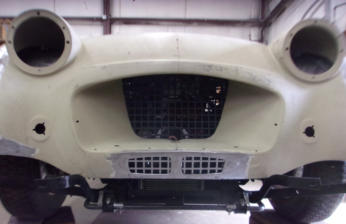
You see a lot of oil cooler air vents below the grille in period race car pics and on today’s vintage racers, and even on a few of today’s street cars that are going for the vintage racer look like this one. The owner of this TR2 even provided an extra grille (damaged) that we were able to carefully cut so that the mesh pattern worked out “even” in both of the lower openings. Now we doubt that the racers years ago took the time we did to design openings and reinforce them with round rod, nor did they weld studs to the back of the apron to fasten the grills securely as we did with this car. Quick and sloppy workmanship that wouldn’t have been noticed 50-60 years ago will stand out today (ever since Toyota commercials showed a ball bearing rolling down a hood gap), so we must pay attention to the details on everything we do here today, especially the custom modifications. We guarantee that slip-shod and half-assed work will never be found on a Macy’s Garage Triumph!April 28, 2025
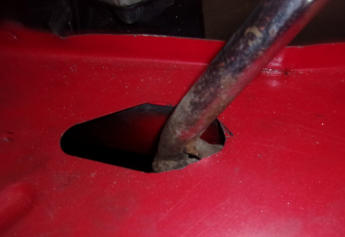
Floor mounted handbrake handles (TR2-TR4) and the holes they pass through don’t always play nice with new replacement floor pans. The holes come per-punched in the TR2-3B pans, but as can be seen here they may need a little trimming for full movement of the handle. It’s not a big deal here because we encounter the problem all the time, but for someone doing their first sidescreen car it is usually a head scratcher when the handbrake cannot be adjusted to catch and release properly. For the TR4 cars, which use the same floor pan as a TR4A-TR6, those cars have a handbrake lever mounted on the driveshaft tunnel so the replacement pans do not have any hole for a floor mounted handle. Our experience pays off once again here, and we have a template in the metal shop so that new TR4 pans (right siide only) can be modified with a precisely located hole BEFORE the pan is installed, and also having the proper shape makes sure we don’t need to waste time trimming the hole later for full travel of the lever.April 21, 2025
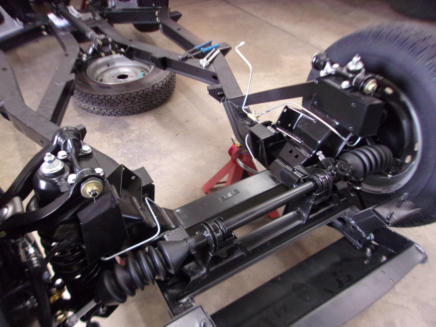
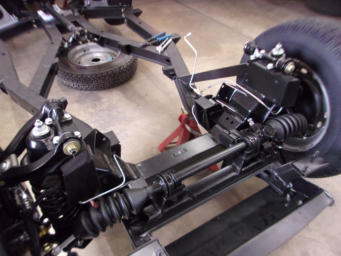
Installing new fuel and brake lines for maintenance and or repair can be done on a fully assembled car, but it can also be a royal PITA! During reassembly of a complete frame-up restoration, it’s usually regarded as one of those few remaining “loose-ends” left toward the end of the process, but again with body and engine/gearbox and most of the major components already in-place, it reverts back to one of those PITA tasks. We prefer to get after the “plumbing” early in the reassembly process while the body, engine, gearbox and exhaust are not in the way. Unfettered access speeds up the whole process, and saves our clients $ while helping us to do a cleaner and neater job of installation. Over the 20+ years we have been restoring and repairing the Triumph TR2-TR6 line EXCLUSIVELY, we’ve acquired, identified, labeled, and stored perfect examples of every single steel line (pipe) used on these cars from TS1LO through the very last TR6. At one time we had a somewhat local Columbus, OH company bending these for us on a CNC bender, but a change of company ownership and the resulting failure of quality and service meant that we had to bring the fabrication of each line back into our own shop. By purchasing just about every tubing flaring and bending tool known (short of the CNC machines), and referring to our huge collection of original patterns, the lines produced and installed here are virtually indistinguishable from the OEM Triumph lines.April 14, 2025
Rust happens in mysterious places, usually down “low” where water naturally flows, but it can also occur higher up if there’s a way for the moisture to become trapped. It doesn’t really matter to us, we’ll just make the patch panel(s) to fit the area(s) which need to be replaced. In this instance, we suppose that some mud or old undercoating created a pocket which held a rain/snow/salt mix up against the steel fender lip for a very long number of years, slowly eating away at what had once been fine British steel! Once we had removed all of the old rusty metal, and trimmed back to full thickness where we’d have something substantial to weld to, a new patch was fabricated which matched the opening precisely. We always fit the patch all around with no overlaps, then hold it in place with an assortment of special clamps and super strong magnets before the first arc is struck to begin the TIG welding process. Once the new patch has been completely welded into place, weld beads are dressed down with an assortment of grinders until we’re left with an invisible repair. Perfect fitting patches and butt welded edges are the only way to perform a lasting repair, because the old way of patching over a hole with overlapping patches only creates new pockets to hold moisture and start the rusting process all over again.April 7, 2025
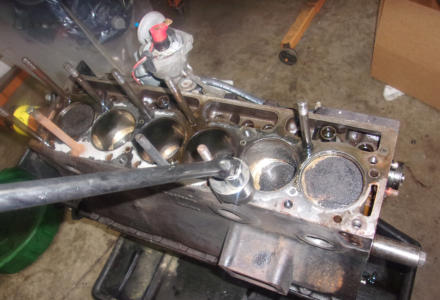
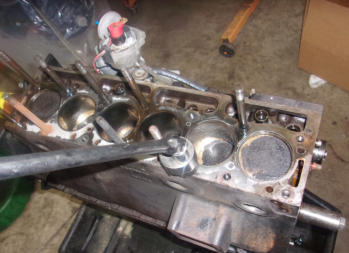
Head studs are one of those things which can sometimes be easily removed, and then there are other times (60/40) when they’ll kick your butt! Many folks will leave them in place when “rebuilding” an engine, but they quickly get in the way when you’re handling the bare block (eg. to clean it) or to run a cylinder hone down through glazed cylinders. If the block goes to the machine shop for boring or decking, the machine shop will add an extra charge to remove any studs still remaining. Most home mechanics and even a few “professionals” will lock two nuts together at the top, and if they’re lucky they can back the stud out of the hole. But with studs this large, and the tendency for long studs to flex a bit due to the distance between the two nuts at top and the frozen threads down-in the block, this is another 60/40 proposition. We always replace old (and probably stretched) studs with new high-strength ARP studs, so they always have to come out. With that in mind, it wasn’t difficult to justify the purchase of a proper stud remover to remove head studs, as well as the smaller studs used in our Triumphs. By gripping down close to the threads you need to loosen and remove, all of the torque from a long breaker bar is transmitted to the area which needs the force. Just by having this little gem in the toolbox, our success rate for head stud removal is up around 99.9%.
BLOG
2025-Q2
America’s BEST Triumph Shop


Macy’s Garage

© 2026 - Macy’s Garage, Ltd.

Blog
WHAT we’re doing, and HOW we’re doing it!
June 30, 2025
Plenty of folks associate outstanding restorations with the money spent, but truth be told we’ve seen plenty of “high dollar cars” that look like crap to knowledgeable eyes. While most are wowed by shiny chrome and paint, it’s actually attention paid to the smallest details that turns a nice car into an outstanding one. And that’s where we really shine in the Triumph world, just as there are others who have “mastered” other various makes across the vintage car spectrum. It’s knowing about and replicating the tiniest details that always makes the biggest impact. Take these metal tabs which Triumph used to secure the wiring harness to the bodies of all TR2-TR6 models. They were plain (painted) steel on the sidescreen cars (TR2- TR3B), and then covered with a soft black sleeve from TR4 and on. After being folded and unfolded around the wiring a few times, the thin steel has a tendency to crack and break off. Needless to say, just about every car we restore is missing a few and has a couple more ready to fail. As these are welded onto the bare body tub before paint, they aren’t anything which has a part number or can be ordered. But in order to provide the highest quality Triumph restorations we are known for, we have these made in batches of 500 by our local laser cutter, always on hand and ready for installation during the metal work phase of our complete restorations.June 23, 2025
Top object in the photo is a jet connecting rod assembly for the SU carburetors on a TR2-TR4. The lower item is someone’s “fix” from a very long time ago. While the lower rod did the job and pulled the rear jet down whenever the choke cable did the same to the front carb, the makeshift rod provided no adjustment as designed into the original style rod. We can only speculate as to whether this solid rod was installed during one of those long past times when practically NO repair parts were available for these “old” cars, or whether it might have been an act of frugality. Whatever the case, the current owner got a good laugh over what her father had done to keep the car running over 30 years ago. It also goes to show that when restoring any vintage vehicle, you can’t simply put it back together the way you found it. Chances are pretty good that someone else has been there before you.June 16, 2025
Photos like this from our metal shop just never get old! Just as little as 20-25 years ago, it was common to “repair” a spot like this by simply smearing ‘bondo’ over the rusted area, and hope that the little curly Q’s of filler that squeesed through the holes would help to hold it all in place. Many folks would even tap (or beat) the area down, so they could have a thicker layer of filler on top, allowing it to be sanded down to the appropriate level. While this might have looked better for a short time, it did not totally seal the area from moisture attacking from below, and within a short amount of time the smooth painted top surface would begin to bubble and crack, making it necessary to start the whole process all over again. If you were really lucky, the repeat damage wouldn’t begin to show until the car was in the hands of the next owner, who is looking only at the shiny paint and thought he was buying a nice ‘rust-free’ car. But we have since learned that the only true lasting repair is to cut out all of the rusted and weak metal, then replace it with a patch that is the perfect shape of the damaged area. This patch must be butt-welded into position (so that there is no overlapping metal to trap moisture between layers) and solidly welded to seal the paint from the effects of moisture working through from below.June 9, 2025
There’s nothing you can do that elevates the look and feel of an old car than a new interior. It’s always exciting to see new trim go into a car near the end of a restoration, as the look of the entire car gets elevated more in a couple of days than it has through the entire process. And let’s face it, the interior is the part of the vehicle that you interact with the most while driving. Everything you see and feel through the driving experience comes from the interior, and that rust on the bumper or scratch in the paint is unseen as you cruise down the road. But sit on ripped/torn seet upholstery and worn out springs and foam, no doubt you’ll notice that with every mile you travel. For this reason we perform plenty of interior upgrades on cars which aren’t getting the full restoration treatment, but looking for the most improvement bang for the owner’s buck! Now today’s interior kits are good, and we use them extensively instead of stitching everything from scratch, but like most reproduction parts they’ll still need some “adjustments” to acheive the exquisite results shown here.June 2, 2025
There once was a time when the parts inventory at current (and past) Triumph dealers was waning, or focused more on current models than past “oldies”, but we doubt that empty gearbox cases were ever a highly stocked item. They generally did not suffer wear or damage, and believe it or not, there were plenty of derilect TR’s sitting in wrecking yards or behind old barns that used gearboxes could be had for a song. Now we have seen a few that were cracked or broken in small areas, and a decent welder had patched it up well enough to go back to work, but NEVER have we seen one that was this ‘knackered’ and welded back together! We wonder how it was that a bellhousing was completely severed all around, with no additional chunks broken out in the process? We also wonder how they were able to guarantee alignment of the two pieces, unless the break was just jagged enough that the components fit together like a key in a lock. We thoroughly checked the clutch disc and input bearings for wear, and everything appeared normal enough that the front/rear alignment must be spot-on, so we changed all the oil seals and re-installed the gearbox just as the owner had requested.May 27, 2025
Previously, we have shown the wooden bucks (red arrow) that we use to create new TR2-TR3B inner front fenders from new flat steel. But they are also useful for repairing original parts as well. This particular inner fender (wheelarch) was all nice solid metal, just crinkled up and crudely beaten back somewhat into shape. In this case, we sliced the original apart in approximately the same places that we would seam a new part, straightened all of the component pieces individually with the help of our English Wheel and planishing hammer, then used the wooden buck to position all the pieces and weld them back together again. After solidly TIG welding all of the pieces together and grinding the welds smooth, the repaired inner fender will look (and fit) as good as new, and the repairs will be impossible to see. Just as a side note, these seams are nearly identical to the seems we’ve found on TS1LO and other very early TR2’s, and replicates the way that Triumph created these parts before they had the large tooling needed to stamp them as a single piece.May 19, 2025
Back on November 11, 2024 (Blog 2024Q4) we showed you photos of a mostly disassembled TR2 body shell, a home restoration project that got way out of hand. We also showed this project on Nov. 18 and 25, 2024, as well as just two weeks ago on May 5, 2025. Today we can proudly proclaim that Humpty Dumpty has been put back together again, (along with several other smaller tweaks and modifications to the metalwork) and the car is happily back home in its own garage. The owner will be completing the final bodywork and paint preparation, and may even paint the car himself. The goal for completion of this 30 year project is summer of 2026, in time for the owner’s 85th birthday! Having owned and driven this very same car way back in college as the third owner, then finding and re- acquiring it as the 9th owner, it’s nice to see it over the hump and within spitting distance of completion.May 12, 2025
Here’s yet another example of a situation where having intimate knowledge of the Triumph TR2-TR6 range of cars pays off. Many vehicles through the years have steering components that are supposed to have strange curves and shapes to them, so someone with minimal to no TR experience might think this is how it’s supposed to be. But we work on NOTHING but TR2-TR6 cars, so we recognized immediately that this TR2-TR3B steering “drop arm” (pitman arm in USA terms) is bent, probably from an accident sometime during the last 63-73 years. It also helps that we rebuild more TR2-TR3B steering boxes than anyone in the USA, and possibly the entire world. Since we posted a “how to” page on rebuilding these steering boxes on our website over 16 years ago, most guys (and many shops) have said “screw this” and sent their boxes to us for overhaul, averaging 2 per month during that entire time. Having seen more than our fair share of these, a bent arm like this one jumps out immediately. And the best advantage of all to our specialization is that although new replacements are not available, we have plenty of good and straight used arms in stock to replace this damaged one!May 5, 2025
You see a lot of oil cooler air vents below the grille in period race car pics and on today’s vintage racers, and even on a few of today’s street cars that are going for the vintage racer look like this one. The owner of this TR2 even provided an extra grille (damaged) that we were able to carefully cut so that the mesh pattern worked out “even” in both of the lower openings. Now we doubt that the racers years ago took the time we did to design openings and reinforce them with round rod, nor did they weld studs to the back of the apron to fasten the grills securely as we did with this car. Quick and sloppy workmanship that wouldn’t have been noticed 50-60 years ago will stand out today (ever since Toyota commercials showed a ball bearing rolling down a hood gap), so we must pay attention to the details on everything we do here today, especially the custom modifications. We guarantee that slip-shod and half-assed work will never be found on a Macy’s Garage Triumph!April 28, 2025
Floor mounted handbrake handles (TR2-TR4) and the holes they pass through don’t always play nice with new replacement floor pans. The holes come per-punched in the TR2-3B pans, but as can be seen here they may need a little trimming for full movement of the handle. It’s not a big deal here because we encounter the problem all the time, but for someone doing their first sidescreen car it is usually a head scratcher when the handbrake cannot be adjusted to catch and release properly. For the TR4 cars, which use the same floor pan as a TR4A-TR6, those cars have a handbrake lever mounted on the driveshaft tunnel so the replacement pans do not have any hole for a floor mounted handle. Our experience pays off once again here, and we have a template in the metal shop so that new TR4 pans (right siide only) can be modified with a precisely located hole BEFORE the pan is installed, and also having the proper shape makes sure we don’t need to waste time trimming the hole later for full travel of the lever.April 21, 2025
Installing new fuel and brake lines for maintenance and or repair can be done on a fully assembled car, but it can also be a royal PITA! During reassembly of a complete frame- up restoration, it’s usually regarded as one of those few remaining “loose-ends” left toward the end of the process, but again with body and engine/gearbox and most of the major components already in-place, it reverts back to one of those PITA tasks. We prefer to get after the “plumbing” early in the reassembly process while the body, engine, gearbox and exhaust are not in the way. Unfettered access speeds up the whole process, and saves our clients $ while helping us to do a cleaner and neater job of installation. Over the 20+ years we have been restoring and repairing the Triumph TR2-TR6 line EXCLUSIVELY, we’ve acquired, identified, labeled, and stored perfect examples of every single steel line (pipe) used on these cars from TS1LO through the very last TR6. At one time we had a somewhat local Columbus, OH company bending these for us on a CNC bender, but a change of company ownership and the resulting failure of quality and service meant that we had to bring the fabrication of each line back into our own shop. By purchasing just about every tubing flaring and bending tool known (short of the CNC machines), and referring to our huge collection of original patterns, the lines produced and installed here are virtually indistinguishable from the OEM Triumph lines.April 14, 2025
Rust happens in mysterious places, usually down “low” where water naturally flows, but it can also occur higher up if there’s a way for the moisture to become trapped. It doesn’t really matter to us, we’ll just make the patch panel(s) to fit the area(s) which need to be replaced. In this instance, we suppose that some mud or old undercoating created a pocket which held a rain/snow/salt mix up against the steel fender lip for a very long number of years, slowly eating away at what had once been fine British steel! Once we had removed all of the old rusty metal, and trimmed back to full thickness where we’d have something substantial to weld to, a new patch was fabricated which matched the opening precisely. We always fit the patch all around with no overlaps, then hold it in place with an assortment of special clamps and super strong magnets before the first arc is struck to begin the TIG welding process. Once the new patch has been completely welded into place, weld beads are dressed down with an assortment of grinders until we’re left with an invisible repair. Perfect fitting patches and butt welded edges are the only way to perform a lasting repair, because the old way of patching over a hole with overlapping patches only creates new pockets to hold moisture and start the rusting process all over again.April 7, 2025
Head studs are one of those things which can sometimes be easily removed, and then there are other times (60/40) when they’ll kick your butt! Many folks will leave them in place when “rebuilding” an engine, but they quickly get in the way when you’re handling the bare block (eg. to clean it) or to run a cylinder hone down through glazed cylinders. If the block goes to the machine shop for boring or decking, the machine shop will add an extra charge to remove any studs still remaining. Most home mechanics and even a few “professionals” will lock two nuts together at the top, and if they’re lucky they can back the stud out of the hole. But with studs this large, and the tendency for long studs to flex a bit due to the distance between the two nuts at top and the frozen threads down-in the block, this is another 60/40 proposition. We always replace old (and probably stretched) studs with new high-strength ARP studs, so they always have to come out. With that in mind, it wasn’t difficult to justify the purchase of a proper stud remover to remove head studs, as well as the smaller studs used in our Triumphs. By gripping down close to the threads you need to loosen and remove, all of the torque from a long breaker bar is transmitted to the area which needs the force. Just by having this little gem in the toolbox, our success rate for head stud removal is up around 99.9%.

America’s BEST Triumph Shop