Macy’s Garage

© 2026 - Macy’s Garage, Ltd.

Blog
WHAT we’re doing, and HOW we’re doing it!
December 28, 2020
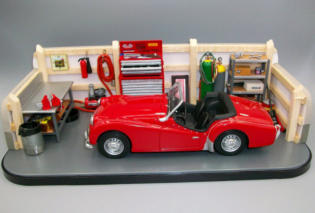
The size of the project does not matter, but the small details certainly do! Our entire team has a laser focus on the fine details, be they functional or cosmetic, and this model TR3A is just one more example to prove that point. What started out to be a replica of our GM Austin Higbee’s personal TR3A, evolved into this striking little diorama with tons of minor details. The workbench and shelf unit are faithful reproductions of fixtures here in our shop, and the torch bottles and cart are painted exactly as the torch set here at Macy’s Garage. The torch hoses are made from tiny phone wire and banded together with small segments of heat shrink tubing, while the air hose on the wall was created with electrical wire and plastic couplings on the ends. The trash can is a short section of electrical conduit, and the trash bag inside is a real miniature bag that was formed with our bag sealer. When repairing and restoring real Triumph TR’s here in our workshop, the small details which make the cars safe and reliable always receive our attention first, and for our full restorations, the details which make them stunningly beautiful follow closely behind.December 21, 2020
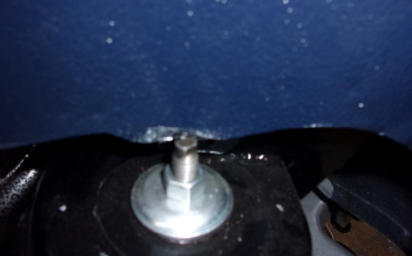
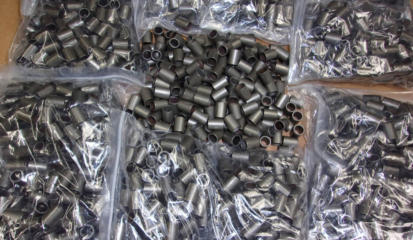
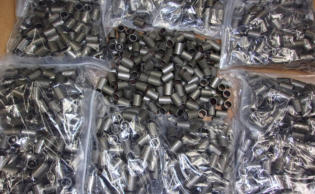
This week’s photo isn’t very sexy, but the story to go along with it is! You probably don’t recognize these little pieces of tubing, but they are VERY important to most TR’s. These are the engine fan bolt spacers (Moss 330-380), and 4 of them are used on every TR2-TR6 with a stock engine cooling fan (or one of our 4-cylinder Hurricane fans). The trouble was, the replacements available from Moss and all others were slightly too large, which made installation a really big P.I.T.A! They would go in, but not without a fight! We include 4 of these spacers in each of our fan blade mounting kits (MCY402), and previously recommended re-using stock sleeves (if you had them) instead of the larger replacements. Finally, we reached a breaking point. I went overseas and had several thousand made from the correct diameter tube. The shipping cost to bring them here was more than the price tag for the spacers, but we are now the only people on the planet with the correct fitting parts. This effort and investment is just another example of our dedication to the absolute highest quality Triumph restoration and repair.December 14, 2020
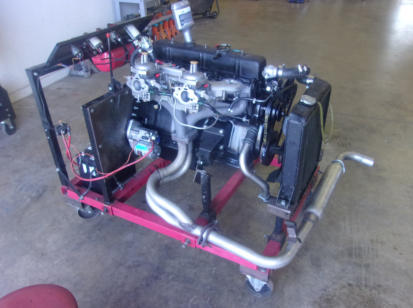
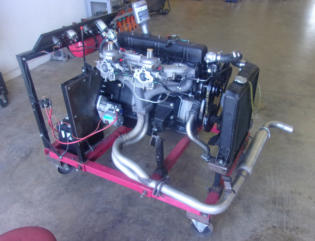
Since we mentioned test stands last week, I thought we should take this opportunity to “complete the set” with a photo of our engine test stand. Every TR engine that we rebuild here (20-25 per year) will spend time on our test rig before being re-installed into a car that is here or shipped back to the owner to complete a “self-install”. With all of the concern these days over premature camshaft and lifter wear, we want to be absolutely certain that our precise “break-in” procedure is followed, to help reduce the possibility of problems later down the road. It also gives us the opportunity to check for “excessive” oil leaks (you’ll never have a completely dry British car engine!), and general operation. Our test stand is convertible between 4 and 6- cylinder TR engines, with 2 different radiators and 4 distinct exhaust systems to accommodate all of the different versions used from TR2 - TR6. It is equipped with oil pressure and water temp gauges to help us monitor those conditions, and it has a tachometer so that we can keep the engine RPM’s within a very specific range. It takes a little extra time to set up and tear down following each engine overhaul, but it sure beats putting the engine into the car and finding out later that it needs to come back out!December 7, 2020
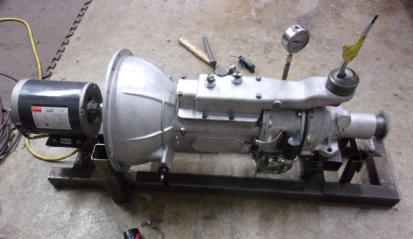
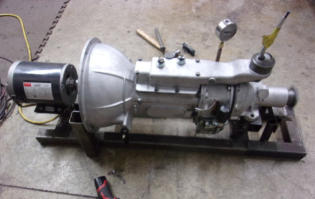
We rebuild all of our gearboxes and overdrives here at Macy’s Garage, and we do enough of them every year that it made sense many moons ago for us to build this test stand for the overdrives. We can mount the gearbox and overdrive after the rebuild or conversion, and run the electric motor to verify that the O/D is building adequate pressure and engaging as it should. If there is a problem, it’s better to find out now, long before installing the unit into the car and assembling the car enough for a road test. It also helps with the gearboxes that are shipped or delivered here without the whole car, giving peace of mind to us as well as our clients that it’s going to work properly after they get it home and installed back into their TR’s.November 30, 2020
We’ve been very busy lately trying to finish cars that were close to completion and needed to be test driven before winter weather arrived. As soon as the first snowflake touched the ground here this morning, the road crews were happy to start slinging salt around and our Triumph driving days are now over until spring. We had also taken every recent opportunity to drive our own TR’s on weekends and enjoy a pleasure cruise whenever a bright sunny day appeared. Yesterday we were able to take our own TR250 out for a few hours, and stopped by this scenic lake to snap a few pics. Never mind that the temperatures were mid 40’s, as the 250 heater and roll-up windows made it nice and cozy inside. If I would have had to drive my personal TR3 as two other members of the Macy’s team do, I might not have been so eager to head out with temps below 50. I’m not hard-core enough to deal with sidecurtains anymore!November 23, 2020
To be able to completely disassemble a 4-cyl TR engine, you must first be able to rotate the crankshaft. If the crank doesn’t turn, you won’t be able to get to all of the connecting rod bolts and release the rods from the crank. And if you can’t get the rods off of the crank, the crank isn’t coming out of the block! Frozen pistons are usually the problem, just as we showed you last week. Some mechanics will quickly throw in the towel (along with various wrenches and hammers) and start looking for another engine to rebuild. This wouldn’t be a big deal if you aren’t worried about having a “matching numbers” car, but when it was your grandfather’s car, and then your mother’s, it would be kinda nice to be able to drive it again behind the same engine as they did. So we broke out the long drill bits in an attempt to release some pressure, and the cylinder liner cracked and let go from the block. With the piston and liner now able to move, we could turn the crankshaft enough to get the rod caps off, and then the piston, rod, and liner all popped out together. These cars try to fight us from time to time, but we have a pretty resourceful team of guys here who always manage to win the battles!November 16, 2020
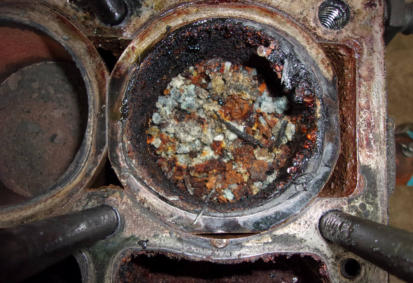
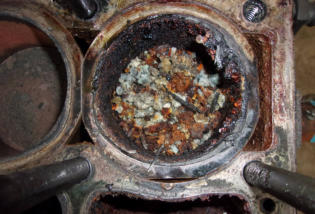
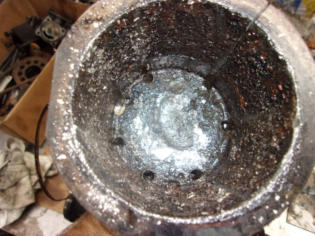
This week we take a peek inside the engine of a TR3A. This is a look into cylinder #1 after the head was removed, and it has the makings of a great science project! This particular car has a long term family history (as do most of our restoration projects), and we were told that the car had been parked when it blew a head gasket 20-25 years ago. They even had a new head gasket in the trunk, showing that someone had intended to repair the trouble but as with just about every other TR that’s been in long term storage, life got in the way. We had no problem deciding which cylinder had caused the car to be parked, but we DID have a lot of trouble getting the engine apart for a complete overhaul. Thankfully these 4-cylinder TR engines have replaceable cylinder sleeves, or this engine block would have been reduced to nothing more than a boat anchor. Check back next week and see what we had to do to free this piston so we could complete the tear-down process.November 9, 2020
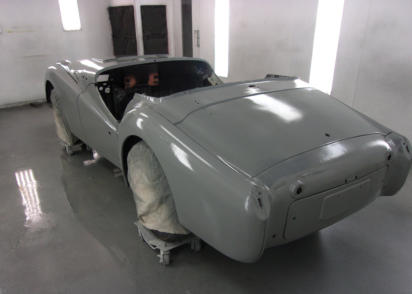
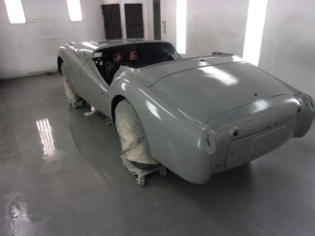
This week’s photo is the exact same TR3A shown in the final phases of metalwork two weeks ago (Oct. 26). When the metalwork is complete and a car is rolled over to our paint shop, step one is to sand down the outer body and get the bare metal covered in a good layer of epoxy primer. The epoxy not only seals the metal tightly, but it also shows the remaining minute imperfections that are too small to be seen in the bare metal. Additional hammer and dolly work can now be performed to fine tune the metal, and any areas requiring filler can be quickly identified. We use an extremely high quality filler, and apply it in very thin layers over the epoxy. After sanding to perfection, the filler will be covered with a second layer of epoxy, sealing the filler totally inside an “epoxy envelope” to guarantee longevity through the next several decades and creating a solid base for the beautiful paint which will follow.November 2, 2020
We sent this TR3A home to NJ last week, the culmination of a VERY lengthy restoration. The owner had taken the car to a transplanted “Aston-Martin bodyman”, and then waited 15 years for him to do the bodywork and paint the car. That’s right, 15 years! We were too shocked to ask for all the details, but this is surely the definition of “maximum patience”. The owner had always planned to reassemble the car himself, but with the passage of all this time, his health and recollection of how it all went back together faded, thus a change of plans was necessary. We were brought a painted body shell on a rolling chassis, and plenty of boxes full of new and used parts. Fortunately, he brought his TR3A parts and pieces to the right place, and we were able to rebuild the drivetrain and completely assemble the car in approximately 8 months. It’s probably safe to say that we are a little more efficient than the painter, but then again we would be lost too if an Aston Martin showed up at our door! The only difference is that we’re smart enough to say NO to projects outside of our expertise.October 26, 2020
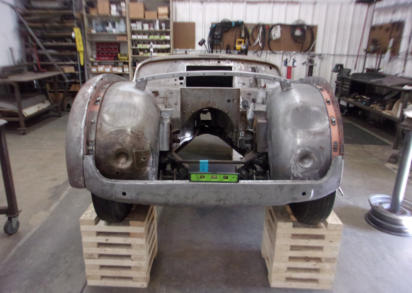
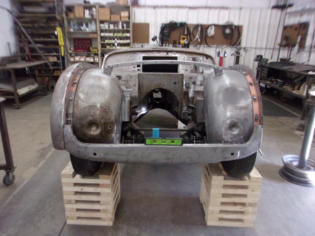
Just about every sidescreen TR that we’ve seen here has had the front apron bashed in at least once in the previous 60-70 years. We believe that parallel parking is to blame for most, as folks in their giant Buick Electras (etc.) couldn’t see the little TRs parked behind them in their mirrors. This makes finding a “better” front apron an impossible task, so we’ve had a ton of experience massaging crumpled metal aprons back into shape. For this particular TR3A the hit(s) had been particularly hard, so just like eating an elephant, the solution was to tackle it in small bites. We started with the lower section, after the flat closing panel had been removed to release the “trapped” wrinkles. Bolting this section onto the car between previously straightened front fenders was a big help with the preliminary shaping. We also added front bumper irons after straightening them in our jigs (yes, we have fixtures for this!) to exactly position this lower piece. Also note that a level was used for an additional check. The time to make sure the panels fit correctly is now, as you don’t want to discover fitting problems after the paint has been applied! The upper section of this apron will come next, and then the two halves will be welded together and the closing panel reinstalled only when everything is in perfect alignment, making a beautiful apron once again from a sow’s ear.October 19, 2020
Hey, look at me in Dad’s TR3! It’s never too late to start educating the next generation of car guys, is it? Here we see Grayson Higbee (3 mos) trying out the driver’s seat of his Dad’s TR3A. He’s having a little trouble reaching the pedals and seeing over the steering wheel, but it’s obvious he’s having a good time, none the less. Daddy will need to find a good hiding place for the keys, and hopefully it will take awhile before Grayson learns how to “Hot Wire” a Triumph. And there will be plenty of TR’s for him to cut his teeth on too, because his father Austin is the General Manager here at Macy’s Garage. I have been involved with the “Old Car Hobby” since I was just about Grayson’s age, and over the past several decades the one thing that has remained constant is the concern over the “graying” of the hobby. All the old timers are worried that the younger generation isn’t interested in cars, and perhaps they are partly to blame for constantly telling the youngsters to “Look but DON’T Touch”. Our GM Austin is only 28, and I knew he “got it” when I first interviewed him 10 years ago. The story about taking HIS father’s lawn mower apart at age 6 to see how it worked was a dead giveaway! No one remembers if the mower ever worked again, but the “Car Guy” seeds must be planted early, and it looks like Grayson is off to a good start.October 12, 2020
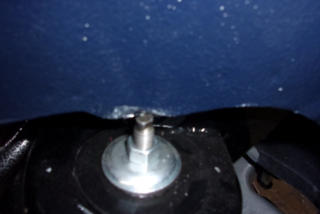
If I’ve said this once, I’ve said it 100 times; Triumph built a pretty good car, which is why so many still exist today. Yet some guys still feel the need to “improve” their cars when they only plan to drive them to the local Cars & Coffee one Saturday each month. Can the original lever arm shocks really be as bad as all the internet chatter? If you need to “tune” your shocks to lower your lap times at a track, then by all means, have at it! But for a street car, there are plenty of other places to spend your money. Don’t waste it to modify your car so that another modification is needed to make it work! This TR6 chassis was restored by the owner, with us handling the remainder of the restoration. He had not installed the rear shocks in the chassis before the car was mocked-up in our metal shop, so we did not know about this interference trouble until after the car was painted and going back together. We cut relief holes in the rear floor and fabricated covers for clearance, but if these new shocks ever need to be changed, the body will have to come off of the frame or the rear suspension will have to be stripped away to get them out. Not a well thought out “improvement” in my book!October 5, 2020
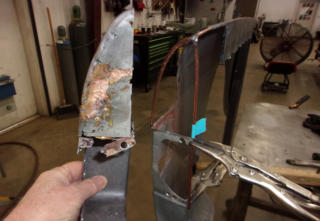
Many times, when a rusty or crashed TR body panel has been “repaired” in the past, we find that we are better off removing the botched repair and creating an entirely new section from scratch. Take the rear corner of this TR6 rear fender for example: Numerous small patches had been brazed over the top of rust perforated metal, and someone really flowed the brass in there with their torch. No way this was ever coming apart, and it had started to rust again around the edges. We cut all of this mess away, and then re-formed the shape with a few pieces of stiff welding wire, the framework of which can be seen in the photo. Once the skeleton was firmly in place, it was easy for our talented metal fabricator to form the sheet metal pieces that were TIG welded together to create another invisible Macy’s Garage repair.
BLOG
2020-Q4
America’s BEST Triumph Shop


Macy’s Garage

© 2026 - Macy’s Garage, Ltd.

Blog
WHAT we’re doing, and HOW we’re doing it!
December 28, 2020
The size of the project does not matter, but the small details certainly do! Our entire team has a laser focus on the fine details, be they functional or cosmetic, and this model TR3A is just one more example to prove that point. What started out to be a replica of our GM Austin Higbee’s personal TR3A, evolved into this striking little diorama with tons of minor details. The workbench and shelf unit are faithful reproductions of fixtures here in our shop, and the torch bottles and cart are painted exactly as the torch set here at Macy’s Garage. The torch hoses are made from tiny phone wire and banded together with small segments of heat shrink tubing, while the air hose on the wall was created with electrical wire and plastic couplings on the ends. The trash can is a short section of electrical conduit, and the trash bag inside is a real miniature bag that was formed with our bag sealer. When repairing and restoring real Triumph TR’s here in our workshop, the small details which make the cars safe and reliable always receive our attention first, and for our full restorations, the details which make them stunningly beautiful follow closely behind.December 21, 2020
This week’s photo isn’t very sexy, but the story to go along with it is! You probably don’t recognize these little pieces of tubing, but they are VERY important to most TR’s. These are the engine fan bolt spacers (Moss 330-380), and 4 of them are used on every TR2-TR6 with a stock engine cooling fan (or one of our 4-cylinder Hurricane fans). The trouble was, the replacements available from Moss and all others were slightly too large, which made installation a really big P.I.T.A! They would go in, but not without a fight! We include 4 of these spacers in each of our fan blade mounting kits (MCY402), and previously recommended re- using stock sleeves (if you had them) instead of the larger replacements. Finally, we reached a breaking point. I went overseas and had several thousand made from the correct diameter tube. The shipping cost to bring them here was more than the price tag for the spacers, but we are now the only people on the planet with the correct fitting parts. This effort and investment is just another example of our dedication to the absolute highest quality Triumph restoration and repair.December 14, 2020
Since we mentioned test stands last week, I thought we should take this opportunity to “complete the set” with a photo of our engine test stand. Every TR engine that we rebuild here (20-25 per year) will spend time on our test rig before being re-installed into a car that is here or shipped back to the owner to complete a “self-install”. With all of the concern these days over premature camshaft and lifter wear, we want to be absolutely certain that our precise “break-in” procedure is followed, to help reduce the possibility of problems later down the road. It also gives us the opportunity to check for “excessive” oil leaks (you’ll never have a completely dry British car engine!), and general operation. Our test stand is convertible between 4 and 6-cylinder TR engines, with 2 different radiators and 4 distinct exhaust systems to accommodate all of the different versions used from TR2 - TR6. It is equipped with oil pressure and water temp gauges to help us monitor those conditions, and it has a tachometer so that we can keep the engine RPM’s within a very specific range. It takes a little extra time to set up and tear down following each engine overhaul, but it sure beats putting the engine into the car and finding out later that it needs to come back out!December 7, 2020
We rebuild all of our gearboxes and overdrives here at Macy’s Garage, and we do enough of them every year that it made sense many moons ago for us to build this test stand for the overdrives. We can mount the gearbox and overdrive after the rebuild or conversion, and run the electric motor to verify that the O/D is building adequate pressure and engaging as it should. If there is a problem, it’s better to find out now, long before installing the unit into the car and assembling the car enough for a road test. It also helps with the gearboxes that are shipped or delivered here without the whole car, giving peace of mind to us as well as our clients that it’s going to work properly after they get it home and installed back into their TR’s.November 30, 2020
We’ve been very busy lately trying to finish cars that were close to completion and needed to be test driven before winter weather arrived. As soon as the first snowflake touched the ground here this morning, the road crews were happy to start slinging salt around and our Triumph driving days are now over until spring. We had also taken every recent opportunity to drive our own TR’s on weekends and enjoy a pleasure cruise whenever a bright sunny day appeared. Yesterday we were able to take our own TR250 out for a few hours, and stopped by this scenic lake to snap a few pics. Never mind that the temperatures were mid 40’s, as the 250 heater and roll-up windows made it nice and cozy inside. If I would have had to drive my personal TR3 as two other members of the Macy’s team do, I might not have been so eager to head out with temps below 50. I’m not hard-core enough to deal with sidecurtains anymore!November 23, 2020
To be able to completely disassemble a 4-cyl TR engine, you must first be able to rotate the crankshaft. If the crank doesn’t turn, you won’t be able to get to all of the connecting rod bolts and release the rods from the crank. And if you can’t get the rods off of the crank, the crank isn’t coming out of the block! Frozen pistons are usually the problem, just as we showed you last week. Some mechanics will quickly throw in the towel (along with various wrenches and hammers) and start looking for another engine to rebuild. This wouldn’t be a big deal if you aren’t worried about having a “matching numbers” car, but when it was your grandfather’s car, and then your mother’s, it would be kinda nice to be able to drive it again behind the same engine as they did. So we broke out the long drill bits in an attempt to release some pressure, and the cylinder liner cracked and let go from the block. With the piston and liner now able to move, we could turn the crankshaft enough to get the rod caps off, and then the piston, rod, and liner all popped out together. These cars try to fight us from time to time, but we have a pretty resourceful team of guys here who always manage to win the battles!November 16, 2020
This week we take a peek inside the engine of a TR3A. This is a look into cylinder #1 after the head was removed, and it has the makings of a great science project! This particular car has a long term family history (as do most of our restoration projects), and we were told that the car had been parked when it blew a head gasket 20-25 years ago. They even had a new head gasket in the trunk, showing that someone had intended to repair the trouble but as with just about every other TR that’s been in long term storage, life got in the way. We had no problem deciding which cylinder had caused the car to be parked, but we DID have a lot of trouble getting the engine apart for a complete overhaul. Thankfully these 4-cylinder TR engines have replaceable cylinder sleeves, or this engine block would have been reduced to nothing more than a boat anchor. Check back next week and see what we had to do to free this piston so we could complete the tear-down.November 9, 2020
This week’s photo is the exact same TR3A shown in the final phases of metalwork two weeks ago (Oct. 26). When the metalwork is complete and a car is rolled over to our paint shop, step one is to sand down the outer body and get the bare metal covered in a good layer of epoxy primer. The epoxy not only seals the metal tightly, but it also shows the remaining minute imperfections that are too small to be seen in the bare metal. Additional hammer and dolly work can now be performed to fine tune the metal, and any areas requiring filler can be quickly identified. We use an extremely high quality filler, and apply it in very thin layers over the epoxy. After sanding to perfection, the filler will be covered with a second layer of epoxy, sealing the filler totally inside an “epoxy envelope” to guarantee longevity through the next several decades and creating a solid base for the beautiful paint which will follow.November 2, 2020
We sent this TR3A home to NJ last week, the culmination of a VERY lengthy restoration. The owner had taken the car to a transplanted “Aston-Martin bodyman”, and then waited 15 years for him to do the bodywork and paint the car. That’s right, 15 years! We were too shocked to ask for all the details, but this is surely the definition of “maximum patience”. The owner had always planned to reassemble the car himself, but with the passage of all this time, his health and recollection of how it all went back together faded, thus a change of plans was necessary. We were brought a painted body shell on a rolling chassis, and plenty of boxes full of new and used parts. Fortunately, he brought his TR3A parts and pieces to the right place, and we were able to rebuild the drivetrain and completely assemble the car in approximately 8 months. It’s probably safe to say that we are a little more efficient than the painter, but then again we would be lost too if an Aston Martin showed up at our door! The only difference is that we’re smart enough to say NO to projects outside of our expertise.October 26, 2020
Just about every sidescreen TR that we’ve seen here has had the front apron bashed in at least once in the previous 60-70 years. We believe that parallel parking is to blame for most, as folks in their giant Buick Electras (etc.) couldn’t see the little TRs parked behind them in their mirrors. This makes finding a “better” front apron an impossible task, so we’ve had a ton of experience massaging crumpled metal aprons back into shape. For this particular TR3A the hit(s) had been particularly hard, so just like eating an elephant, the solution was to tackle it in small bites. We started with the lower section, after the flat closing panel had been removed to release the “trapped” wrinkles. Bolting this section onto the car between previously straightened front fenders was a big help with the preliminary shaping. We also added front bumper irons after straightening them in our jigs (yes, we have fixtures for this!) to exactly position this lower piece. Also note that a level was used for an additional check. The time to make sure the panels fit correctly is now, as you don’t want to discover fitting problems after the paint has been applied! The upper section of this apron will come next, and then the two halves will be welded together and the closing panel reinstalled only when everything is in perfect alignment, making a beautiful apron once again from a sow’s ear.October 19, 2020
Hey, look at me in Dad’s TR3! It’s never too late to start educating the next generation of car guys, is it? Here we see Grayson Higbee (3 mos) trying out the driver’s seat of his Dad’s TR3A. He’s having a little trouble reaching the pedals and seeing over the steering wheel, but it’s obvious he’s having a good time, none the less. Daddy will need to find a good hiding place for the keys, and hopefully it will take awhile before Grayson learns how to “Hot Wire” a Triumph. And there will be plenty of TR’s for him to cut his teeth on too, because his father Austin is the General Manager here at Macy’s Garage. I have been involved with the “Old Car Hobby” since I was just about Grayson’s age, and over the past several decades the one thing that has remained constant is the concern over the “graying” of the hobby. All the old timers are worried that the younger generation isn’t interested in cars, and perhaps they are partly to blame for constantly telling the youngsters to “Look but DON’T Touch”. Our GM Austin is only 28, and I knew he “got it” when I first interviewed him 10 years ago. The story about taking HIS father’s lawn mower apart at age 6 to see how it worked was a dead giveaway! No one remembers if the mower ever worked again, but the “Car Guy” seeds must be planted early, and it looks like Grayson is off to a good start.October 12, 2020
If I’ve said this once, I’ve said it 100 times; Triumph built a pretty good car, which is why so many still exist today. Yet some guys still feel the need to “improve” their cars when they only plan to drive them to the local Cars & Coffee one Saturday each month. Can the original lever arm shocks really be as bad as all the internet chatter? If you need to “tune” your shocks to lower your lap times at a track, then by all means, have at it! But for a street car, there are plenty of other places to spend your money. Don’t waste it to modify your car so that another modification is needed to make it work! This TR6 chassis was restored by the owner, with us handling the remainder of the restoration. He had not installed the rear shocks in the chassis before the car was mocked-up in our metal shop, so we did not know about this interference trouble until after the car was painted and going back together. We cut relief holes in the rear floor and fabricated covers for clearance, but if these new shocks ever need to be changed, the body will have to come off of the frame or the rear suspension will have to be stripped away to get them out. Not a well thought out “improvement” in my book!October 5, 2020
Many times, when a rusty or crashed TR body panel has been “repaired” in the past, we find that we are better off removing the botched repair and creating an entirely new section from scratch. Take the rear corner of this TR6 rear fender for example: Numerous small patches had been brazed over the top of rust perforated metal, and someone really flowed the brass in there with their torch. No way this was ever coming apart, and it had started to rust again around the edges. We cut all of this mess away, and then re-formed the shape with a few pieces of stiff welding wire, the framework of which can be seen in the photo. Once the skeleton was firmly in place, it was easy for our talented metal fabricator to form the sheet metal pieces that were TIG welded together to create another invisible Macy’s Garage repair.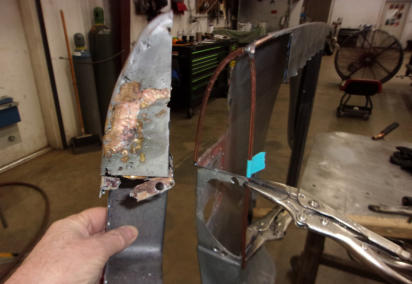


America’s BEST Triumph Shop