Macy’s Garage

© 2026 - Macy’s Garage, Ltd.

Blog
WHAT we’re doing, and HOW we’re doing it!
March 27, 2023
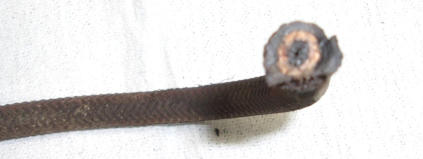
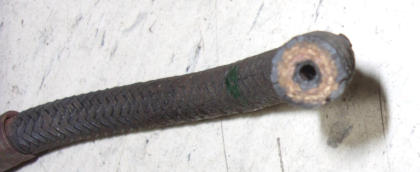
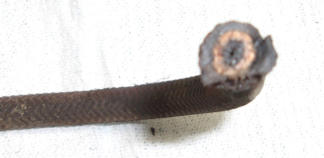
Continuing with last week’s theme regarding brakes, we have here two flexible brake hoses that have been sliced open. Now any time you see hoses with this “herringbone” pattern in the outer covering, you can safely bet that they are VERY old. Old is generally bad for rubber components, and even more so when it involves brakes and their implications for safety. While obvious damage like visible external cracks will alert you to a hose which requires replacement, it is the hidden internal damage from years of corrosive brake fluid that you should be most concerned about. Compare the well-used hose at the top to the NOS (New Old Stock) hose at the bottom. You can see that the fluid passage in the new hose is quite small compared to the outer diameter of the hose, similar to the I.D. of the 3/16” steel lines that carry most of the brake fluid. The well-used upper hose however has disintegrated inside and closed off almost completely, blocking fluid travel for both the application and the release of brake pressure. In most cases, pressure from the brake pedal and master cylinder will push through the restriction and apply the brakes, but the trouble starts when you take your foot off of the pedal and the fluid cannot freely return and immediately release 100% of the pressure. Dragging or stuck brakes are the result, and we’ve seen the same thing happen to flexible clutch hoses, keeping the clutch from smoothly engaging when you let the pedal up. Bottom line is that if you have herringbone hoses, change them NOW! And if you are using corrosive DOT-3 or DOT-4 brake fluid, plan on changing these hoses on a regular and frequent schedule.March 20, 2023
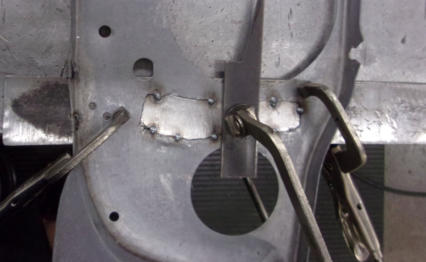
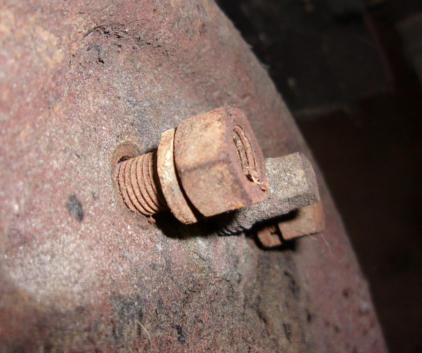
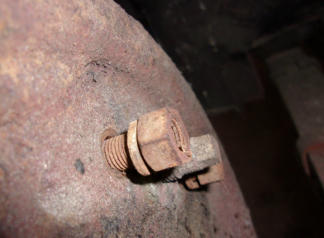
This week’s photo shows the back side of a rear brake backing plate, focused on the square adjustment stud (middle) in between 2 threaded studs with nuts and lock washers to hold the adjuster assembly in the backing plate. From the rusted stud threads, it’s obvious that this adjuster has been loose for a very long time! Needless to say, this TR3A came to our shop on a complaint that the brakes were hanging up and getting hot. The usual process for diagnosing a hot brake issue would be to raise the car and see which wheel is dragging, and then if it’s a drum brake the next step is to loosen the adjuster. That’s how we zero’d in on this part of the problem. It’s kinda hard to miss, so we don’t have any doubts that the owner and his usual mechanic both skipped troubleshooting 101, or at least napped through most of the class! What’s even more amazing is that the front disc brake calipers look to have been recently rebuilt with new pistons and a newer looking seal kit, even though one of the seals was installed incorrectly which allowed that piston to leak fluid. Never mind that the brake discs had some really deep rust pits which mandated new replacement rotors. We found even more troubles throughout this brake system, so visit next week for episode 2 of Triumph Brake Horrors!March 13, 2023
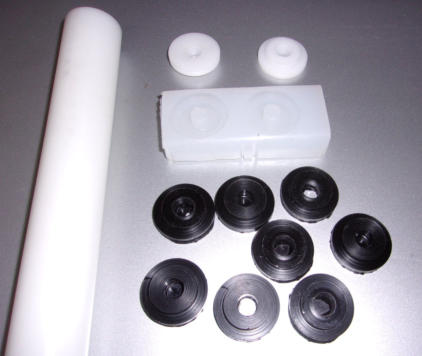
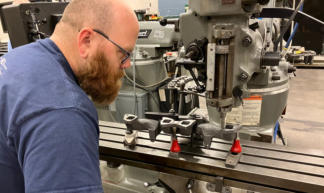
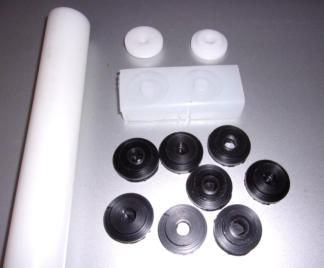
Special bushings for the TR4 radiator stay rods have not been available for many years now, perhaps because Triumph changed the design 3 times throughout the TR4 production and it’s too complicated for the mainstream suppliers. The earliest cars up to body CT1016 had steady rods connected to the inner fenders, and after that they were moved to tabs on the front frame cross tube. The earliest design is so rare, that we won’t describe how we made them work on our own CT288L. The tabs on the cross tube required a special stepped rubber bushing along with an easy to find flat rubber washer. It’s the stepped bushing which has been impossible to get for the last 10-12 years, so we finally had to break down and make them here. Starting with a Delrin (plastic) rod, we turned models of the needed bushings on our lathe. From there, we created a silicone mold around the Delrin models, and then cast new bushings in that mold using a two part urethane rubber of adequate hardness. These stepped bushings will also work on the “flat” steady rods used for the TR4A, and by drilling a larger center hole in the Delrin models we can make yet another mold to work on the very late TR4’s that had a steel sleeve through the middle (similar to but different than the steel sleeves used to install the engine cooling fans). We’ll never be able to charge enough for these babies to cover the cost to make them, but it’s worth it to assure our Triumph restorations are the always the VERY BEST!March 6, 2023
Triumph enthusiasts are very fortunate that so many parts are still available for our cars. There are however a few pieces which have never been reproduced, including most larger castings. Exhaust manifolds fit into that category, so we go to great lengths to save the old originals whenever we can. Manifolds were never painted, and had they been the paint products available 50-60 years ago wouldn’t have lasted more than a mile or two. Fortunately the high heat kept the moisture away from most and castings were thick enough that they didn’t rust through from the outside. But poor maintenance also has an ill effect, and cars that were driven with loose manifolds or blown manifold gaskets would eat away the machined sealing surfaces, making it impossible to seal with only a new gasket. Super hot exhaust gasses will quickly erode machined gasket surfaces if allowed to leak, but if caught soon enough the surfaces can be re-machined back to flat, and another “un-obtainium” part will be saved.February 27, 2023
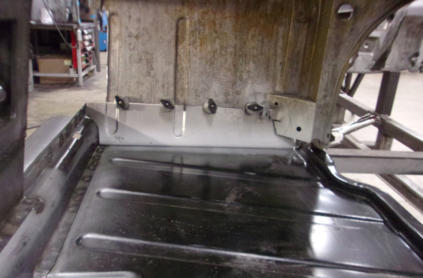
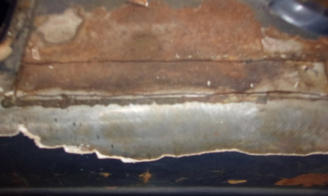
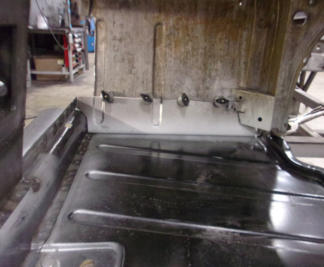
When all of the carpet and upholstery are peeled back, you can’t help but notice all of the grooves and channels that are stamped into large flat panels such as floors and firewalls. We call them ribs, and they aren’t there just for looks. The ribs actually stiffen these panels, adding strength while reducing vibrations and harmonics. On flat panels like floors, they also hold water and accelerate the rusting process at the bottom of the ribs. Once started, the rust will creep over the rest of the panel like cancer. What’s really interesting is the rust in a vertical panel such as the lower firewall shown in this photo. You would think that the water would run downhill and away from this panel, but once started at the bottom edge, it actually will creep uphill and damage all of the area above and have to be replaced. What’s important here is just how you repair a section like this, where the rust has gotten up high enough to eat away some of the stiffening ribs. Many home restorers (and some shops) will simply lay a flat piece of metal over the rust and caulk the gap where the “repair” piece crosses the rib. Others who actually cut away the rust, may still use a flat repair panel and caulking, or beat the new panel down with a hammer to somewhat align with the rib before welding. And then there is the correct way as shown here, where the ribs are returned to their original shape and size, restoring all of the strength that the factory thought was needed in this area.February 20, 2023
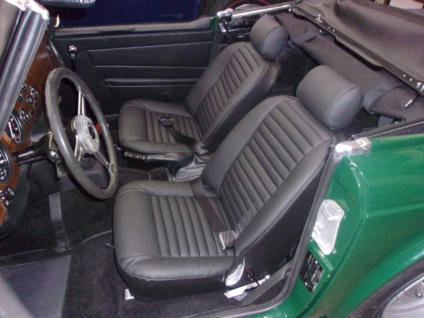
Now we have the Great Reveal, and you can see the completed transformation. It’s hard to tell this is the same TR6 that we showed last week, yet changes such as this are a routine matter around here. This car arrived with more parts in boxes than were actually bolted onto the car, so the interior upgrade was just one small part of the work we performed. We rolled it into the building on four small wheeled dollies, because all of the front suspension and part of the rear had been removed. Engine and gearbox were out too, so all of those components had to be examined, cleaned, painted, and installed. New wiring, check! Send the gauges out for restoration and a new wood dash overlay, Roger that too! Basically, we restored the entire car except for the bodywork and paint. It would have been nice if we had been able to strip and paint the frame, but as the paint and body were already done there wasn’t a reason to separate body from frame. All in all, the project was a success, and what was once a forgotten pile of parts in the corner of a warehouse, can now be driven and enjoyed by the happy owner, hopefully for many years to come.February 13, 2023
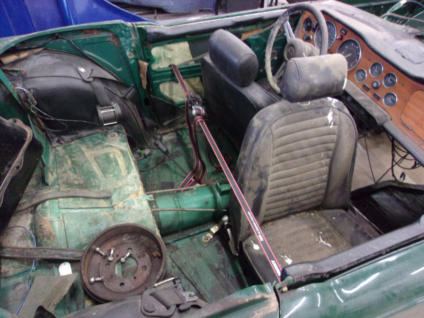
We receive Triumphs here in all different sorts of conditions, of which this TR6 is just one more example. Following disassembly many years ago, it was then shipped off to a local body shop for a “re-spray”. Hard to tell just how long that process took, but evidently long enough that the owner ran out of enthusiasm or forgot how it all went back together. After sitting in a dark corner of some warehouse for several years (the last sticker on the license plate was from 1999), it finally made it’s way here to us for “reassembly”. During the lengthy interlude between the enthusiastic disassembly and arrival at our shop, many of the small parts had been lost or misplaced, and several others had deteriorated further to where they now needed our attention. Fortunately the car made it here to us rather than some local shop who may or may not have ever seen a TR6 before, and we were able to sort through everything and return this collection of parts to a safe and driveable car that can finally be enjoyed again by the happy owner. While there are multiple before and after stories throughout this particular (and every other) car, next week we’ll show you the dramatic transformation of the interior as just one example of our skills.February 6, 2023
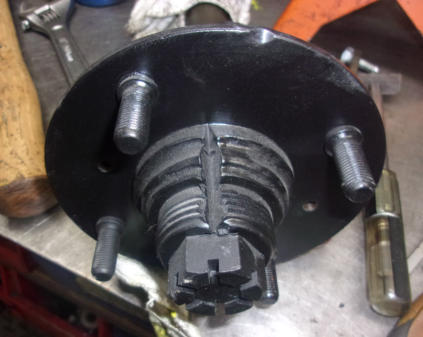
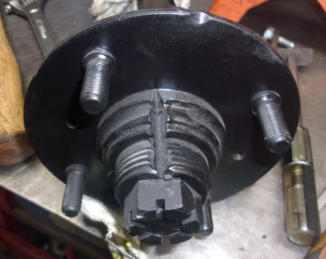
Rear axle hubs (A.K.A. Wheel Flanges) can be extremely difficult to remove from the axles without the proper tools, be they solid axle TR’s or IRS cars. At some time in the distant past, someone obviously attempted to remove this one without the proper tools! These hubs only need to be separated from the axles if you are replacing the outer hub bearing or seal, and it also helps to have the hub off if you need to replace one or more of the wheel studs. It doesn’t look like the mission was accomplished all those many years ago, as someone likely gave up after wearing themselves out with a BIG cold chisel and a very heavy hammer. Hopefully they tried this with the axle removed from the car, so as to avoid hitting the rear fender (wing) with a wild hammer swing. Obviously this is NOT the right approach, as it has certainly destroyed a very expensive hub in the process. Striking the bodywork during the attempt would have only add insult to injury! We have solid and IRS rear axles shipped to us quite frequently for repair, sometimes just to disassemble so that the owner can finish the job themselves, but most times so that we can accomplish a complete repair before boxing them up and shipping back to a waiting TR somewhere here in North America. Rest assured, we have the proper tools (and the knowledge + experience to use them)!January 30, 2023
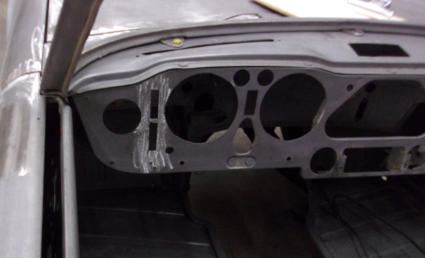
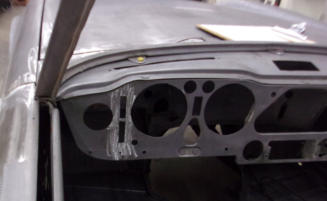
This week we complete the TR6 dash repair trilogy. The photo shows the completed dash repair, proper square switch holes, and no remaining evidence of the hammer and chisel hack job that had been performed at some time in the distant past. We do realize that this area will never be seen once the wood overlay and switches are in place. However, our goal is always to make repairs that are undetectable, either when viewing the assembled car or should anyone ever need to disassemble it again. We often amuse ourselves when looking at previous “repairs” and modifications, and ask with a smirk, “why did they do that?”. We do not intend to ever be the butt of a joke or a source of amusement to anyone at any time in the future. We always strive to actually RESTORE the whole car back to original condition, not just the parts that will be easily seen. We’ll get our Triumphs as close to original as possible, even if we happen to make them a little better than factory in the process. And if the owner requests a modification or change, we’ll do that too, but to a high standard that doesn’t involve hammers and chisels!January 23, 2023
The best fix for a mess like we showed you last week is the nuclear option and start over from ground zero. First we created a patch to fit tightly in the butchered hole and tacked it into position. From here we TIG welded the seams completely from the back side and ground the welds smooth. Now with a solid panel to work from and no holes in the damaged location, we were able to create a pattern from one of several undamaged dash panels here and mark out the locations for two new holes. From that point, cutting two rectangular holes in the proper locations with a mini cut-off wheel and a Dremel tool was a relatively simple task. We also opened them up a bit to accept the new larger switches while we were at it! A BIG part of the efficiency we bring to Triumph restorations is having been here many times before, and knowing how to head off future problems well in advance of occurrence!January 16, 2023
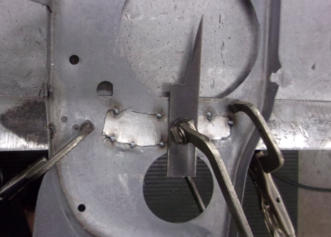
We have here today the left end of a TR6 dash panel. You normally would never get to see this because it is covered by the wood overlay and lower crash pads along the bottom edge. What isn’t right is the oddly shaped hole running vertically between the two round holes. Originally this would have been two separate holes, both being perfect rectangles for wiper and washer switches in 1969-1972, and the same rectangular switch on top for the lighting switch and an oddly shaped bottom hole for the round wiper switch and wiper warning lamp at the bottom. We have no idea why someone would have needed to crudely chop away at this metal at some point during the past 50 years, but what’s done is done so now we’ll have to fix it. I will mention at this time that some of the new reproduction wiper and light switches are slightly wider, and a small amount of metal will need to be filed away from the sides of these holes to make the new switches fit, but the modification is minimal and you’ll hopefully do a nicer job than what was previously done to this panel!January 9, 2023
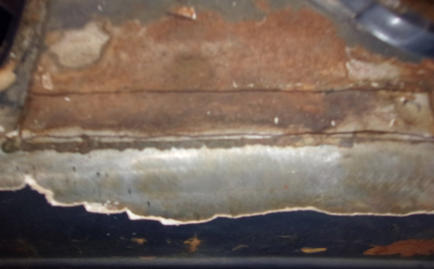
Last week we were looking at the seam where rear fenders meet the body tub on TR4-TR6 cars, and I mentioned the “quickie “ repairs made years ago which won’t last forever. No sooner had I posted last week’s Blog than we started the disassembly of this TR6, which provides an excellent example. A metal patch has been brazed over a rusty section of the rear deck along the seam line. No doubt this was intended to keep the Bondo from falling through the hole until it hardened. You can see that the Bondo eventually cracked and peeled off, leaving this area in need of yet more repair work. In fact, in going over this car at the start of a complete frame-up restoration, it is the re-work of prior bad repairs that is going to give us the most trouble. The brazed patch in this location (and the opposite side) isn’t the worst of it, because Mr. Torch the brazing expert had filled the seams with molten brass, probably expecting the liquid metal to run down into the rust holes between the body tub and fenders and “fill” the problem. What he actually did was to make the fenders and the body tub a single unit, which probably means the fenders will have to be destroyed beyond repair just to get them off of the car.January 3, 2023
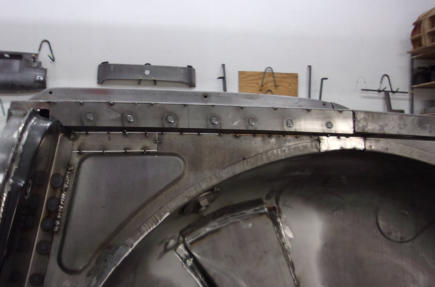
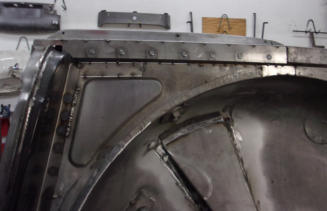
Every car and truck has a general area where they are most prone to rust. Lower front fender between the wheel opening and the front edge of the door is common, as well as the lower rear quarter panel behind the door and the rear wheel opening. On the TR4-TR6, it’s the upper seam where the rear fenders (wings) bolt on. While the shape and size of the rusty areas are always different from car to car, we know that we’ll always find trouble here. This is because Triumph assembled the bodies before painting, so this seam never received any paint or primer. Wet spray from the rear tires was always flung up into this seam, and any moisture added to bare steel will start nature’s rusting process. Add in winter road salt in the northern climates, and this spot is a rust disaster just waiting to happen, and very quickly in most cases. By now, all of these cars have had some type of quickie repair that holds up in proportion to the reduced use the cars see as collector items, but the only way to accomplish a permanent repair is to cut away all of the rust and weld in new metal as shown in the photo. These seams will be solidly welded before painting in pieces (prior to assembly) so that all bare metal can be covered.
BLOG
2023-Q1
America’s BEST Triumph Shop


Macy’s Garage

© 2026 - Macy’s Garage, Ltd.

Blog
WHAT we’re doing, and HOW we’re doing it!
March 27, 2023
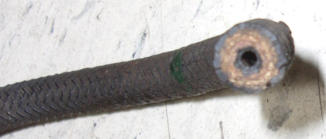
Continuing with last week’s theme regarding brakes, we have here two flexible brake hoses that have been sliced open. Now any time you see hoses with this “herringbone” pattern in the outer covering, you can safely bet that they are VERY old. Old is generally bad for rubber components, and even more so when it involves brakes and their implications for safety. While obvious damage like visible external cracks will alert you to a hose which requires replacement, it is the hidden internal damage from years of corrosive brake fluid that you should be most concerned about. Compare the well-used hose at the top to the NOS (New Old Stock) hose at the bottom. You can see that the fluid passage in the new hose is quite small compared to the outer diameter of the hose, similar to the I.D. of the 3/16” steel lines that carry most of the brake fluid. The well- used upper hose however has disintegrated inside and closed off almost completely, blocking fluid travel for both the application and the release of brake pressure. In most cases, pressure from the brake pedal and master cylinder will push through the restriction and apply the brakes, but the trouble starts when you take your foot off of the pedal and the fluid cannot freely return and immediately release 100% of the pressure. Dragging or stuck brakes are the result, and we’ve seen the same thing happen to flexible clutch hoses, keeping the clutch from smoothly engaging when you let the pedal up. Bottom line is that if you have herringbone hoses, change them NOW! And if you are using corrosive DOT-3 or DOT-4 brake fluid, plan on changing these hoses on a regular and frequent schedule.March 20, 2023
This week’s photo shows the back side of a rear brake backing plate, focused on the square adjustment stud (middle) in between 2 threaded studs with nuts and lock washers to hold the adjuster assembly in the backing plate. From the rusted stud threads, it’s obvious that this adjuster has been loose for a very long time! Needless to say, this TR3A came to our shop on a complaint that the brakes were hanging up and getting hot. The usual process for diagnosing a hot brake issue would be to raise the car and see which wheel is dragging, and then if it’s a drum brake the next step is to loosen the adjuster. That’s how we zero’d in on this part of the problem. It’s kinda hard to miss, so we don’t have any doubts that the owner and his usual mechanic both skipped troubleshooting 101, or at least napped through most of the class! What’s even more amazing is that the front disc brake calipers look to have been recently rebuilt with new pistons and a newer looking seal kit, even though one of the seals was installed incorrectly which allowed that piston to leak fluid. Never mind that the brake discs had some really deep rust pits which mandated new replacement rotors. We found even more troubles throughout this brake system, so visit next week for episode 2 of Triumph Brake Horrors!March 13, 2023
Special bushings for the TR4 radiator stay rods have not been available for many years now, perhaps because Triumph changed the design 3 times throughout the TR4 production and it’s too complicated for the mainstream suppliers. The earliest cars up to body CT1016 had steady rods connected to the inner fenders, and after that they were moved to tabs on the front frame cross tube. The earliest design is so rare, that we won’t describe how we made them work on our own CT288L. The tabs on the cross tube required a special stepped rubber bushing along with an easy to find flat rubber washer. It’s the stepped bushing which has been impossible to get for the last 10-12 years, so we finally had to break down and make them here. Starting with a Delrin (plastic) rod, we turned models of the needed bushings on our lathe. From there, we created a silicone mold around the Delrin models, and then cast new bushings in that mold using a two part urethane rubber of adequate hardness. These stepped bushings will also work on the “flat” steady rods used for the TR4A, and by drilling a larger center hole in the Delrin models we can make yet another mold to work on the very late TR4’s that had a steel sleeve through the middle (similar to but different than the steel sleeves used to install the engine cooling fans). We’ll never be able to charge enough for these babies to cover the cost to make them, but it’s worth it to assure our Triumph restorations are always the VERY BEST!March 6, 2023
Triumph enthusiasts are very fortunate that so many parts are still available for our cars. There are however a few pieces which have never been reproduced, including most larger castings. Exhaust manifolds fit into that category, so we go to great lengths to save the old originals whenever we can. Manifolds were never painted, and had they been the paint products available 50-60 years ago wouldn’t have lasted more than a mile or two. Fortunately the high heat kept the moisture away from most and castings were thick enough that they didn’t rust through from the outside. But poor maintenance also has an ill effect, and cars that were driven with loose manifolds or blown manifold gaskets would eat away the machined sealing surfaces, making it impossible to seal with only a new gasket. Super hot exhaust gasses will quickly erode machined gasket surfaces if allowed to leak, but if caught soon enough the surfaces can be re-machined back to flat, and another “un- obtainium” part will be saved.February 27, 2023
When all of the carpet and upholstery are peeled back, you can’t help but notice all of the grooves and channels that are stamped into large flat panels such as floors and firewalls. We call them ribs, and they aren’t there just for looks. The ribs actually stiffen these panels, adding strength while reducing vibrations and harmonics. On flat panels like floors, they also hold water and accelerate the rusting process at the bottom of the ribs. Once started, the rust will creep over the rest of the panel like cancer. What’s really interesting is the rust in a vertical panel such as the lower firewall shown in this photo. You would think that the water would run downhill and away from this panel, but once started at the bottom edge, it actually will creep uphill and damage all of the area above and have to be replaced. What’s important here is just how you repair a section like this, where the rust has gotten up high enough to eat away some of the stiffening ribs. Many home restorers (and some shops) will simply lay a flat piece of metal over the rust and caulk the gap where the “repair” piece crosses the rib. Others who actually cut away the rust, may still use a flat repair panel and caulking, or beat the new panel down with a hammer to somewhat align with the rib before welding. And then there is the correct way as shown here, where the ribs are returned to their original shape and size, restoring all of the strength that the factory thought was needed in this area.February 20, 2023
Now we have the Great Reveal, and you can see the completed transformation. It’s hard to tell this is the same TR6 that we showed last week, yet changes such as this are a routine matter around here. This car arrived with more parts in boxes than were actually bolted onto the car, so the interior upgrade was just one small part of the work we performed. We rolled it into the building on four small wheeled dollies, because all of the front suspension and part of the rear had been removed. Engine and gearbox were out too, so all of those components had to be examined, cleaned, painted, and installed. New wiring, check! Send the gauges out for restoration and a new wood dash overlay, Roger that too! Basically, we restored the entire car except for the bodywork and paint. It would have been nice if we had been able to strip and paint the frame, but as the paint and body were already done there wasn’t a reason to separate body from frame. All in all, the project was a success, and what was once a forgotten pile of parts in the corner of a warehouse, can now be driven and enjoyed by the happy owner, hopefully for many years to come.February 13, 2023
We receive Triumphs here in all different sorts of conditions, of which this TR6 is just one more example. Following disassembly many years ago, it was then shipped off to a local body shop for a “re-spray”. Hard to tell just how long that process took, but evidently long enough that the owner ran out of enthusiasm or forgot how it all went back together. After sitting in a dark corner of some warehouse for several years (the last sticker on the license plate was from 1999), it finally made it’s way here to us for “reassembly”. During the lengthy interlude between the enthusiastic disassembly and arrival at our shop, many of the small parts had been lost or misplaced, and several others had deteriorated further to where they now needed our attention. Fortunately the car made it here to us rather than some local shop who may or may not have ever seen a TR6 before, and we were able to sort through everything and return this collection of parts to a safe and driveable car that can finally be enjoyed again by the happy owner. While there are multiple before and after stories throughout this particular (and every other) car, next week we’ll show you the dramatic transformation of the interior as just one example of our skills.February 6, 2023
Rear axle hubs (A.K.A. Wheel Flanges) can be extremely difficult to remove from the axles without the proper tools, be they solid axle TR’s or IRS cars. At some time in the distant past, someone obviously attempted to remove this one without the proper tools! These hubs only need to be separated from the axles if you are replacing the outer hub bearing or seal, and it also helps to have the hub off if you need to replace one or more of the wheel studs. It doesn’t look like the mission was accomplished all those many years ago, as someone likely gave up after wearing themselves out with a BIG cold chisel and a very heavy hammer. Hopefully they tried this with the axle removed from the car, so as to avoid hitting the rear fender (wing) with a wild hammer swing. Obviously this is NOT the right approach, as it has certainly destroyed a very expensive hub in the process. Striking the bodywork during the attempt would have only add insult to injury! We have solid and IRS rear axles shipped to us quite frequently for repair, sometimes just to disassemble so that the owner can finish the job themselves, but most times so that we can accomplish a complete repair before boxing them up and shipping back to a waiting TR somewhere here in North America. Rest assured, we have the proper tools (and the knowledge + experience to use them)!January 30, 2023
This week we complete the TR6 dash repair trilogy. The photo shows the completed dash repair, proper square switch holes, and no remaining evidence of the hammer and chisel hack job that had been performed at some time in the distant past. We do realize that this area will never be seen once the wood overlay and switches are in place. However, our goal is always to make repairs that are undetectable, either when viewing the assembled car or should anyone ever need to disassemble it again. We often amuse ourselves when looking at previous “repairs” and modifications, and ask with a smirk, “why did they do that?”. We do not intend to ever be the butt of a joke or a source of amusement to anyone at any time in the future. We always strive to actually RESTORE the whole car back to original condition, not just the parts that will be easily seen. We’ll get our Triumphs as close to original as possible, even if we happen to make them a little better than factory in the process. And if the owner requests a modification or change, we’ll do that too, but to a high standard that doesn’t involve hammers and chisels!January 23, 2023
The best fix for a mess like we showed you last week is the nuclear option and start over from ground zero. First we created a patch to fit tightly in the butchered hole and tacked it into position. From here we TIG welded the seams completely from the back side and ground the welds smooth. Now with a solid panel to work from and no holes in the damaged location, we were able to create a pattern from one of several undamaged dash panels here and mark out the locations for two new holes. From that point, cutting two rectangular holes in the proper locations with a mini cut-off wheel and a Dremel tool was a relatively simple task. We also opened them up a bit to accept the new larger switches while we were at it! A BIG part of the efficiency we bring to Triumph restorations is having been here many times before, and knowing how to head off future problems well in advance of occurrence!January 16, 2023
We have here today the left end of a TR6 dash panel. You normally would never get to see this because it is covered by the wood overlay and lower crash pads along the bottom edge. What isn’t right is the oddly shaped hole running vertically between the two round holes. Originally this would have been two separate holes, both being perfect rectangles for wiper and washer switches in 1969-1972, and the same rectangular switch on top for the lighting switch and an oddly shaped bottom hole for the round wiper switch and wiper warning lamp at the bottom. We have no idea why someone would have needed to crudely chop away at this metal at some point during the past 50 years, but what’s done is done so now we’ll have to fix it. I will mention at this time that some of the new reproduction wiper and light switches are slightly wider, and a small amount of metal will need to be filed away from the sides of these holes to make the new switches fit, but the modification is minimal and you’ll hopefully do a nicer job than what was previously done to this panel!January 9, 2023
Last week we were looking at the seam where rear fenders meet the body tub on TR4-TR6 cars, and I mentioned the “quickie “ repairs made years ago which won’t last forever. No sooner had I posted last week’s Blog than we started the disassembly of this TR6, which provides an excellent example. A metal patch has been brazed over a rusty section of the rear deck along the seam line. No doubt this was intended to keep the Bondo from falling through the hole until it hardened. You can see that the Bondo eventually cracked and peeled off, leaving this area in need of yet more repair work. In fact, in going over this car at the start of a complete frame-up restoration, it is the re-work of prior bad repairs that is going to give us the most trouble. The brazed patch in this location (and the opposite side) isn’t the worst of it, because Mr. Torch the brazing expert had filled the seams with molten brass, probably expecting the liquid metal to run down into the rust holes between the body tub and fenders and “fill” the problem. What he actually did was to make the fenders and the body tub a single unit, which probably means the fenders will have to be destroyed beyond repair just to get them off of the car.January 3, 2023
Every car and truck has a general area where they are most prone to rust. Lower front fender between the wheel opening and the front edge of the door is common, as well as the lower rear quarter panel behind the door and the rear wheel opening. On the TR4-TR6, it’s the upper seam where the rear fenders (wings) bolt on. While the shape and size of the rusty areas are always different from car to car, we know that we’ll always find trouble here. This is because Triumph assembled the bodies before painting, so this seam never received any paint or primer. Wet spray from the rear tires was always flung up into this seam, and any moisture added to bare steel will start nature’s rusting process. Add in winter road salt in the northern climates, and this spot is a rust disaster just waiting to happen, and very quickly in most cases. By now, all of these cars have had some type of quickie repair that holds up in proportion to the reduced use the cars see as collector items, but the only way to accomplish a permanent repair is to cut away all of the rust and weld in new metal as shown in the photo. These seams will be solidly welded before painting in pieces (prior to assembly) so that all bare metal can be covered.

America’s BEST Triumph Shop