Macy’s Garage

© 2026 - Macy’s Garage, Ltd.

Blog
WHAT we’re doing, and HOW we’re doing it!
June 24, 2024
The Triumph Register of America (TRA) held their 50th Anniversary meet last week, and we took both Tonda’s 1961 TR4 (CT288L) and Mark’s 1957 TR3 (TS17734L). Shown here is the TR4. This car has been to TRA only once before (in 2018), when it was awarded Best of Show (BOS) honors on top of the club’s first ever perfect 100 point judged score in the history of the club. TRA sends all former BOS winners to the “Premier” class for at least 5 years, where they are still judged but ineligible to win BOS a second time. We considered re-entering the “normal” concours this year, but there were two cars competing for BOS that had been at our shop for a lot of work, and we didn’t want to compete with our own clients. So while Tonda’s TR4 was again judged to be a perfect 100 points (6 years after the first time), she was still not eligible for Best of Show honors. And now there are only TWO times that a car has achieved the perfect 100 points in the 50 year history of TRA, and both times it just happened to be this same car!June 17, 2024
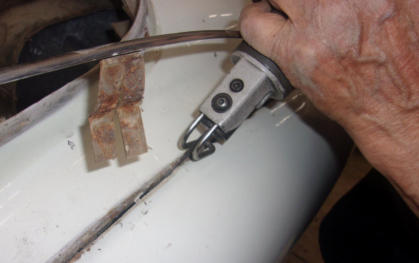
Here’s a little piece of Triumph trivia that you’ll never see anywhere else, two different patterns for the TR2 tonneau covers. If you bother to look at the footnote under the “Stayfast” covers in the Moss catalog, it implies that their one pattern fits ALL TR2-TR3A (up to TS41742) with only a fastener change required due to the “Baby” Tenax fasteners on the earliest TR2’s. But drop down to the vinyl tonneau covers and they do list a separate part number for the TR2 with “Tenax” fasteners (but NOT the babies!) up to TS5255, and then presumably the same pattern with Lift the Dot fasteners after that. But if you look in the Standard-Triumph Spare Parts Catalogue in the ‘High Speed Equipment” section, you’ll find another part number that’s been broken out for the very earliest TR2’s from TS1-TS1871. That’s what we’re showing here. The very first TR2’s had the tenax pegs AHEAD of the dash rail capping, so a longer tonneau cover was required (if fitted). Look closely at this photo to see the lower cover in this stack. You can just see it sticking out around the edges of the top cover that Moss sells to fit “everything”. If you are fortunate enough to have one of the first 1871 TR2’s that need the earliest pattern tonneau, save yourself some time/trouble and order it from John Skinner Co. in the UK. They have the correct pattern for these very early cars.June 10, 2024
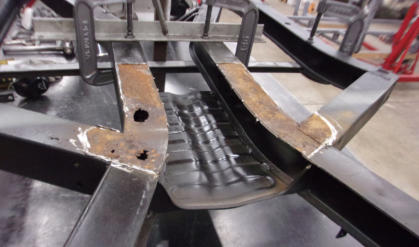
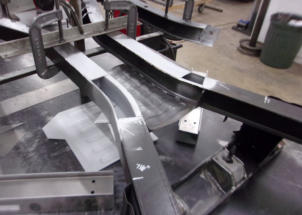
Final installment of the IRS frame repair (TR4A-TR6). Admittedly, this isn’t the worst frame that we’ve ever saved, but the process is much the same. New trailing arm mount boxes and lower T-shirt have been installed. All of the hidden “weak” rusty areas have been replaced with new solid steel of the same gauge as original. The frame is now just as strong, straight, and true as the day it was fabricated in England 50 some years ago. The hidden areas inside that were opened-up for repair have been cleaned and painted. All we need to do now is complete the paint on the outside of the frame and it’s ready to start assembling the chassis. We’re always happy to perform quick and easy (for us) projects like this for all home restorers and lesser experienced or equipped shops. So, if you have a TR6 with a questionable frame, give us a call before you shell out the big bucks for a new replacement.June 3, 2024
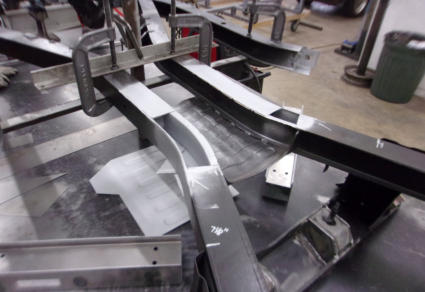
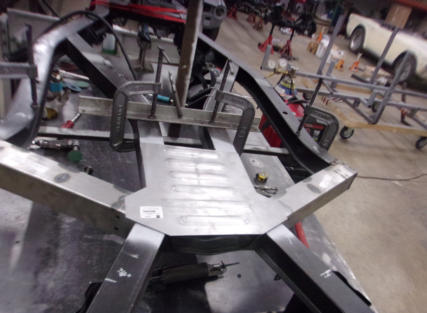
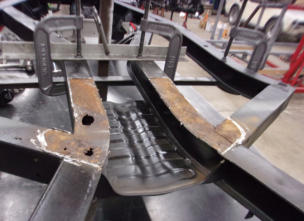
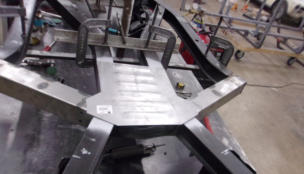
Week two of our 3 week look into this TR6 frame repair. In actual time, this only took 2-3 days and cost the client less than $2000. Much better than the $7k plus he was looking at for a completely new frame (plus options and shipping!). You can plainly see where the weak sections have been removed from the two central rails, and the inside of each box has been cleaned and painted. Look close and compare this to last week’s photo and you can see that both trailing arm mount sections and a large portion of the outer perimeter frame is missing from the upper right corner of this week’s pic. There is no need to be concerned about repairing a frame like this because a close look at any frame will show that they were originally fabricated from many smaller pieces that were welded together. The factory had a jig to hold all of the pieces in alignment before they were welded, and the new frames which are available for that $7k price tag are made by the same exact process. We too have our own flat frame table and jig to hold all of the pieces in alignment, so all frames repaired here will be just as strong and true as a good original or a 100% new frame. The only thing lacking is the high cost! May 28, 2024 The Triumph TR4A-TR6 frames are very prone to rust, so much so that we created our own frame table so that we can repair them here. The first place where this rust becomes visible is usually the rear suspension trailing arm mount sections, and digging in to repair those will usually reveal additional “hidden” damage. It’s usually enough to repair while pieces are removed using carefully fabricated sections of the same gauge steel, and TIG welding it all solidly in place. In this week’s photo, only the lower “T-Shirt” in the center has been removed. As the bottom is always going to be where the worst rust happens, we will work most of the repairs with the frame positioned upside-down and firmly secured onto our frame table. Next week we’ll show this same angle again, but after all of the weak and rusty sections have been removed.May 20, 2024
Just about anyone with a few basic tools can tear an old car apart. Whether it ever goes back together again is another matter. Part of that equation is the care and finesse that goes into the disassembly process, as you really should pay close attention that nothing more is damaged in the process. There’s already enough that will need work without creating more by a ”take no prisoners” approach. Destroy some hard to find part through careless disassembly, and your restoration might come to a halt before it really gets started. We like to call our process a “surgical disassembly”, and we take our time to plan and avoid inflicting any additional damage. This photo shows a TR3A which recently arrived for a complete restoration. It has been one of the most difficult disassemblies we’ve ever experienced. Every single bolt holding each of the four fenders needed to be cut off, and here is just one of the tricks we used. A small air saw and a tiny reciprocating blade will just fit between the body tub and the fenders, allowing each of the frozen bolts and spinning cage nuts to be sliced apart without damaging either panel. Time consuming, yes. But so is repairing fenders and body tubs that were carelessly damaged.May 13, 2024
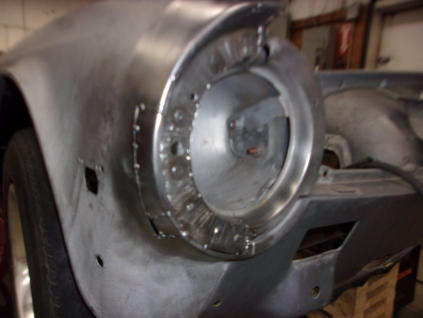
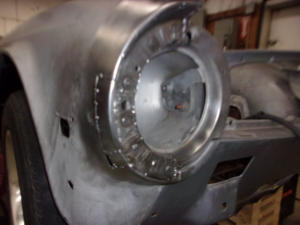
Every car has “typical” places where they will rust, and the headlight area of a TR6 is one of them. Believe it or not, the top of the tires will actually fling water, snow, salt, dirt, etc. forward, and there is just enough of a pocket here to collect it and promote rust. Think back to the 1955 and 1956 Chevy’s that were common when I was in high school. Only about 14-15 years old at the time, and most of them in Ohio were rusted above the top of the headlights. If not, they had already been repaired by the “cap” patches that sold like crazy through J. C. Whitney or the Western Auto stores. Unfortunately, “caps” are not available for the TR6 front fenders, so we have to create them in our metal shop. This is also an area where 3 different pieces come together in layers, so we make our repair pieces in three layers to match. While many will still lay screen wire in here and slather it with Bondo, basically sculpting the “repair” from filler, a replacement cap made in the same manner as the original is really the only correct way to save an otherwise decent fender for continued use on a beautiful TR6 restoration.May 6, 2024
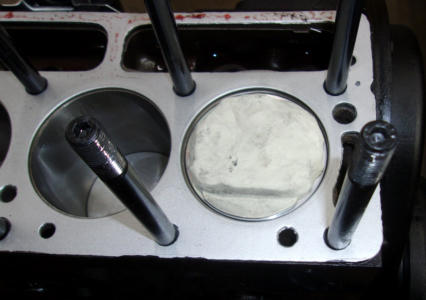
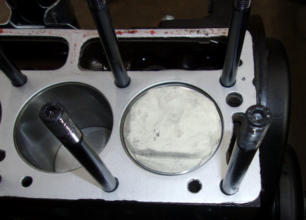
We are presently rebuilding a TR6 engine that had previously had a large amount of work done (at an MG shop!) and wouldn’t run very long without bending pushrods. The most recent work was a camshaft and cylinder head package, and nothing done to the short block. We pulled the head and found the cylinders to be terribly scored, but no indication of valves touching the pistons to bend the pushrods. That was caused by a couple of valves seized in the valve guides, a problem we’ve also seen in the past when using bronze valve guides. So, it needed a full and complete rebuild. On reassembly, we found that the head had been shaved by a huge amount, resulting in the push rods being too long for correct valve adjustment, also a contributing factor to the bent pushrods. The previous new camshaft was badly scored, so we replaced the camshaft as part of the rebuild. Which brings us to this week’s photo. Needing to make sure that the severe head shave would still allow the valves to clear with a different cam, we performed a “clay the pistons” test. Modeling clay is placed on top of the pistons, and the head is installed with rocker shaft/pushrods adjusted. Then you crank the engine over by hand and disassemble to measure the thickness of the clay and verify the valve to piston clearance.April 29, 2024
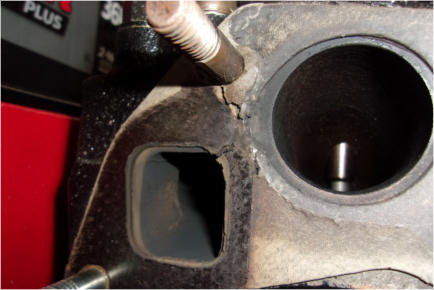
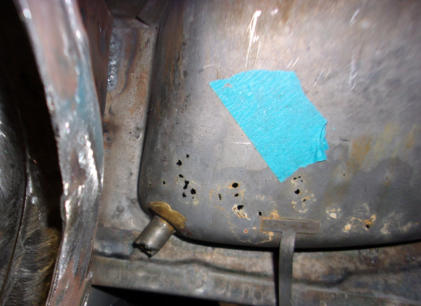
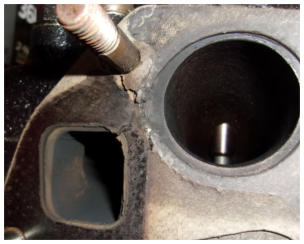
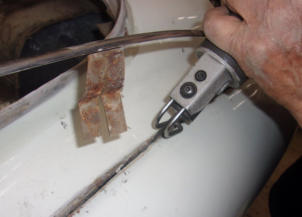
Cars can and will rust in some strange places, often places where you would never think to look. Not until you notice water on your carpet after a car wash or a drive in the rain would you start an investigation leading to this spot. This is the lower outer corner of the scuttle plenum, or in other words the chamber under the cowl vent that feeds fresh air to the heater and vent system of a TR4-TR6. You can see the little hose nipple in the corner. This is supposed to collect any water that enters the plenum from above, then drain it out at the rear edge of the front fenders. Inside the plenum is an area which never received any paint from the factory, all bare steel so it’s going to rust. Rust flakes and any other dirt and debris which enters through an open vent (or TR6 plastic grille) will clog the tube and hold the water inside, accelerating the rust until it breaks through like this (or more). We’ve had cars with this whole corner missing. Debris can also clog the drain hole at the bottom of the fender, and when that hole clogs, it’s a major contributor to the front fenders rusting along the lower edge.April 22, 2024
It’s always fun to find obvious problems that others have missed. We have a TR3A here that was sent to us after two previous attempts to rebuild the engine had yeilded poor results. The engine had a serious shake and vibration which the locals couldn’t find, and the owner fully expected that we would have to rebuild the engine once more to get to the bottom of the problem. Rather than dive right in with an expensive overhaul and balancing operation, we opted to perform a little diagnosis first, and see if there wasn’t a more simple fix. While confirming that the plug wires were in the correct firing order and checking the ignition timing (simple problems we’ve seen far too many times), we did hear a loud hiss originating on the right side of the engine. From there, it didn’t take a rocket scientist to notice that a couple of the intake and exhaust manifold studs were too long and the nuts had bottomed out before securing the manifolds tightly to the head. The next logical step was to pull the manifolds and look at the gaskets, which were indeed the source of a major vacuum leak and the cause of all the shaking. After new gaskets and a couple of correct length studs, the engine now runs as smooth as silk, without the time and expense of yet another engine rebuild!April 15, 2024
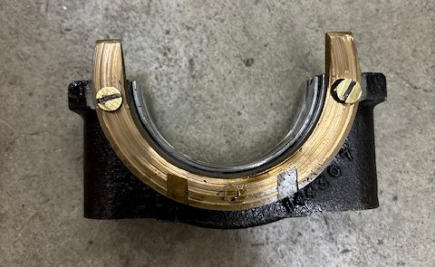
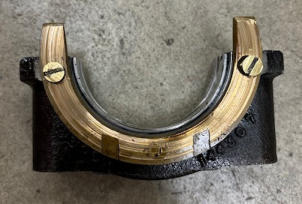
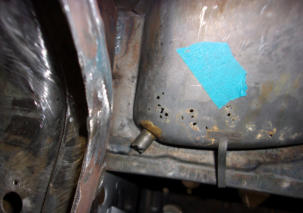
Thrust washers in the 6-cyl Triumph engines have been known to be problematic. Allow the wear to get bad enough and they will drop out into the oil pan. When that happens, the crankshaft is pushed forward to a point where it wears against the engine block and main bearing cap, making an awful racket and ruining those components. If you watch the crankshaft end float (annually) and don’t sit at traffic lights with the clutch pedal depressed (or other driving habits that accelerate the thrust bearing wear) you’ll probably never have a problem. We removed the oil pan on this TR6 just to replace the gasket, and owing to our Triumph experience we decided to check the crank end float while we were there. The spec is .006”-.008”, and this one measured .030”, approaching the danger zone. After patting ourselves on the back for being proactive and saving the owner some money by changing thrust bearings while the pan was already off only felt good until we dropped the main cap. The owner just bought this car, so we assume that the prior owner did this “repair” just long enough to get the car sold. The crankshaft is ruined, and the current owner does not want to fix it. The owner’s wife says SELL, and hopefully the sellers will let potential buyers know that it needs a major engine overhaul.April 8, 2024
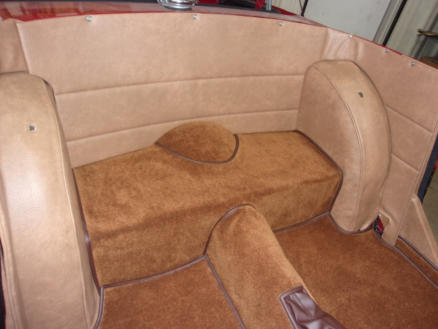
Here we have the finished update of the TR6 interior from last week. New carpet and wheelarch padding, but all of the rest are the same old components shown in last week’s photo. Just the wheelarches alone would have been a huge improvement, getting the seams straight and removing the wrinkles, but a slight color change to the carpet was a big help as well. Minor tweaks to the side and rear panels helped too, although too minor to show up in the pics. The hard backing on the side panels means that they will always wrinkle where they curve to meet the rear gas tank panel, but it’s not a big deal as they are hidden when the soft top is folded down, and way back in a dark shadow that makes them less visible when the top is up. Front carpets should be considered a “normal wear” item, and are usually the first interior component to show their age. The crisp lines of carpet will wear away gradually so it usually doesn’t get noticed until it looks really bad. Keep a careful watch on it, you’ll see the signs much earlier than you might expect. If you drive your car frequently, especially when your drives are short and you get in & out repeatedly without adding many miles, you will probably see a big improvement if you plan on replacing the carpet every 5-10 years.April 1, 2024
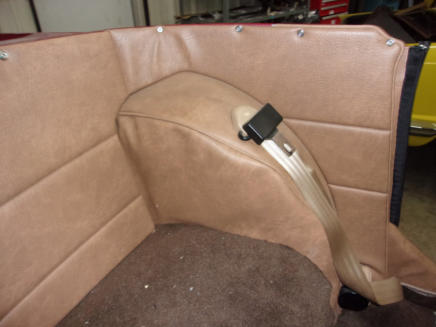
Sometimes, just a little detail work is all that’s needed to improve the “cosmetics” of your Triumph. Take this TR6 for example. The interior was actually in pretty good shape, but a sloppy installation left it looking a little bit “rough”. While the car was here for an engine rebuild and a moderate sized list of smaller items to address, it was decided that we should tidy-up the interior and make the car more appealing. The biggest mistake here is with the wheel arch covers, and a lot of folks struggle to get these right. It doesn’t help that some of the interior suppliers send the wrong type of padding in their kits, and poor looking covers were so common that we posted a page on our website about them many many years ago: https://macysgarage.com/wheelarch%20cvr.htm Check back with us next week and see how new wheel arch padding and several fitting adjustments (plus a new carpet set) brought this TR6 interior up to something the owner and his family will be proud to sit in.
BLOG
2024-Q2
America’s BEST Triumph Shop


Macy’s Garage

© 2026 - Macy’s Garage, Ltd.

Blog
WHAT we’re doing, and HOW we’re doing it!
June 24, 2024
The Triumph Register of America (TRA) held their 50th Anniversary meet last week, and we took both Tonda’s 1961 TR4 (CT288L) and Mark’s 1957 TR3 (TS17734L). Shown here is the TR4. This car has been to TRA only once before (in 2018), when it was awarded Best of Show (BOS) honors on top of the club’s first ever perfect 100 point judged score in the history of the club. TRA sends all former BOS winners to the “Premier” class for at least 5 years, where they are still judged but ineligible to win BOS a second time. We considered re-entering the “normal” concours this year, but there were two cars competing for BOS that had been at our shop for a lot of work, and we didn’t want to compete with our own clients. So while Tonda’s TR4 was again judged to be a perfect 100 points (6 years after the first time), she was still not eligible for Best of Show honors. And now there are only TWO times that a car has achieved the perfect 100 points in the 50 year history of TRA, and both times it just happened to be this same car!June 17, 2024
Here’s a little piece of Triumph trivia that you’ll never see anywhere else, two different patterns for the TR2 tonneau covers. If you bother to look at the footnote under the “Stayfast” covers in the Moss catalog, it implies that their one pattern fits ALL TR2-TR3A (up to TS41742) with only a fastener change required due to the “Baby” Tenax fasteners on the earliest TR2’s. But drop down to the vinyl tonneau covers and they do list a separate part number for the TR2 with “Tenax” fasteners (but NOT the babies!) up to TS5255, and then presumably the same pattern with Lift the Dot fasteners after that. But if you look in the Standard- Triumph Spare Parts Catalogue in the ‘High Speed Equipment” section, you’ll find another part number that’s been broken out for the very earliest TR2’s from TS1- TS1871. That’s what we’re showing here. The very first TR2’s had the tenax pegs AHEAD of the dash rail capping, so a longer tonneau cover was required (if fitted). Look closely at this photo to see the lower cover in this stack. You can just see it sticking out around the edges of the top cover that Moss sells to fit “everything”. If you are fortunate enough to have one of the first 1871 TR2’s that need the earliest pattern tonneau, save yourself some time/trouble and order it from John Skinner Co. in the UK. They have the correct pattern for these very early cars.June 10,2024
Final installment of the IRS frame repair (TR4A-TR6). Admittedly, this isn’t the worst frame that we’ve ever saved, but the process is much the same. New trailing arm mount boxes and lower T-shirt have been installed. All of the hidden “weak” rusty areas have been replaced with new solid steel of the same gauge as original. The frame is now just as strong, straight, and true as the day it was fabricated in England 50 some years ago. The hidden areas inside that were opened-up for repair have been cleaned and painted. All we need to do now is complete the paint on the outside of the frame and it’s ready to start assembling the chassis. We’re always happy to perform quick and easy (for us) projects like this for all home restorers and lesser experienced or equipped shops. So, if you have a TR6 with a questionable frame, give us a call before you shell out the big bucks for a new replacement.June 3, 2024
Week two of our 3 week look into this TR6 frame repair. In actual time, this only took 2-3 days and cost the client less than $2000. Much better than the $7k plus he was looking at for a completely new frame (plus options and shipping!). You can plainly see where the weak sections have been removed from the two central rails, and the inside of each box has been cleaned and painted. Look close and compare this to last week’s photo and you can see that both trailing arm mount sections and a large portion of the outer perimeter frame is missing from the upper right corner of this week’s pic. There is no need to be concerned about repairing a frame like this because a close look at any frame will show that they were originally fabricated from many smaller pieces that were welded together. The factory had a jig to hold all of the pieces in alignment before they were welded, and the new frames which are available for that $7k price tag are made by the same exact process. We too have our own flat frame table and jig to hold all of the pieces in alignment, so all frames repaired here will be just as strong and true as a good original or a 100% new frame. The only thing lacking is the high cost!May 28, 2024
The Triumph TR4A-TR6 frames are very prone to rust, so much so that we created our own frame table so that we can repair them here. The first place where this rust becomes visible is usually the rear suspension trailing arm mount sections, and digging in to repair those will usually reveal additional “hidden” damage. It’s usually enough to repair while pieces are removed using carefully fabricated sections of the same gauge steel, and TIG welding it all solidly in place. In this week’s photo, only the lower “T- Shirt” in the center has been removed. As the bottom is always going to be where the worst rust happens, we will work most of the repairs with the frame positioned upside- down and firmly secured onto our frame table. Next week we’ll show this same angle again, but after all of the weak and rusty sections have been removed.May 20, 2024
Just about anyone with a few basic tools can tear an old car apart. Whether it ever goes back together again is another matter. Part of that equation is the care and finesse that goes into the disassembly process, as you really should pay close attention that nothing more is damaged in the process. There’s already enough that will need work without creating more by a ”take no prisoners” approach. Destroy some hard to find part through careless disassembly, and your restoration might come to a halt before it really gets started. We like to call our process a “surgical disassembly”, and we take our time to plan and avoid inflicting any additional damage. This photo shows a TR3A which recently arrived for a complete restoration. It has been one of the most difficult disassemblies we’ve ever experienced. Every single bolt holding each of the four fenders needed to be cut off, and here is just one of the tricks we used. A small air saw and a tiny reciprocating blade will just fit between the body tub and the fenders, allowing each of the frozen bolts and spinning cage nuts to be sliced apart without damaging either panel. Time consuming, yes. But so is repairing fenders and body tubs that were carelessly damaged.May 13, 2024
Every car has “typical” places where they will rust, and the headlight area of a TR6 is one of them. Believe it or not, the top of the tires will actually fling water, snow, salt, dirt, etc. forward, and there is just enough of a pocket here to collect it and promote rust. Think back to the 1955 and 1956 Chevy’s that were common when I was in high school. Only about 14-15 years old at the time, and most of them in Ohio were rusted above the top of the headlights. If not, they had already been repaired by the “cap” patches that sold like crazy through J. C. Whitney or the Western Auto stores. Unfortunately, “caps” are not available for the TR6 front fenders, so we have to create them in our metal shop. This is also an area where 3 different pieces come together in layers, so we make our repair pieces in three layers to match. While many will still lay screen wire in here and slather it with Bondo, basically sculpting the “repair” from filler, a replacement cap made in the same manner as the original is really the only correct way to save an otherwise decent fender for continued use on a beautiful TR6 restoration.May 6, 2024
We are presently rebuilding a TR6 engine that had previously had a large amount of work done (at an MG shop!) and wouldn’t run very long without bending pushrods. The most recent work was a camshaft and cylinder head package, and nothing done to the short block. We pulled the head and found the cylinders to be terribly scored, but no indication of valves touching the pistons to bend the pushrods. That was caused by a couple of valves seized in the valve guides, a problem we’ve also seen in the past when using bronze valve guides. So, it needed a full and complete rebuild. On reassembly, we found that the head had been shaved by a huge amount, resulting in the push rods being too long for correct valve adjustment, also a contributing factor to the bent pushrods. The previous new camshaft was badly scored, so we replaced the camshaft as part of the rebuild. Which brings us to this week’s photo. Needing to make sure that the severe head shave would still allow the valves to clear with a different cam, we performed a “clay the pistons” test. Modeling clay is placed on top of the pistons, and the head is installed with rocker shaft/pushrods adjusted. Then you crank the engine over by hand and disassemble to measure the thickness of the clay and verify the valve to piston clearance.April 29, 2024
Cars can and will rust in some strange places, often places where you would never think to look. Not until you notice water on your carpet after a car wash or a drive in the rain would you start an investigation leading to this spot. This is the lower outer corner of the scuttle plenum, or in other words the chamber under the cowl vent that feeds fresh air to the heater and vent system of a TR4-TR6. You can see the little hose nipple in the corner. This is supposed to collect any water that enters the plenum from above, then drain it out at the rear edge of the front fenders. Inside the plenum is an area which never received any paint from the factory, all bare steel so it’s going to rust. Rust flakes and any other dirt and debris which enters through an open vent (or TR6 plastic grille) will clog the tube and hold the water inside, accelerating the rust until it breaks through like this (or more). We’ve had cars with this whole corner missing. Debris can also clog the drain hole at the bottom of the fender, and when that hole clogs, it’s a major contributor to the front fenders rusting along the lower edge.April 22, 2024
It’s always fun to find obvious problems that others have missed. We have a TR3A here that was sent to us after two previous attempts to rebuild the engine had yeilded poor results. The engine had a serious shake and vibration which the locals couldn’t find, and the owner fully expected that we would have to rebuild the engine once more to get to the bottom of the problem. Rather than dive right in with an expensive overhaul and balancing operation, we opted to perform a little diagnosis first, and see if there wasn’t a more simple fix. While confirming that the plug wires were in the correct firing order and checking the ignition timing (simple problems we’ve seen far too many times), we did hear a loud hiss originating on the right side of the engine. From there, it didn’t take a rocket scientist to notice that a couple of the intake and exhaust manifold studs were too long and the nuts had bottomed out before securing the manifolds tightly to the head. The next logical step was to pull the manifolds and look at the gaskets, which were indeed the source of a major vacuum leak and the cause of all the shaking. After new gaskets and a couple of correct length studs, the engine now runs as smooth as silk, without the time and expense of another engine rebuild!April 15, 2024
Thrust washers in the 6-cyl Triumph engines have been known to be problematic. Allow the wear to get bad enough and they will drop out into the oil pan. When that happens, the crankshaft is pushed forward to a point where it wears against the engine block and main bearing cap, making an awful racket and ruining those components. If you watch the crankshaft end float (annually) and don’t sit at traffic lights with the clutch pedal depressed (or other driving habits that accelerate the thrust bearing wear) you’ll probably never have a problem. We removed the oil pan on this TR6 just to replace the gasket, and owing to our Triumph experience we decided to check the crank end float while we were there. The spec is .006”-.008”, and this one measured .030”, approaching the danger zone. After patting ourselves on the back for being proactive and saving the owner some money by changing thrust bearings while the pan was already off only felt good until we dropped the main cap. The current owner just bought this car, so we assume that the prior owner did this “repair” just long enough to get the car sold. The crankshaft is ruined, and the current owner does not want to fix it. The owner’s wife says SELL, and hopefully the sellers will let potential buyers know that it needs a major engine overhaul.April 8, 2024
Here we have the finished update of the TR6 interior from last week. New carpet and wheelarch padding, but all of the rest are the same old components shown in last week’s photo. Just the wheelarches alone would have been a huge improvement, getting the seams straight and removing the wrinkles, but a slight color change to the carpet was a big help as well. Minor tweaks to the side and rear panels helped too, although too minor to show up in the pics. The hard backing on the side panels means that they will always wrinkle where they curve to meet the rear gas tank panel, but it’s not a big deal as they are hidden when the soft top is folded down, and way back in a dark shadow that makes them less visible when the top is up. Front carpets should be considered a “normal wear” item, and are usually the first interior component to show their age. The crisp lines of carpet will wear away gradually so it usually doesn’t get noticed until it looks really bad. Keep a careful watch on it, you’ll see the signs much earlier than you might expect. If you drive your car frequently, especially when your drives are short and you get in & out repeatedly without adding many miles, you will probably see a big improvement if you plan on replacing the carpet every 5-10 years.April 1, 2024
Sometimes, just a little detail work is all that’s needed to improve the “cosmetics” of your Triumph. Take this TR6 for example. The interior was actually in pretty good shape, but a sloppy installation left it looking a little bit “rough”. While the car was here for an engine rebuild and a moderate sized list of smaller items to address, it was decided that we should tidy-up the interior and make the car more appealing. The biggest mistake here is with the wheel arch covers, and a lot of folks struggle to get these right. It doesn’t help that some of the interior suppliers send the wrong type of padding in their kits, and poor looking covers were so common that we posted a page on our website about them many many years ago: https://macysgarage.com/wheelarch%20cvr.htm Check back with us next week and see how new wheel arch padding and several fitting adjustments (plus a new carpet set) brought this TR6 interior up to something the owner and his family will be proud to sit in.

America’s BEST Triumph Shop