
Macy’s Garage

© 2026 - Macy’s Garage, Ltd.

Blog
WHAT we’re doing, and HOW we’re doing it!
December 30, 2024
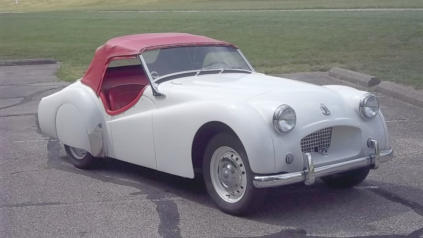
Frequent visitors to our website and all Triumph afficianados should recognize TS1LO, the very first Triumph TR2. We are still humbled to have been chosen to perform the last restoration of this important Triumph during 2012-2015. Since completion, TS1LO has led a quiet life in the collection of Dr. Phillip Hoopes, and through his generosity continues to travel to many different show locations across the country. The news today is that Classic Motor Films (classicmotorfilms.com) has produced a new documentary regarding this car, available on their youtube channel: https://www.youtube.com/@ClassicMotorFilms . Classic Motor Films John Linney is a Triumph owner, and already has several high quality and very entertaining Triumph films included on his youtube channel. The TS1 film was shot last summer (2024), and the quality and longevity of our 9-year old restoration will be obvious as you view this video.December 23, 2024
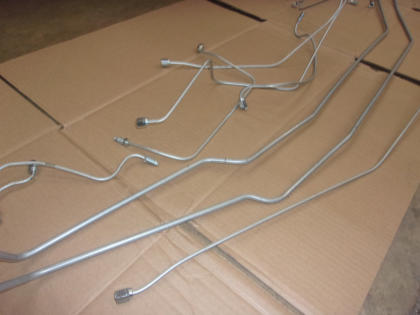
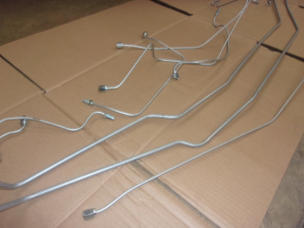
Through the many years that we’ve been repairing and restoring Triumph TR2-TR6 sports cars, we have collected multiple unmolested samples of every steel brake, clutch, and fuel line to fit these cars. Yes, there are places to buy them pre-bent, but our experience was that the fit was variable at best, and at times as bad as ‘completely incorrect’. We also did not appreciate long lines that were bent 180 degrees to fit into a shipping box, nor the fact that the wait time was often 3-4 months to receive an order. For a brief couple of years we had a company in Columbus bending lines specifically for us from our own patterns, and the service and quality was spot on until a new owner took over and messed it all up. Since that time, we have purchased every tubing tool that we could get our hands on and brought the ‘plumbing’ operation in-house and completely under our own control. We don’t want to be in the “bend them to fit a box” situation, so we won’t ship pre-bent lines, but every TR that’s here for service and restoraion will receive perfect lines fabricated here, as shown with this (partial) TR6 set. We have every variation for every small production change, they always fit, and we have them available whenever they are needed. It is also a good excuse to feed our tool addiction!December 16, 2024
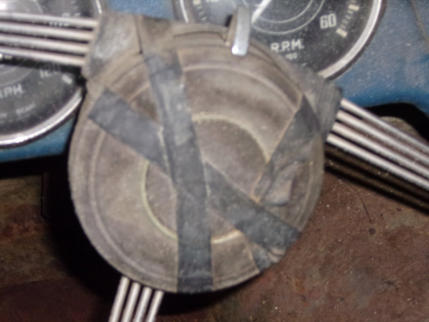
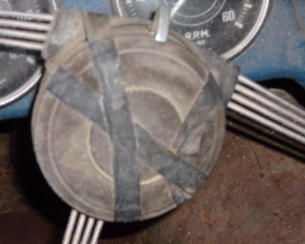
Don’t drive something like this! Control Heads (turn signal and horn switches) for the sidescreen cars (TR2-TR3B) are complicated little engineering marvels, and while previously reproduced, the world-wide supply has dried up following the horrific fire at The Roadster Factory last Christmas. Albert Runyan tells us that a new supply of reproductions is expected sometime this spring, but what to do if you need it now, or there’s a production problem with the new batch? Several months ago, we dove into our supply of used and beaten/battered control heads, and started rebuilding them here in-house. Whenever we’d get a couple done and put up on our eBay store, they sold immediately, indicating a high demand for this particular part. Now, with 2024 drawing to a close, we have unfortunately exhausted our supply of rebuildable cores. But we do still have parts, and can probably rebuild your old core if you’d care to pull it out and ship it here to us. The cost will be similar to what the reproductions sold for a year ago, something around $200 depending on what parts need to be replaced. We’ll also include a new steering column wiring harness with an easy to decipher color code for simple connection to your car’s loom. Expected turn-around time is about two weeks.December 9, 2024
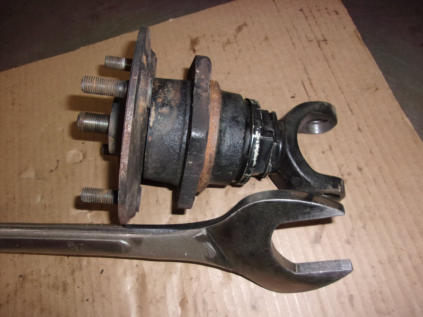
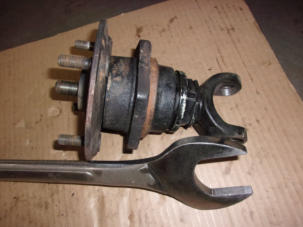
We often make mention of all the special tools and fixtures we have here to service the Triumph TR2-TR6 models, and in most instances we’ll show some big expensive and elaborate piece. This time it’s a smaller but equally important tool, a special wrench to loosen and tighten the TR4A-TR6 IRS rear hub adjusting and locking nuts. Both of these nuts are “thin”, and it takes a “skinny” wrench to fit into the tight space they occupy. You won’t find a suitable wrench in stock or available off the shelf anywhere in the world, so they have to be made. Step one was to find a 2-1/16” open end wrench, which was hard to get locally at the time (we were in a hurry!). We started with a more common 2” wrench, and had our local machinist (before we bought our own vertical mill) widen it to 2-1/16”. We also had him mill the width down to 3/8” wide by removing an equal amount of metal from each side. It’s not a “cheap” wrench (nearly $200 total, 14+ years ago) but we do rebuild 100% of our IRS hubs here in-house, and we’ve used this “simple” wrench over and over again on every set of IRS hubs we’ve ever done. I guess that it’s paid for itself by now!December 2, 2024
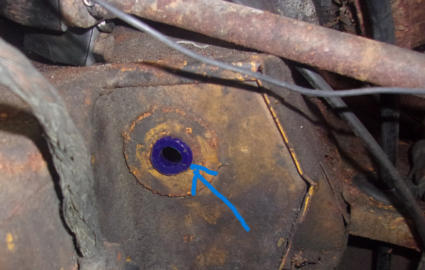
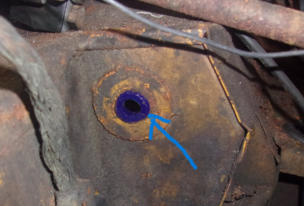
This photo shows the left side of a TR6 firewall (bulkhead). The rusty round shaft running through the upper right corner is the steering column, and the braided gray cable along the left side is the battery ground cable. The important part here is the new purple urethane throttle shaft (gas pedal) bushing that has already been installed into the firewall. These bushings are originally hard plastic, and are well known to crack and fall out (unnoticed) with age, causing sloppy motion and poor throttle response. These bushings can be replaced with the engine in place, but it’s a difficult job due to the restricted access that causes. But when the engine (or even just the cylinder head) has been removed as shown here, the access is wide open and bushing replacement is super E-Z. Even if the old bushings appear O.K. and haven’t fallen out yet, when you have the access you should probably take advantage of the situation and replace them. Your reduced blood pressure (in the future) will thank you!November 25, 2024
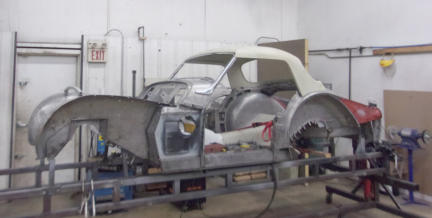
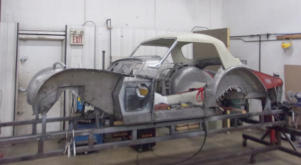
Approximately 3 days after first bolting the inner sills onto our body jig, and this is where we’re at. The door openings are always the most critical and we’ll be installing the doors before welding anything beyond a few tacks, but there’s nothing like a hardtop to make sure the top of the passenger compartment is precise. The A and B posts supplied were all reproduction parts and loosely installed in the wrong places so we used the hardtop as the starting point, rather than the confirmation role it normally takes on. Carpenters live by the “meassure twice-cut once” rule, but here in the metal shop our version is “fit 3 times, weld once”. A project which the owner has struggled with for many years can come together quickly when turned over to those who know these cars the BEST. Special fixtures and jigs are a big help too!November 18, 2024
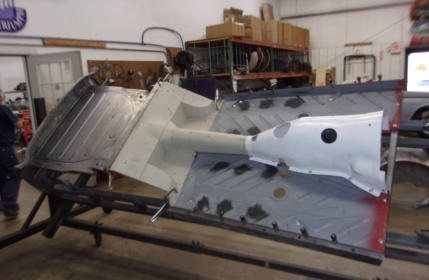
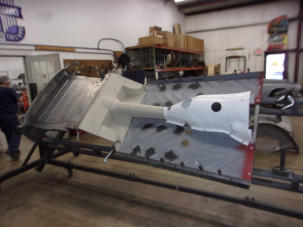
Step one in assembling any complex structure is to establish a solid foundation. While it is possible to do this on top of an original chassis, we utilize one of our three Auto-Twirler rotisseries and the Triumph TR body jigs that we created here many years ago. Well proven to always fit the chassis and allowing unequalled access to all sides of the various panels, our jig and rotisserie combinations allow us to quickly and accurately build a pile of parts into a straight and square body tub that will accept all outer body panels later without fitting issues. And if the last person to work on a project got the cart before the horse and has already restored the chassis (as done with this car), you wouldn’t want to be cutting, welding, and grinding body parts on top of a “fresh” chassis restoration. An additional complication here ruling out use of the chassis for a jig is that this car is using a NEW reproduction frame. It’s just one more component that can be slightly “off” from an original, and when most of the parts are reproductions, small errors that get added on top of other small errors usually ends up being out of kilter by quite a bit. After repairing and assembling dozens of TR body tubs on our solid fixtures, there is no doubt that we have established the foundation that’s necessary for such a complex task.November 11, 2024
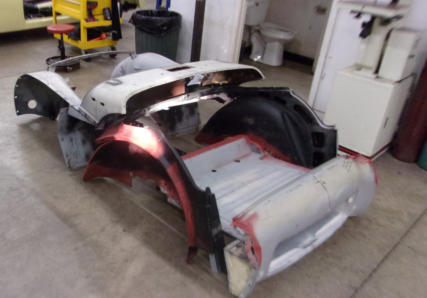
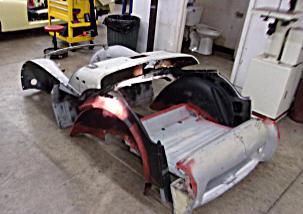
Over the years we’ve all seen photos of “shorty” versions of various old cars, one of my favorites being the 55-56 Chevy 2-door station wagons. But NEVER before have I ever envisioned a shorty TR2, until now that is. This is how this TR2 project came to us, a loosely assembled collection of pieces bolted onto a rolling chassis. Nothing was solidly connected, and then there were numerous new reproduction panels included in the mix as well, all of which are always “off” just enough to keep it interesting. Needless to say, the owner was having a bunch of trouble getting it all to fit back together! It’s another of those Humpty Dumpty cars we often get here, and it’s finally in the hands of the only team who accomplish a task that’s over the heads of all the King’s horses and all the King’s men! There was plenty of body filler that had already been applied, and much of it in areas where we’ll need to weld. That meant that step one was to take this collection of parts over to Pro-Strip in Indianapolis, so that we can have the filler removed and see what good metal is left, then determine just what repairs will be needed as we work our way through and build thisTR2 back literally from the ground up.November 4, 2024
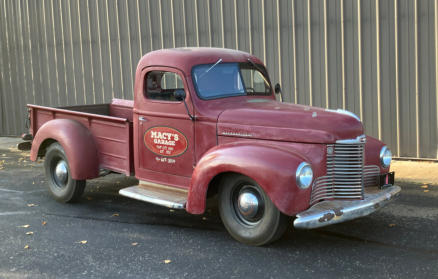
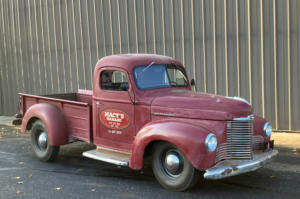
We are happy to present our “NEW” shop truck, a 1947 International KB-1 half-ton pickup. Caught at a weak moment, we bought this off of eBay back in late February and had it shipped here in early March from Albuquerque, NM. Built 9 decades ago in nearby Springfield, OH, it has spent most of it’s time in the dry SW, so there was virtually NO RUST to deal with. But just like we always tell everyone that it’s impossible to estimate the time and cost to restore an old car, it’s no surprise that we missed it by a mile on this personal project too! While no rust and a desireable amount of patina removed paint and bodywork from the equation, the lack of available International parts meant that most of the unseen bits making up the steering, suspension, brakes and wiring had to be completely replaced with modern upgrades. The renovation that we expected to complete in two months ended up taking 8, and the cost was also x4 the original estimate! But now we have a really cool old truck to chase parts and cruise to lunch. All it needs now is a fresh pine tree to haul around during the month of December!October 28, 2024
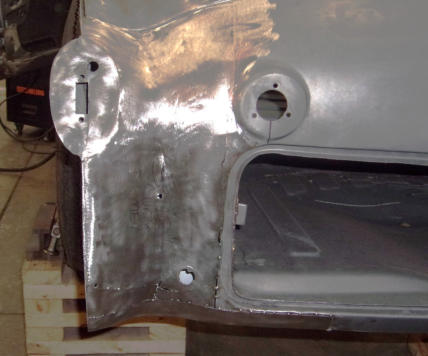
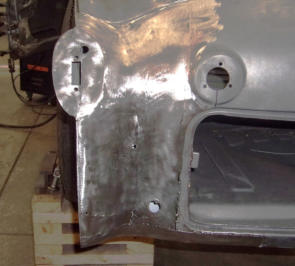
Although the major pieces are just tack welded into place and still require complete welding and grinding of those welds, this will be the final photo in this series. During the process of repairing the apron, we also took advantage of the open access at this rear corner to replace the wrinkled trunk floor (which had also been folded up and pushed over during this incident), and the rear sidewall of the trunk (damaged as part of the set). Fixing all three areas only took about as long as it would have taken just to fit a reproduction rear apron, saving the owner the cost of an apron AND the cost of repairing/replacing the adjacent panels. While this is still far off from being “paint ready”, the required thin skim of filler will be minor, and thin enough that future shrinkage will never be an issue. “Bondo” got a bad name back when amateurs and body guys alike would pack a hole or large dent full of it, and then it would shrink and crack, many times even falling back out of the hole! The modern fillers are a vast improvement over the original plastic fillers, and shrinkage is less of a problem today. Plus, the tendency to shrink is always in relation to the thickness, which explains our efforts to get the metal so close that nothing thicker than a light skim coat will ever be required.October 21, 2024
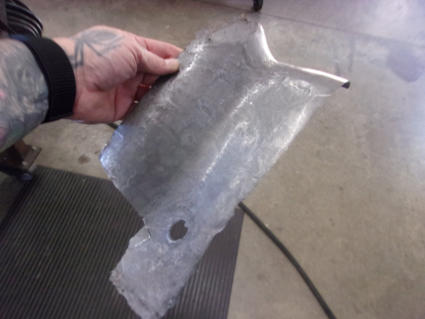
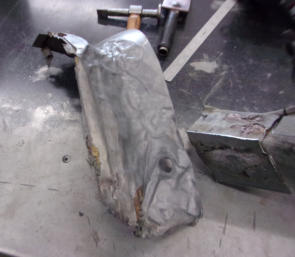
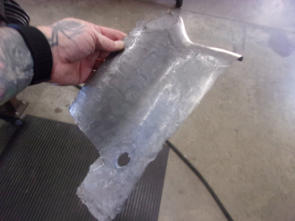
Having the right tools is always half the battle, and possessing the skills to use them is the second half. This is what the crumpled apron section looked like after approximately 30 minutes on our planishing hammer and guided by Matt’s talented hands. We also could have made a completely new piece from scratch, starting with a flat piece of drawing steel. Our English wheel and Dake power hammer would have been required (in addition to the planishing hammer), but with the complex shape and reverse curves in this area, the fabrication of a new piece would have taken 8-10 times longer than the time needed to save the original piece.October 14, 2024
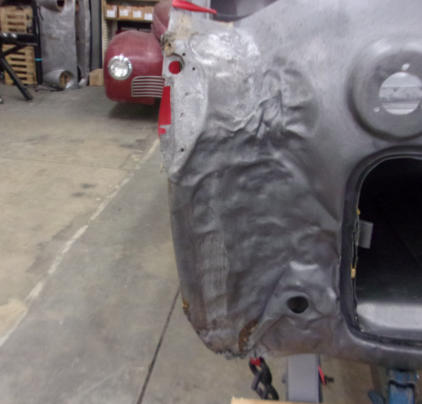
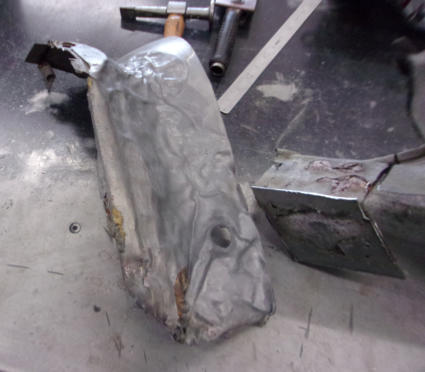
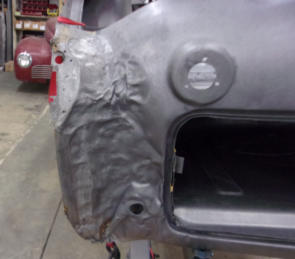
The decision to repair the damage rather than replace the whole apron was helped by the fact that the “bad” stopped just before it reached over to the spare tire compartment opening or the turn signal plinth. Had it been mangled just another inch or two over toward the center, we’d probably be well along toward a new apron install by now. As it worked out, we were able to slice the damaged area away from the apron just outside of the spare tire opening, and remove the “bad” section as a single chunk. Not accessible from the rear? Problem solved! There is a small rust section in the lower left corner, and the presence of some brazing indicated that it has been worked on before. For now, we’ll concentrate on repairing the crumpled part, and save the fabrication of a rust repair patch until all of the major damage has been repaired. Then we can base the new rust repair patch on the position of our straightened metal and the location of the left rear fender where the two will join. It’s really going to be easier that it looks right now!October 7, 2024
As if we already don’t have enough work to do repairing rust in our old Triumph sports cars, then there’s the damage caused over the last 40-60 years by abuse! This week, along with the start of a new calendar quarter, we’re also going to start a small series of the repair to the left rear corner of this TR3A. Rust and damage in the rear apron area is just about the hardest to repair, as several panels come together in this area and it’s all sealed up with zero access to the back side. While some would almost avoid restoring a car like this, many more would opt to install a new reproduction apron with a base cost of $1700. While the new aprons look nice when you open the box, we know from past experience that it will take many hours of work to make the new pieces fit. After carefully considering our years of experience with these Triumph cars, our talented metal shop crew felt that this could be repaired in about the same amount of time it would take to make a reproduction apron fit, and save our client the $1700 cost of a new part in the process. While the actual repair only took a couple of days, check back over the next few weeks to see how we were able to economically save this mess from the scrap heap, and do so without gallons of bondo as with the previous “repair”.
BLOG
2024-Q4
America’s BEST Triumph Shop






Macy’s Garage

© 2026 - Macy’s Garage, Ltd.

Blog
WHAT we’re doing, and HOW we’re doing it!
December 30, 2024
Frequent visitors to our website and all Triumph afficianados should recognize TS1LO, the very first Triumph TR2. We are still humbled to have been chosen to perform the last restoration of this important Triumph during 2012-2015. Since completion, TS1LO has led a quiet life in the collection of Dr. Phillip Hoopes, and through his generosity continues to travel to many different show locations across the country. The news today is that Classic Motor Films (classicmotorfilms.com) has produced a new documentary regarding this car, available on their youtube channel: https://www.youtube.com/@ClassicMotorFilms . Classic Motor Films John Linney is a Triumph owner, and already has several high quality and very entertaining Triumph films included on his youtube channel. The TS1 film was shot last summer (2024), and the quality and longevity of our 9- year old restoration will be obvious as you view this video.December 23, 2024
Through the many years that we’ve been repairing and restoring Triumph TR2-TR6 sports cars, we have collected multiple unmolested samples of every steel brake, clutch, and fuel line to fit these cars. Yes, there are places to buy them pre-bent, but our experience was that the fit was variable at best, and at times as bad as ‘completely incorrect’. We also did not appreciate long lines that were bent 180 degrees to fit into a shipping box, nor the fact that the wait time was often 3-4 months to receive an order. For a brief couple of years we had a company in Columbus bending lines specifically for us from our own patterns, and the service and quality was spot on until a new owner took over and messed it all up. Since that time, we have purchased every tubing tool that we could get our hands on and brought the ‘plumbing’ operation in-house and completely under our own control. We don’t want to be in the “bend them to fit a box” situation, so we won’t ship pre- bent lines, but every TR that’s here for service and restoraion will receive perfect lines fabricated here, as shown with this (partial) TR6 set. We have every variation for every small production change, they always fit, and we have them available whenever they are needed. It is also a good excuse to feed our tool addiction!December 16, 2024
Don’t drive something like this! Control Heads (turn signal and horn switches) for the sidescreen cars (TR2-TR3B) are complicated little engineering marvels, and while previously reproduced, the world-wide supply has dried up following the horrific fire at The Roadster Factory last Christmas. Albert Runyan tells us that a new supply of reproductions is expected sometime this spring, but what to do if you need it now, or there’s a production problem with the new batch? Several months ago, we dove into our supply of used and beaten/battered control heads, and started rebuilding them here in-house. Whenever we’d get a couple done and put up on our eBay store, they sold immediately, indicating a high demand for this particular part. Now, with 2024 drawing to a close, we have unfortunately exhausted our supply of rebuildable cores. But we do still have parts, and can probably rebuild your old core if you’d care to pull it out and ship it here to us. The cost will be similar to what the reproductions sold for a year ago, something around $200 depending on what parts need to be replaced. We’ll also include a new steering column wiring harness with an easy to decipher color code for simple connection to your car’s loom. Expected turn-around time is about two weeks.December 9, 2024
We often make mention of all the special tools and fixtures we have here to service the Triumph TR2-TR6 models, and in most instances we’ll show some big expensive and elaborate piece. This time it’s a smaller but equally important tool, a special wrench to loosen and tighten the TR4A-TR6 IRS rear hub adjusting and locking nuts. Both of these nuts are “thin”, and it takes a “skinny” wrench to fit into the tight space they occupy. You won’t find a suitable wrench in stock or available off the shelf anywhere in the world, so they have to be made. Step one was to find a 2- 1/16” open end wrench, which was hard to get locally at the time (we were in a hurry). We started with a more common 2” wrench, and had our local machinist (before we bought our own vertical mill) widen it to 2-1/16”. We also had him mill the width down to 3/8” wide by removing an equal amount of metal from each side. It’s not a “cheap” wrench (nearly $200 total, 14+ years ago) but we do rebuild 100% of our IRS hubs here in-house, and we’ve used this “simple” wrench over and over again on every set of IRS hubs we’ve ever done. I guess that it’s paid for itself by now!December 2, 2024
This photo shows the left side of a TR6 firewall (bulkhead). The rusty round shaft running through the upper right corner is the steering column, and the braided gray cable along the left side is the battery ground cable. The important part here is the new purple urethane throttle shaft (gas pedal) bushing that has already been installed into the firewall. These bushings are originally hard plastic, and are well known to crack and fall out (unnoticed) with age, causing sloppy motion and poor throttle response. These bushings can be replaced with the engine in place, but it’s a difficult job due to the restricted access that causes. But when the engine (or even just the cylinder head) has been removed as shown here, the access is wide open and bushing replacement is super E-Z. Even if the old bushings appear O.K. and haven’t fallen out yet, when you have the access you should probably take advantage of the situation and replace them. Your reduced blood pressure (in the future) will thank you!November 25, 2024
Approximately 3 days after first bolting the inner sills onto our body jig, and this is where we’re at. The door openings are always the most critical and we’ll be installing the doors before welding anything beyond a few tacks, but there’s nothing like a hardtop to make sure the top of the passenger compartment is precise. The A and B posts supplied were all reproduction parts and loosely installed in the wrong places so we used the hardtop as the starting point, rather than the confirmation role it normally takes on. Carpenters live by the “meassure twice-cut once” rule, but here in the metal shop our version is “fit 3 times, weld once”. A project which the owner has struggled with for many years can come together quickly when turned over to those who know these cars the BEST. Special fixtures and jigs are a big help too!November 18, 2024
Step one in assembling any complex structure is to establish a solid foundation. While it is possible to do this on top of an original chassis, we utilize one of our three Auto-Twirler rotisseries and the Triumph TR body jigs that we created here many years ago. Well proven to always fit the chassis and allowing unequalled access to all sides of the various panels, our jig and rotisserie combinations allow us to quickly and accurately build a pile of parts into a straight and square body tub that will accept all outer body panels later without fitting issues. And if the last person to work on a project got the cart before the horse and has already restored the chassis (as done with this car), you wouldn’t want to be cutting, welding, and grinding body parts on top of a “fresh” chassis restoration. An additional complication here ruling out use of the chassis for a jig is that this car is using a NEW reproduction frame. It’s just one more component that can be slightly “off” from an original, and when most of the parts are reproductions, small errors that get added on top of other small errors usually ends up being out of kilter by quite a bit. After repairing and assembling dozens of TR body tubs on our solid fixtures, there is no doubt that we have established the foundation that’s necessary for such a complex task.November 11, 2024
Over the years we’ve all seen photos of “shorty” versions of various old cars, one of my favorites being the 55-56 Chevy 2-door station wagons. But NEVER before have I ever envisioned a shorty TR2, until now that is. This is how this TR2 project came to us, a loosely assembled collection of pieces bolted onto a rolling chassis. Nothing was solidly connected, and then there were numerous new reproduction panels included in the mix as well, all of which are always “off” just enough to keep it interesting. Needless to say, the owner was having a bunch of trouble getting it all to fit back together! It’s another of those Humpty Dumpty cars we often get here, and it’s finally in the hands of the only team who accomplish a task that’s over the heads of all the King’s horses and all the King’s men! There was plenty of body filler that had already been applied, and much of it in areas where we’ll need to weld. That meant that step one was to take this collection of parts over to Pro-Strip in Indianapolis, so that we can have the filler removed and see what good metal is left, then determine just what repairs will be needed as we work our way through and build thisTR2 back literally from the ground up.November 4, 2024
We are happy to present our “NEW” shop truck, a 1947 International KB-1 half-ton pickup. Caught at a weak moment, we bought this off of eBay back in late February and had it shipped here in early March from Albuquerque, NM. Built 9 decades ago in nearby Springfield, OH, it has spent most of it’s time in the dry SW, so there was virtually NO RUST to deal with. But just like we always tell everyone that it’s impossible to estimate the time and cost to restore an old car, it’s no surprise that we missed it by a mile on this personal project too! While no rust and a desireable amount of patina removed paint and bodywork from the equation, the lack of available International parts meant that most of the unseen bits making up the steering, suspension, brakes and wiring had to be completely replaced with modern upgrades. The renovation that we expected to complete in two months ended up taking 8, and the cost was also x4 the original estimate! But now we have a really cool old truck to chase parts and cruise to lunch. All it needs now is a fresh pine tree to haul around during the month of December!October 28, 2024
Although the major pieces are just tack welded into place and still require complete welding and grinding of those welds, this will be the final photo in this series. During the process of repairing the apron, we also took advantage of the open access at this rear corner to replace the wrinkled trunk floor (which had also been folded up and pushed over during this incident), and the rear sidewall of the trunk (damaged as part of the set). Fixing all three areas only took about as long as it would have taken just to fit a reproduction rear apron, saving the owner the cost of an apron AND the cost of repairing/replacing the adjacent panels. While this is still far off from being “paint ready”, the required thin skim of filler will be minor, and thin enough that future shrinkage will never be an issue. “Bondo” got a bad name back when amateurs and body guys alike would pack a hole or large dent full of it, and then it would shrink and crack, many times even falling back out of the hole! The modern fillers are a vast improvement over the original plastic fillers, and shrinkage is less of a problem today. Plus, the tendency to shrink is always in relation to the thickness, which explains our efforts to get the metal so close that nothing thicker than a light skim coat will ever be required.October 21, 2024
Having the right tools is always half the battle, and possessing the skills to use them is the second half. This is what the crumpled apron section looked like after approximately 30 minutes on our planishing hammer and guided by Matt’s talented hands. We also could have made a completely new piece from scratch, starting with a flat piece of drawing steel. Our English wheel and Dake power hammer would have been required (in addition to the planishing hammer), but with the complex shape and reverse curves in this area, the fabrication of a new piece would have taken 8-10 times longer than the time needed to save the original piece.October 14, 2024
The decision to repair the damage rather than replace the whole apron was helped by the fact that the “bad” stopped just before it reached over to the spare tire compartment opening or the turn signal plinth. Had it been mangled just another inch or two over toward the center, we’d probably be well along toward a new apron install by now. As it worked out, we were able to slice the damaged area away from the apron just outside of the spare tire opening, and remove the “bad” section as a single chunk. Not accessible from the rear? Problem solved! There is a small rust section in the lower left corner, and the presence of some brazing indicated that it has been worked on before. For now, we’ll concentrate on repairing the crumpled part, and save the fabrication of a rust repair patch until all of the major damage has been repaired. Then we can base the new rust repair patch on the position of our straightened metal and the location of the left rear fender where the two will join. It’s really going to be easier that it looks right now!October 7, 2024
As if we already don’t have enough work to do repairing rust in our old Triumph sports cars, then there’s the damage caused over the last 40-60 years by abuse! This week, along with the start of a new calendar quarter, we’re also going to start a small series of the repair to the left rear corner of this TR3A. Rust and damage in the rear apron area is just about the hardest to repair, as several panels come together in this area and it’s all sealed up with zero access to the back side. While some would almost avoid restoring a car like this, many more would opt to install a new reproduction apron with a base cost of $1700. While the new aprons look nice when you open the box, we know from past experience that it will take many hours of work to make the new pieces fit. After carefully considering our years of experience with these Triumph cars, our talented metal shop crew felt that this could be repaired in about the same amount of time it would take to make a reproduction apron fit, and save our client the $1700 cost of a new part in the process. While the actual repair only took a couple of days, check back over the next few weeks to see how we were able to economically save this mess from the scrap heap, and do so without gallons of bondo as with the previous “repair”.

America’s BEST Triumph Shop

