Macy’s Garage

© 2026 - Macy’s Garage, Ltd.

Blog
WHAT we’re doing, and HOW we’re doing it!
December 27, 2021
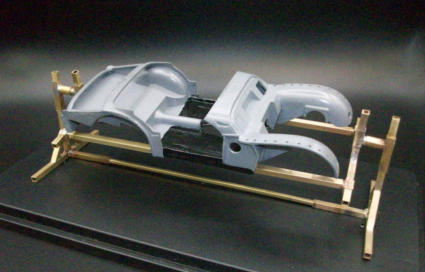
Last year, we finished our Blog posts for 2020 with a miniature TR3A model and diorama that was created during “off” hours. While there must be times that we are away from Macy’s Garage, Triumphs are never far away from our thoughts! This year, we recreated a familiar sight in our shop, a TR2/3 body tub on one of our three rotisseries/body jigs that we use to replace floors and sills with quick precision. This seemingly simple model and rotisserie however were anything but simple to make. Starting with an old and expensive Gunze-Sangyo TR2 model kit (not the uber-expensive “High’Tech” version), the one piece outer body was sliced apart to make a “tub”, then missing pieces like boot fillers and A-posts and kick panels were created to finish the conversion. Our full size rotisseries were carefully measured and converted to 1/24 scale before miniature brass tubing was cut and soldered together to create the replica. This mini spins and parts slide for adjustment exactly like our full size rotisseries do. As we pointed out in last year’s Triumph model post, it’s our attention to the smallest details which sets us apart!December 20, 2021
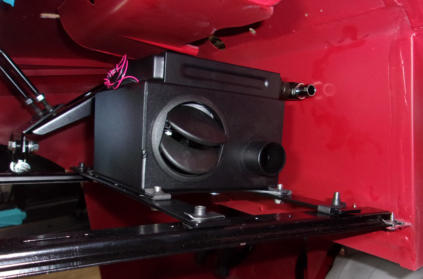
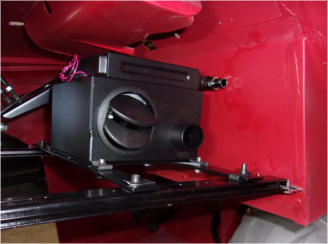
With Smiths heater parts in short supply, we had to come up with an alternative just over a year ago. We found this handy little 3.5kw heater in the U.K., and then engineered brackets and sourced hoses and hardware to make them fit under the dash of all TR2-TR3B cars. Then, just when we were feeling warm and fuzzy, the heater manufacturer changed the design! The water connections for the top mounted heater core originally pointed straight down, and the hoses were routed straight up between the heater itself and the rear of the battery box. With the new design, the heater core was moved toward the rear of the heater box, and the hose fittings were changed to a screw-in fitting that pointed straight at the battery box. Guess what? No room to attach the hoses! What we once thought was a completed project would no longer work, which sent us back to the drawing board all over again. Fortunately, the solution was an easy fix which actually works out a little better. Once we were able to determine the strange thread size of the heater core tank (and the included hose barbs), we located some nifty little swivel elbows that could be screwed into the heater, and then receive the hose barbs to connect the hoses. Being able to swivel the elbows eliminated any strange alignment issues, and allow for better hose routing in the process! It’s too bad that all problems aren’t this easy to fix!December 13, 2021
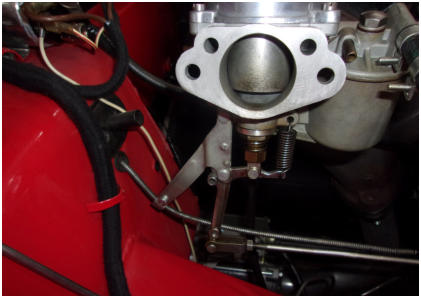
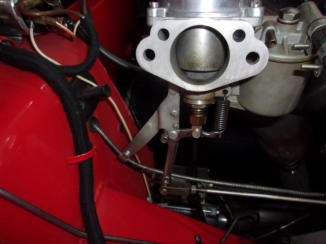
Today we have another photo of the TR3 that was featured last week. We could keep our blog posts filled from now until the spring thaw with photos of the various atrocities that were committed here, but we’ll just show this one more and then move on next week. One of the owner’s complaints was the choke was almost impossible to pull. Now before I go any farther, I need to state that the new cables ARE tough to pull. Most often, it’s because the solid sleeve behind the panel is about 1/4” too long. It then presses against the heater, putting the cable in a bind. But the big fancy multi-marque shop didn’t install a heater, and by just opening the bonnet we spotted the problem immediately. Note the tight “S” bend in the cable, which is an even worse situation than having it press up against the heater. At least they did route the cable through the correct hole, which is something that can’t be said for all the various other cables and gauge lines which pass through the left side of the firewall! So if the cable is routed through the correct hole, then why isn’t the alignment any better? It’s because someone has installed the cable bracket on the WRONG carburetor. The bracket holding the cable sheath should be on the FRONT carburetor, so the cable has a chance to straighten out after passing through the firewall. Some days, we get all of our exercise from shaking our heads in disbelief!December 6, 2021
We have another TR3 here in a long line of Triumphs that are sent to us after a “restoration” at another shop. The owner originally selected a well-known east coast ‘sports car’ shop that was closer to his home, and after an expensive and lengthy process, he received a TR3A that he was afraid to drive more than 2-3 blocks from his house. When the car arrived here, it didn’t take more than 15-20 minutes for our guys to fill two pages with things that had to be done (or re-done). Most of it was small things which we could rectify easily without backing up and starting all over, but he’s stuck with several other big problems like poor panel fit which will allow paint to chip around the hood, doors, and trunk. One of the biggest “fixable” issues was a terrible oil leak from the gearbox and overdrive. This photo shows the overdrive adaptor plate which is bolted onto the rear of the gearbox case. These are supposed to be attached with six bolts, but I only count four. The two large holes at the bottom are supposed to hold the last two bolts, which someone failed to install. You might get away with such negligence for awhile if they were the top bolts, but down at the bottom where all the oil collects? Not a chance in Hades that oil wouldn’t pour out of here, and it certainly did! You can be passionate about these cars until the end of time, but without knowledge and skills to go along with it, the resulting work will be mediocre at best.November 29, 2021
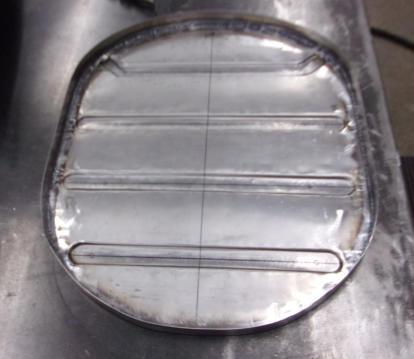
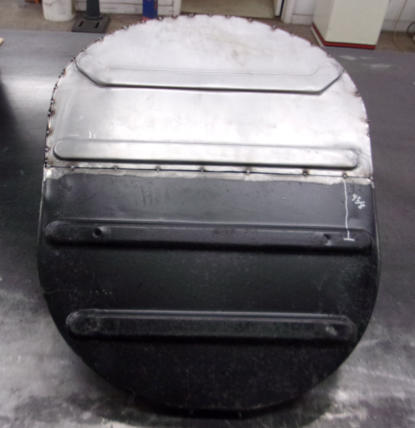
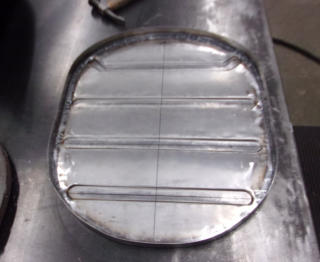
The seat pan in last week’s photo was pretty extreme, in that it was so bad we had to fabricate a new pan 100%. Most times, we are able to repair the rust damage in just a portion of the base, saving time and effort on our part that results in a lower cost to our clients. Just because we can make a complete new unit doesn’t mean that we have to. Fortunately, the special tooling that we created to make the pressed bottoms can be used for either a front or rear half just as easily as it can be used to make an entire bottom. Once this seam is completely TIG welded and the welds ground smooth, no one will ever know what was done to save this seat assembly, not that anyone should ever be removing your seat cushions to take a look at the pans!November 22, 2021
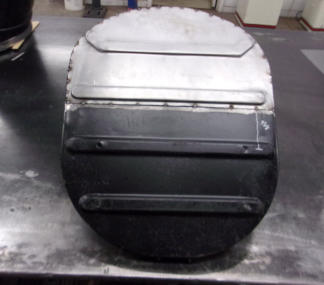
Continuing with last week’s topic regarding the special tools and fixtures we’ve created, here is a folding seat bottom for a TR3-3B. We call these seat “pans” because the sides around the base make them resemble a frying pan. The indented channels in the bottom add strength, as well as providing a recess for the nuts which hold the seats onto the seat slides. The rim around the edge helps to keep the seat spring in place, and adds even more strength and stability to the bottom. But the thing this rim really does best is to hold water! Whenever some previous owner would get caught with the top down, the pans would fill up and the rusting process would begin. Park your Triumph in the back yard for a few years with a leaky or non-existent top, and the seat pans will be the first parts to suffer from the resulting rust. This is such a common problem that we created a special press to form the stamped ribs many years ago, and although we’ve never kept track of how many times this fixture has been used, we can say with absolute certainty that this press gets used as much or more than any other fixture that we have here in our arsenal. Many times we’ll only have to make a front or back half to repair a rusty pan, and other times like this one we’ll have to fabricate an entire new pan from scratch. Just one more example of why there aren’t many problems with these cars that will ever scare us!November 15, 2021
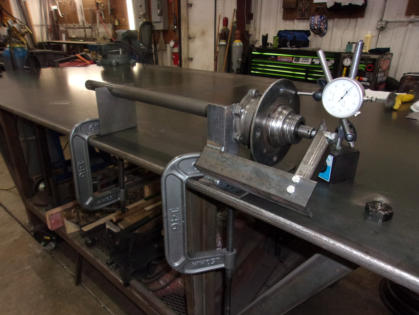
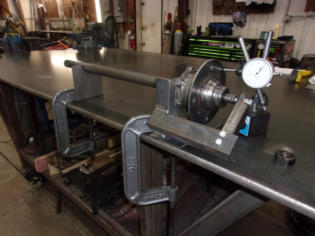
In addition to the well known Churchill tools that we’ve found or made over the years, there are quite a few other tools and fixtures we’ve devised to make our Triumph shop operations more efficient. Take this hub checking fixture for example. The Girling style rear wheel hubs on the big TR series (especially the solid axle cars) are extremely difficult to get apart, and over the many decades that these cars have been in service, more than a few rear hubs have been bent by mechanics without the proper tools, skills, or knowledge. We created this fixture that holds the bearing hub securely, applies a small pre-load to the bearing, and stabilizes the far end of the axle, all so that we can run a dial indicator along the outer edge of the hub and see if it’s going to run true or not. Now if we were trying to work on every car that showed up at our door, we would never have the time to create jigs like this for every possible make and model, nor would we have the room to store them until the next time we see a 1966 XYZ. By sticking to the TR2-TR6 range exclusively, we know that special tools like this will be used in our shop over and over and over again, so it’s easy to justify the time and expense required to create them.November 8, 2021
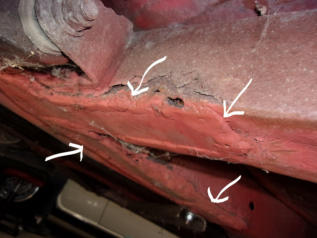
It was a sad day for the owner of this TR6 when we told him his frame was extremely rusty and had been poorly patched at some time in the past. This news was extremely surprising because he had owned this car for over 20 years, but admittedly didn’t give it much attention and it sat idle during most of that time. Some previous owner, or their “mechanic”, had welded some metal plates on the bottom of a rusty frame member, and then covered it up with primer to hide their “repair”. We keep stressing over and over again that you should NEVER buy an IRS TR (TR4A-TR6) without first looking underneath at the frame, and when you do you are looking not only for rust holes but for cover-ups such as this one. Most times the guilty parties will try to disguise their handiwork by painting over the “repair” or slathering it with thick undercoating, but if you look closely for thicker sections where additional metal has been added, or weld beads that don’t continue down the entire frame, you’ll quickly recognize that something bad has been covered up. We have no way to know if this was an honest attempt to “fix” a serious problem, or to pass a poor car on to an unsuspecting new owner. And of course, just like the cancer that it is, it continues to rust away under the patch and spread to the surrounding “good” metal.November 1, 2021
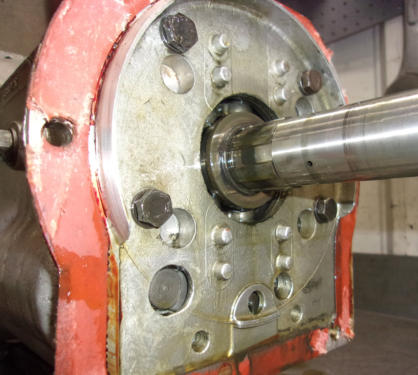
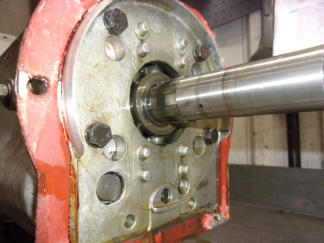
Here’s something we’ve never seen before! The outer ends of TR3/4 rear axles are machined on a taper, and the hub flange to which the tire and wheel attaches (not to mention locating the rear brake drum), has a matching taper inside which centers the flange. This is an ultra precise fit, so that the hub will run straight and true, 90 degrees to the axle. The hub and axles usually fit together so snugly that it’s a strain to ever get them apart again, even with the special M86A Churchill tool (if you are lucky enough to have one!). But it appears that this axle and it’s associated hub worked loose at some time, probably from a loose retaining nut, and the axle and inner hub flange were damaged in the process. Someone’s cure for damaged parts and a loose wobbly fit? Pack the space with some thin brass shim stock! Forget that the precision fit was gone, and that the wheel would wobble and shake the car. As long as it would go down the road under it’s own power so the owner could make it to work or school the next day, who cares if it shakes and vibrates? We always have to remember that there was a time when these TR’s we all love so much were reduced to nothing more than cheap transportation, so whatever it took to put the car back in service at the least possible cost was A-OK with the owners. It’s a miracle that so many have survived such abuse!October 25, 2021
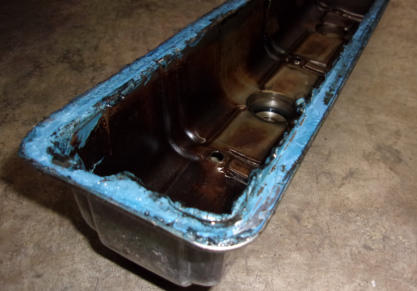
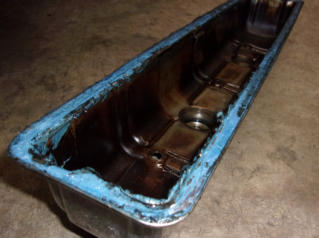
We all understand that British cars leak oil, and we might even enjoy making jokes about it. But we do need to help our little British cars out a bit, and actually installing proper gaskets would be a good place to start! It’s true that many modern engines can be assembled using nothing more than a high tech gasket maker in a tube, but it never seems to work out well for our Triumphs or other LBC’s. Someone at some time in the past thought they’d give it a go with this TR6 rocker cover, and the engine bay received quite an oil bath as a result. Given that the machined gasket surfaces and bolt spacing could have been better when these cars were first built, we NEVER make the claim that we can stop the oil leaks, only slow them down to a reasonable amount. The results of this experiment were anything but reasonable!October 18, 2021
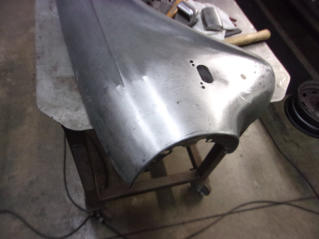
This week we see the completed repair from last week. If you didn’t know where to look, this repair would be completely invisible. There are still a few imperfections remaining, but they are small enough that they would fill with several coats of primer. To save time and cost to the owner, we will use a very tiny amount of filler to speed up the process, eliminating the need to spray primer and block sand multiple times. Today’s body filler products are 10x better than what was available 20+ years ago, and part of the bad reputation that fillers have also originates from poor application techniques way back when. All body fillers will shrink over time in proportion to their thickness. So when you have deep craters such as seen with the previous metal “repair”, thicker filler will be needed and shrinkage is increased. The best case scenario with filler shrinkage would be that you would see a wave around the filler location. Worst case would be that the filler would crack and fall out. If the back side isn’t welded in completely solid like this and moisture can get to it from the back side, falling out will be a certainty. While it is possible to perform the metalwork with such a precision that zero filler is required, doing so would be cost prohibitive. To work out the remaining 10% of the metal defects would add 90% to the total cost of the repair. Keep the filler extremely thin, and keep the $ in your wallet.October 11, 2021
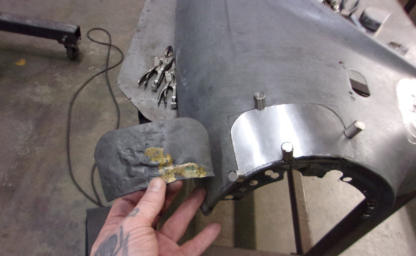
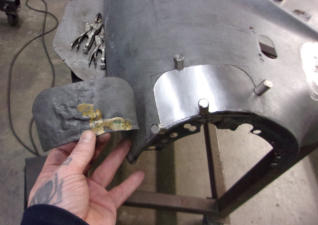
The TR2-TR6 cars that we restore are now between 45-68 years old, and a lot has happened to them before their arrival here. Much of what we do during the restoration process involves repairing work that was previously done to lower standards than what is considered to be high quality today. For example, take a look at the section of TR6 front fender that Matt is holding in his hand. The headlight area of these fenders is known to rust, but quite a few were also wadded up via collision with something that was not a TR6. The original “repair” looks like the scrunched metal was beaten back into a rough shape with a hammer, and then any punctures or rust holes were brazed closed with a welding torch. After the previous bodyman got it “close enough” with the hammer and torch, the next step would have been to slather on the bondo and sand to a final shape. Compare that to Matt’s surgical removal of the damaged metal, and the perfectly shaped replacement section which he created to fill the hole. Magnets hold it in position at this point. Next week we’ll show you the completed repair, after the new panel has been butt welded with a TIG welder and the welds ground smooth to make an invisible repair.October 4, 2021
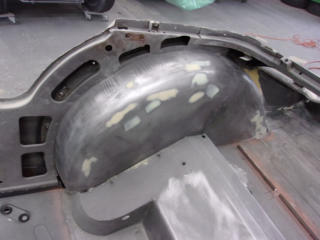
A well known morsel of generally accepted wisdom says that experience is the best teacher, and here’s a perfect example of that. Having done more than a hundred complete TR restorations, we learned a very long time ago that the time to start thinking about the interior installation is well before the paint goes onto the bodywork. Take this TR3 inner wheel arch for example. We know full well that these body panels are covered with a very thin layer of foam padding along the top edge only, and the vertical areas of the panel will only get thin vinyl applied directly to the primed or painted metal. Now the thin padding along the top will hide some small imperfections in the metal, but if the vinyl alone is glued down over small dents or bumps, and especially any small specks of weld splatter or dirt and debris, the thin vinyl layer will actually magnify the imperfections. Just as with painting over body panels that are less than perfect, you cannot apply vinyl upholstery materials over flaws unless you want them to stand out when the restoration is done. Armed with that knowledge, we bodywork and smooth the upholstered interior panels right along with the outer body panels, with an eye to the interior installation which will occur much later in the restoration process.
BLOG
2021-Q4
America’s BEST Triumph Shop


Macy’s Garage

© 2026 - Macy’s Garage, Ltd.

Blog
WHAT we’re doing, and HOW we’re doing it!
December 27, 2021
Last year, we finished our Blog posts for 2020 with a miniature TR3A model and diorama that was created during “off” hours. While there must be times that we are away from Macy’s Garage, Triumphs are never far away from our thoughts! This year, we recreated a familiar sight in our shop, a TR2/3 body tub on one of our three rotisseries/body jigs that we use to replace floors and sills with quick precision. This seemingly simple model and rotisserie however were anything but simple to make. Starting with an old and expensive Gunze-Sangyo TR2 model kit (not the uber-expensive “High’Tech” version), the one piece outer body was sliced apart to make a “tub”, then missing pieces like boot fillers and A-posts and kick panels were created to finish the conversion. Our full size rotisseries were carefully measured and converted to 1/24 scale before miniature brass tubing was cut and soldered together to create the replica. This mini spins and parts slide for adjustment exactly like our full size rotisseries do. As we pointed out in last year’s Triumph model post, it’s our attention to the smallest details which sets us apart!December 20, 2021
With Smiths heater parts in short supply, we had to come up with an alternative just over a year ago. We found this handy little 3.5kw heater in the U.K., and then engineered brackets and sourced hoses and hardware to make them fit under the dash of all TR2-TR3B cars. Then, just when we were feeling warm and fuzzy, the heater manufacturer changed the design! The water connections for the top mounted heater core originally pointed straight down, and the hoses were routed straight up between the heater itself and the rear of the battery box. With the new design, the heater core was moved toward the rear of the heater box, and the hose fittings were changed to a screw-in fitting that pointed straight at the battery box. Guess what? No room to attach the hoses! What we once thought was a completed project would no longer work, which sent us back to the drawing board all over again. Fortunately, the solution was an easy fix which actually works out a little better. Once we were able to determine the strange thread size of the heater core tank (and the included hose barbs), we located some nifty little swivel elbows that could be screwed into the heater, and then receive the hose barbs to connect the hoses. Being able to swivel the elbows eliminated any strange alignment issues, and allow for better hose routing in the process! It’s too bad that all problems aren’t this easy to fix!December 13, 2021
Today we have another photo of the TR3 that was featured last week. We could keep our blog posts filled from now until the spring thaw with photos of the various atrocities that were committed here, but we’ll just show this one more and then move on next week. One of the owner’s complaints was the choke was almost impossible to pull. Now before I go any farther, I need to state that the new cables ARE tough to pull. Most often, it’s because the solid sleeve behind the panel is about 1/4” too long. It then presses against the heater, putting the cable in a bind. But the big fancy multi-marque shop didn’t install a heater, and by just opening the bonnet we spotted the problem immediately. Note the tight “S” bend in the cable, which is an even worse situation than having it press up against the heater. At least they did route the cable through the correct hole, which is something that can’t be said for all the various other cables and gauge lines which pass through the left side of the firewall! So if the cable is routed through the correct hole, then why isn’t the alignment any better? It’s because someone has installed the cable bracket on the WRONG carburetor. The bracket holding the cable sheath should be on the FRONT carburetor, so the cable has a chance to straighten out after passing through the firewall. Some days, we get all of our exercise from shaking our heads in disbelief!December 6, 2021
We have another TR3 here in a long line of Triumphs that are sent to us after a “restoration” at another shop. The owner originally selected a well-known east coast ‘sports car’ shop that was closer to his home, and after an expensive and lengthy process, he received a TR3A that he was afraid to drive more than 2-3 blocks from his house. When the car arrived here, it didn’t take more than 15-20 minutes for our guys to fill two pages with things that had to be done (or re-done). Most of it was small things which we could rectify easily without backing up and starting all over, but he’s stuck with several other big problems like poor panel fit which will allow paint to chip around the hood, doors, and trunk. One of the biggest “fixable” issues was a terrible oil leak from the gearbox and overdrive. This photo shows the overdrive adaptor plate which is bolted onto the rear of the gearbox case. These are supposed to be attached with six bolts, but I only count four. The two large holes at the bottom are supposed to hold the last two bolts, which someone failed to install. You might get away with such negligence for awhile if they were the top bolts, but down at the bottom where all the oil collects? Not a chance in Hades that oil wouldn’t pour out of here, and it certainly did! You can be passionate about these cars until the end of time, but without knowledge and skills to go along with it, the resulting work will be mediocre at best.November 29, 2021
The seat pan in last week’s photo was pretty extreme, in that it was so bad we had to fabricate a new pan 100%. Most times, we are able to repair the rust damage in just a portion of the base, saving time and effort on our part that results in a lower cost to our clients. Just because we can make a complete new unit doesn’t mean that we have to. Fortunately, the special tooling that we created to make the pressed bottoms can be used for either a front or rear half just as easily as it can be used to make an entire bottom. Once this seam is completely TIG welded and the welds ground smooth, no one will ever know what was done to save this seat assembly, not that anyone should ever be removing your seat cushions to take a look at the pans!November 22, 2021
Continuing with last week’s topic regarding the special tools and fixtures we’ve created, here is a folding seat bottom for a TR3-3B. We call these seat “pans” because the sides around the base make them resemble a frying pan. The indented channels in the bottom add strength, as well as providing a recess for the nuts which hold the seats onto the seat slides. The rim around the edge helps to keep the seat spring in place, and adds even more strength and stability to the bottom. But the thing this rim really does best is to hold water! Whenever some previous owner would get caught with the top down, the pans would fill up and the rusting process would begin. Park your Triumph in the back yard for a few years with a leaky or non-existent top, and the seat pans will be the first parts to suffer from the resulting rust. This is such a common problem that we created a special press to form the stamped ribs many years ago, and although we’ve never kept track of how many times this fixture has been used, we can say with absolute certainty that this press gets used as much or more than any other fixture that we have here in our arsenal. Many times we’ll only have to make a front or back half to repair a rusty pan, and other times like this one we’ll have to fabricate an entire new pan from scratch. Just one more example of why there aren’t many problems with these cars that will ever scare us!November 15, 2021
In addition to the well known Churchill tools that we’ve found or made over the years, there are quite a few other tools and fixtures we’ve devised to make our Triumph shop operations more efficient. Take this hub checking fixture for example. The Girling style rear wheel hubs on the big TR series (especially the solid axle cars) are extremely difficult to get apart, and over the many decades that these cars have been in service, more than a few rear hubs have been bent by mechanics without the proper tools, skills, or knowledge. We created this fixture that holds the bearing hub securely, applies a small pre-load to the bearing, and stabilizes the far end of the axle, all so that we can run a dial indicator along the outer edge of the hub and see if it’s going to run true or not. Now if we were trying to work on every car that showed up at our door, we would never have the time to create jigs like this for every possible make and model, nor would we have the room to store them until the next time we see a 1966 XYZ. By sticking to the TR2-TR6 range exclusively, we know that special tools like this will be used in our shop over and over and over again, so it’s easy to justify the time and expense required to create them.November 8, 2021
It was a sad day for the owner of this TR6 when we told him his frame was extremely rusty and had been poorly patched at some time in the past. This news was extremely surprising because he had owned this car for over 20 years, but admittedly didn’t give it much attention and it sat idle during most of that time. Some previous owner, or their “mechanic”, had welded some metal plates on the bottom of a rusty frame member, and then covered it up with primer to hide their “repair”. We keep stressing over and over again that you should NEVER buy an IRS TR (TR4A- TR6) without first looking underneath at the frame, and when you do you are looking not only for rust holes but for cover-ups such as this one. Most times the guilty parties will try to disguise their handiwork by painting over the “repair” or slathering it with thick undercoating, but if you look closely for thicker sections where additional metal has been added, or weld beads that don’t continue down the entire frame, you’ll quickly recognize that something bad has been covered up. We have no way to know if this was an honest attempt to “fix” a serious problem, or to pass a poor car on to an unsuspecting new owner. And of course, just like the cancer that it is, it continues to rust away under the patch and spread to the surrounding “good” metal.November 1, 2021
Here’s something we’ve never seen before! The outer ends of TR3/4 rear axles are machined on a taper, and the hub flange to which the tire and wheel attaches (not to mention locating the rear brake drum), has a matching taper inside which centers the flange. This is an ultra precise fit, so that the hub will run straight and true, 90 degrees to the axle. The hub and axles usually fit together so snugly that it’s a strain to ever get them apart again, even with the special M86A Churchill tool (if you are lucky enough to have one!). But it appears that this axle and it’s associated hub worked loose at some time, probably from a loose retaining nut, and the axle and inner hub flange were damaged in the process. Someone’s cure for damaged parts and a loose wobbly fit? Pack the space with some thin brass shim stock! Forget that the precision fit was gone, and that the wheel would wobble and shake the car. As long as it would go down the road under it’s own power so the owner could make it to work or school the next day, who cares if it shakes and vibrates? We always have to remember that there was a time when these TR’s we all love so much were reduced to nothing more than cheap transportation, so whatever it took to put the car back in service at the least possible cost was A-OK with the owners. It’s a miracle that so many have survived such abuse!October 25, 2021
We all understand that British cars leak oil, and we might even enjoy making jokes about it. But we do need to help our little British cars out a bit, and actually installing proper gaskets would be a good place to start! It’s true that many modern engines can be assembled using nothing more than a high tech gasket maker in a tube, but it never seems to work out well for our Triumphs or other LBC’s. Someone at some time in the past thought they’d give it a go with this TR6 rocker cover, and the engine bay received quite an oil bath as a result. Given that the machined gasket surfaces and bolt spacing could have been better when these cars were first built, we NEVER make the claim that we can stop the oil leaks, only slow them down to a reasonable amount. The results of this experiment were anything but reasonable!October 18, 2021
This week we see the completed repair from last week. If you didn’t know where to look, this repair would be completely invisible. There are still a few imperfections remaining, but they are small enough that they would fill with several coats of primer. To save time and cost to the owner, we will use a very tiny amount of filler to speed up the process, eliminating the need to spray primer and block sand multiple times. Today’s body filler products are 10x better than what was available 20+ years ago, and part of the bad reputation that fillers have also originates from poor application techniques way back when. All body fillers will shrink over time in proportion to their thickness. So when you have deep craters as seen with the previous metal “repair”, thicker filler will be needed and shrinkage is increased. The best case scenario with filler shrinkage would be that you would see a wave around the filler location. Worst case would be that the filler would crack and fall out. If the back side isn’t welded in completely solid like this and moisture can get to it from the back side, falling out will be a certainty. While it is possible to perform the metalwork with such a precision that zero filler is required, doing so would be cost prohibitive. To work out the remaining 10% of the metal defects would add 90% to the total cost of the repair. Keep the filler extremely thin, and keep the $ in your wallet.October 11, 2021
The TR2-TR6 cars that we restore are now between 45-68 years old, and a lot has happened to them before their arrival here. Much of what we do during the restoration process involves repairing work that was previously done to lower standards than what is considered to be high quality today. For example, take a look at the section of TR6 front fender that Matt is holding in his hand. The headlight area of these fenders is known to rust, but quite a few were also wadded up via collision with something that was not a TR6. The original “repair” looks like the scrunched metal was beaten back into a rough shape with a hammer, and then any punctures or rust holes were brazed closed with a welding torch. After the previous bodyman got it “close enough” with the hammer and torch, the next step would have been to slather on the bondo and sand to a final shape. Compare that to Matt’s surgical removal of the damaged metal, and the perfectly shaped replacement section which he created to fill the hole. Magnets hold it in position at this point. Next week we’ll show you the completed repair, after the new panel has been butt welded with a TIG welder and the welds ground smooth to make an invisible repair.October 4, 2021
A well known morsel of generally accepted wisdom says that experience is the best teacher, and here’s a perfect example of that. Having done more than hundred complete TR restorations now, we learned a very long time ago that the time to start thinking about the interior installation is well before the paint goes onto the bodywork. Take this TR3 inner wheel arch for example. We know full well that these body panels are covered with a very thin layer of foam padding along the top edge only, and the vertical areas of the panel will only get thin vinyl applied directly to the primed or painted metal. Now the thin padding along the top will hide some small imperfections in the metal, but if the vinyl alone is glued down over small dents or bumps, and especially any small specks of weld splatter or other dirt and debris, the thin vinyl layer will actually magnify the imperfections. Just as with painting over body panels that are less than perfect, you cannot apply vinyl upholstery materials over flaws unless you want them to stand out when the restoration is done. Armed with that knowledge, we bodywork and smooth the upholstered interior panels right along with the outer body panels, with an eye to the interior installation which will occur much later in the restoration process.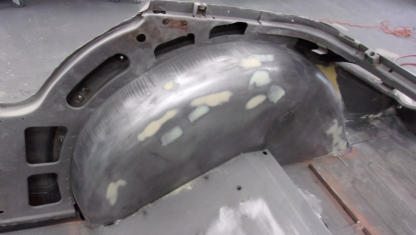


America’s BEST Triumph Shop