Macy’s Garage

© 2026 - Macy’s Garage, Ltd.

Blog
WHAT we’re doing, and HOW we’re doing it!
December 30, 2019
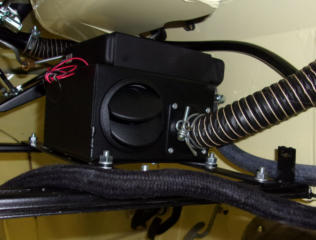
Repair parts for the original round Smith’s heaters used in TR2-TR3B have been virtually non existent for the past several decades, and we’ve finally reached a point here where our stash of good used blower motors and round matrix’s has been exhausted. There is a replacement round matrix (core) that is available, but it is short in height and doesn’t fit well, and it’s also terribly expensive. If you want or need a heater in your sidescreen TR, then it’s time to consider a newer replacement that will perform the task, even if it looks a bit different to anyone who goes looking for it in the hidden location up under the scuttle. With this in mind, we have sourced these nifty little heater units from the UK, and we have fabricated the bracketry needed to cleanly and securely install them out of sight behind the instrument panel. We expect to have these heater kits in stock at all times here on the near side of the Atlantic, and we’ll be able to supply them as a complete kit with mounts and hoses at a cost that is about half the price of the ill-fitting replacement cores. Order from our website on the Parts-Accessories page.December 23, 2019
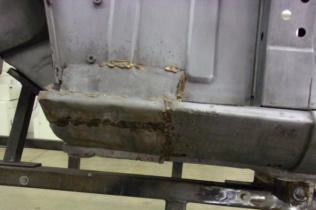
And now we have a properly completed repair. The entire outer sill (rocker panel) has been replaced with a new reproduction part, and the rusty lower section of the bulkhead end panel (kick panel) has been surgically removed and replaced with new metal. After aligning the new patch with the remaining original but solid metal, the pieces were TIG welded together with a continuous butt joint, free of any cracks,voids, or overlaps which might allow moisture in to start the rusting process all over again. We then grind away the excess weld, and leave a repair that will be nearly invisible to anyone who might disassemble this car again 50-60 years from now! Unlike a TR2-3B which has a heavy gauge inner sill to support the door posts and the floors, the only support that a TR4-TR6 body has in this area is a thin sheet metal box which is formed by the inner and outer sills and a small section of the outer floor pan, so it is imperative that any rust in this area is repaired in a manner to assure it is structurally sound. The previous “repair” certainly was not!December 16, 2019
When this TR4 came back from being stripped, we found it to be covered with this type of low quality rust “repair”, where a new piece of metal had been tacked/brazed over a gaping hole to “close it up”. None of the rusty original metal had been removed first, and the new patch was not solidly attached, leaving plenty of cracks for water to seep into the interior compartment. Sometimes this type of patch would be “sealed” with caulking or roofing tar in locations like this which were not visible, and exterior “repairs” would receive a healthy smear of bondo to smooth over the jagged edges. But bondo does nothing to seal the seams, and moisture will soon attack the bondo and paint from the back side, causing bubbles and cracks in the paint in just a few short years. The original rusty metal that is left under a patch like this also makes a nice pocket to collect moisture, which then accelerates the rust process the next time around. Unfortunately, this type of repair was very common 20/30/40 years ago, and is still performed by many home restorers and lower tier restoration shops today. Visit again next week to see how we properly repair rust damage like this, in an invisible and enduring manner.December 9, 2019
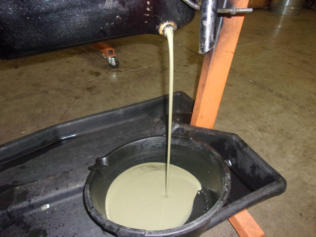
We get a fair amount of TR2/3 steering boxes sent to us for repair AFTER some other owner or shop has attempted the job themselves, but this is the first time we’ve ever seen it done this way! Changing the worm gear (when required) is a specialized operation, and we have developed special tools and procedures for doing so in a fast and efficient manner. Originally, the worm gears were fed onto the lower steering shaft, and then the end of the shaft was flared (like a steel brake line) to keep the gear tightly in place. Apparently the shop who attempted to replace this one could not figure out how to “un-flare” the steering shaft and release the old worm gear, so they ground through the entire length of the old gear along both sides and cut the worm in two to release it. I just hope they weren’t charging the TR3 owner by the hour while performing this painfully slow process! I don’t know how they got the new worm installed, but it was not tight and the steering was erratic, so it ended up here to be done correctly. We did not like all of the cuts and grinding marks they left in the shaft either, so we provided a replacement shaft without the battle scars in the interest of safety. December 2, 2019 You know you have a problem when you drain your engine oil and it looks like this! This TR3A engine came to us to be rebuilt because it was blowing blue smoke out of the tailpipe. Once we got the engine out of the car and mounted onto one of our many engine stands, it was time to drain the oil prior to disassembly. The blue cloud rising from the tailpipe was so dense that I don’t think anyone even bothered to check the dip stick, which would have surely displayed this white goopy oil and water mixture. We were only suspecting a broken ring or two, but now it looks to be a bit more serious. Not that any of this changes our game plan, as we always perform a complete rebuild, and are never tempted to just “fix the problem” and throw it all back together. To learn more about our comprehensive approach to engine overhauls, be sure to read our “Engine Rebuild” page under the “INFO” button.November 25, 2019
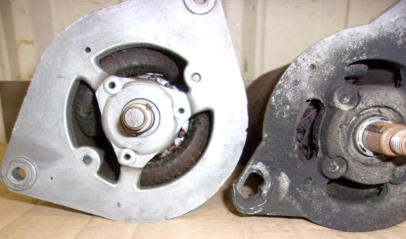
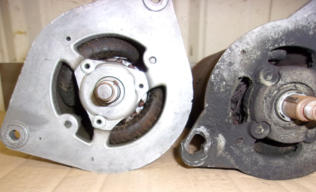
Far too many times we’ll find generators on TR2-TR4A like the one on the right. No one has bothered to check the generator mountings for a very long time, and the bolts have loosened enough to allow the generator to wiggle and wear out the mounting holes of the soft aluminum end plate. This can happen at both the front and the rear of the generator, and as replacement end plates are not available, allowing this to occur basically renders an original generator unuseable as a core to rebuild. Since we already have a dwindling supply of original parts, not to mention the possibility of a generator falling off the engine when you’re driving far away from home, it would be a good idea to check the security of the generator mountings every time you are under the bonnet!November 18, 2019
When you see a placard like this on any TR, you should know that this a Triumph that has seen some serious competition! Shown here is Jeff’s TR3A, (which has been featured a previous blog), following the return from Europe where Jeff and his son Jeff, along with the family TR3A, competed in the Leige-Brescia-Leige rally this past July. The event was a grueling 2400 miles of European back roads and treacherous mountain passes, and we are pleased to report that the “Two Jeffs” placed 2nd with their TR3A and its “Macy’s Garage prepared” engine, gearbox, overdrive, and rear differential! You can read the entire (and lengthy) account of this European TR adventure by downloading the article Jeff wrote HERE.November 11, 2019
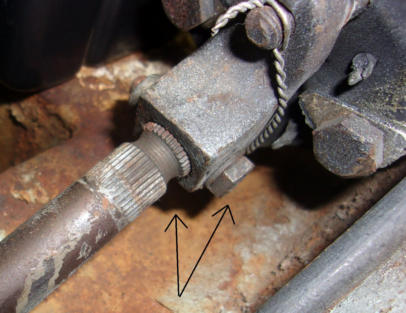
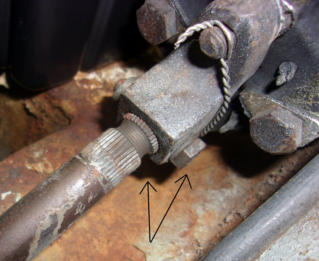
Brakes and steering are the two most important safety items on any car, as cars must go where you point them AND be able to stop. This week we’re looking at a steering situation that isn’t very safe! This is the steering shaft of a TR4, up near the firewall where the column enters the engine compartment. The steering components of a TR6 are assembled in the same manner. When assembling a steering column and the associated shafts, the couplers are supposed to slide down onto the splined shafts until the pinch bolt (right arrow) will pass through the smooth groove in the shaft (left arrow). This assures that the coupler is engaged sufficiently onto the shaft, and the pinch bolt running through the shaft groove will make certain that the coupler will not disconnect from the shaft. As someone in the past has failed to notice, the only thing holding this coupling and shaft together is raw friction, and not much of it at that. The bolt is passing above the top of the shaft and it’s just barely hanging on, not nearly as safe as it should be! If you drive a TR4-TR6, please take a look at your steering shaft couplings just to be certain that your steering column is assembled correctly. It’s hard to know what sort of incompetent mechanic worked on it last!November 4, 2019
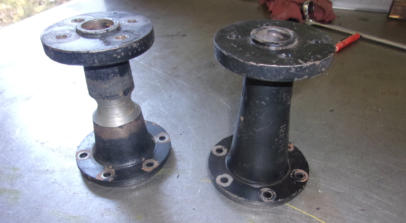
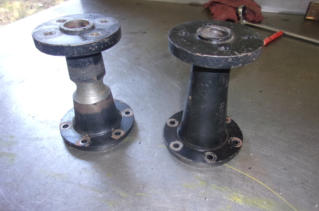
Here’s another photo of the worn TR4A crankshaft hub extension (left) from last week, and a good hub extension which has not been ground away against the steering rack tube on the right. What always amazes me is that this big massive casting is always the part which wears away, and the thin (.062”) steel tubes which encase the steering racks never show much more than a tiny scratch. From this demonstration you can easily see which part is made from the softer metal! Thankfully, this was caught before the casting wore completely through and destroyed the new aluminum radiator. It wouldn’t have taken too many more miles for this catastrophe to have occurred. We do keep a large inventory of used TR parts to support the projects in our shop, so sourcing a replacement was no more difficult that pulling a part from our warehouse. No hours spent searching the internet, sending e-mails or making phone calls, and no waiting for parts to arrive and paying shipping costs. Efficiency is our middle name!October 28, 2019
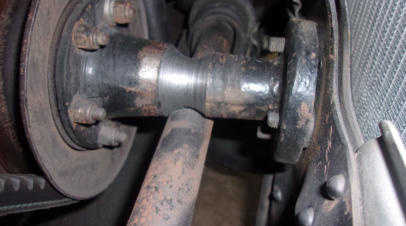
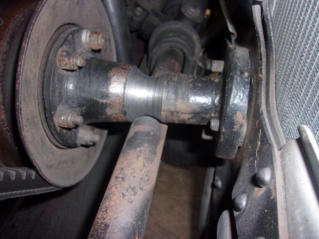
What we have this week is another sad story of an unsuspecting TR owner who paid the local “I can fix any car” mechanic to mess up his Triumph. A couple of months ago, this TR4A broke a fan belt. The owner took the car to a local that he’s been using for general maintenance, and a new belt was installed (along with a new aluminum radiator). Now all of you TR4 owners out there who have done this in the past will know that to get a new belt onto these cars, either the steering rack must be removed, or the engine has to be jacked up. No other way around it. This particular mechanic chose to jack up the engine, but he took the lazy way out and didn’t bother to loosen the motor mount bolts. How do we know this? Because of all the old grease and dirt packed on the motor mount nuts! Unfortunately this “jacking up of the engine” broke both of the front motor mounts, and when the owner picked up the car and drove it home, the motor promptly shifted out of position and fell down, allowing the cast iron hub extension to ride on top of the steering rack. We’ve seen worn hub extensions before, but this one was just about to go through completely, & probably toss the fan blade into the new aluminum radiator!October 21, 2019
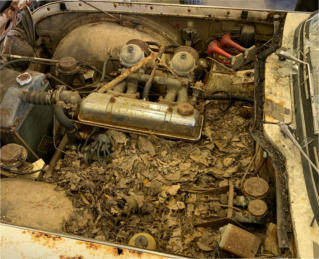
One more to go along with the neglected TR4 from October 7. This one was just too good not to share! Once we were able to get the hood open, we found this gigantic squirrel nest inside the engine bay. When cars are neglected by humans, you can rest assured that they will not be ignored by the animals! We’ve seen our share of nut shells and mouse droppings inside of engine cylinders, and blown plenty of nesting material out of exhaust systems on cars which were coaxed back to life. We’ve also repaired plenty of chewed wiring and interior components, including a TR6 that literally had the entire interior (including the wood dash overlay) eaten by raccoons, but never have we seen an engine bay that was as completely taken over as with this one. Apparently the tarp which was draped over the car did a wonderful job of making the TR4 a nice cozy habitat for the wildlife, not to mention trapping the moisture inside which totalled the car with rust.October 14, 2019
Congratulations go out this week to Ken and Sherry from Houston, TX, for winning Best of Show honors at the VTR (Vintage Triumph Register) national meet last week in Dripping Springs, TX. Having performed the complete restoration of this car in 2017-2018, we are just as proud as Ken and Sherry to receive the top prize at the largest Triumph show in the USA! While we did not build this car specifically to be a serious concours contender like we did with Tonda’s TR4 (CT288L), we did restore this to our mid-level “Show” quality, which was apparently good enough to wow the judges! The Beige paint and Vermillion interior colors are original to this car, and quite refreshing in a sea of BRG and Signal Red cars. This car is the very first blog photo shown here on April 16, 2018 (2018-Q2), and you can see what we started with on our Before/After page under the Gallery menu. One more important fact regarding the VTR appearance last week, the car was DRIVEN to and from the show, in 90 degree heat, something between 600-700 miles for the week. We build them to drive AND make them pretty!October 7, 2019
While serving in the U.S. Air Force and stationed in England, many had the good fortune to purchase a new Triumph TR, drive it all over Europe, and then bring it home to the United States with them. They loved their TR’s and they served them faithfully for many years, taking them all over the USA. They wanted to restore their cars some day, and parked them under tarps in their back yards until they were ready. But the “ready” day never arrived, and 14-15 years passed by without ever taking another look at them. Unfortunately, tarps don’t breathe and they trap moisture below, causing accelerated rust and deterioration until the cars are no longer salvageable. Any of you who have a TR presently stored in a similar fashion, I suggest that you go uncover it and have a look today! Perhaps if you are lucky, it won’t be too late to save that car you loved!
BLOG
2019-Q4
America’s BEST Triumph Shop


Macy’s Garage

© 2026 - Macy’s Garage, Ltd.

Blog
WHAT we’re doing, and HOW we’re doing it!
December 30, 2019
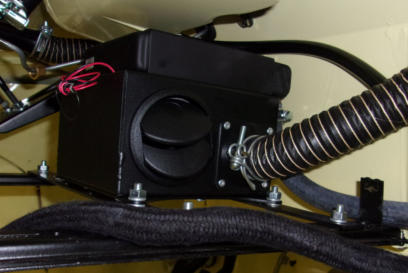
Repair parts for the original round Smith’s heaters used in TR2-TR3B have been virtually non existent for the past several decades, and we’ve finally reached a point here where our stash of good used blower motors and round matrix’s has been exhausted. There is a replacement round matrix (core) that is available, but it is short in height and doesn’t fit well, and it’s also terribly expensive. If you want or need a heater in your sidescreen TR, then it’s time to consider a newer replacement that will perform the task, even if it looks a bit different to anyone who goes looking for it in the hidden location up under the scuttle. With this in mind, we have sourced these nifty little heater units from the UK, and we have fabricated the bracketry needed to cleanly and securely install them out of sight behind the instrument panel. We expect to have these heater kits in stock at all times here on the near side of the Atlantic, and we’ll be able to supply them as a complete kit with mounts and hoses at a cost that is about half the price of the ill- fitting replacement cores. Order from our website on the Parts-Accessories page.December 23, 2019
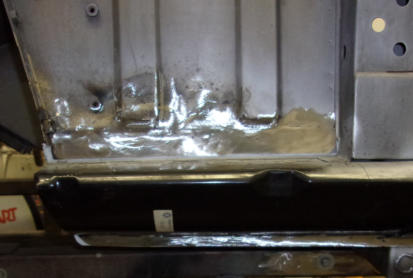
And now we have a properly completed repair. The entire outer sill (rocker panel) has been replaced with a new reproduction part, and the rusty lower section of the bulkhead end panel (kick panel) has been surgically removed and replaced with new metal. After aligning the new patch with the remaining original but solid metal, the pieces were TIG welded together with a continuous butt joint, free of any cracks,voids, or overlaps which might allow moisture in to start the rusting process all over again. We then grind away the excess weld, and leave a repair that will be nearly invisible to anyone who might disassemble this car again 50-60 years from now! Unlike a TR2-3B which has a heavy gauge inner sill to support the door posts and the floors, the only support that a TR4-TR6 body has in this area is a thin sheet metal box which is formed by the inner and outer sills and a small section of the outer floor pan, so it is imperative that any rust in this area is repaired in a manner to assure it is structurally sound. The previous “repair” certainly was not!December 16, 2019
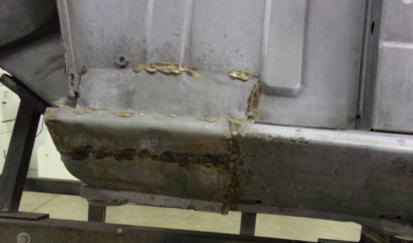
When this TR4 came back from being stripped, we found it to be covered with this type of low quality rust “repair”, where a new piece of metal had been tacked/brazed over a gaping hole to “close it up”. None of the rusty original metal had been removed first, and the new patch was not solidly attached, leaving plenty of cracks for water to seep into the interior compartment. Sometimes this type of patch would be “sealed” with caulking or roofing tar in locations like this which were not visible, and exterior “repairs” would receive a healthy smear of bondo to smooth over the jagged edges. But bondo does nothing to seal the seams, and moisture will soon attack the bondo and paint from the back side, causing bubbles and cracks in the paint in just a few short years. The original rusty metal that is left under a patch like this also makes a nice pocket to collect moisture, which then accelerates the rust process the next time around. Unfortunately, this type of repair was very common 20/30/40 years ago, and is still performed by many home restorers and lower tier restoration shops today. Visit again next week to see how we properly repair rust damage like this, in an invisible and enduring manner.December 9, 2019
We get a fair amount of TR2/3 steering boxes sent to us for repair AFTER some other owner or shop has attempted the job themselves, but this is the first time we’ve ever seen it done this way! Changing the worm gear (when required) is a specialized operation, and we have developed special tools and procedures for doing so in a fast and efficient manner. Originally, the worm gears were fed onto the lower steering shaft, and then the end of the shaft was flared (like a steel brake line) to keep the gear tightly in place. Apparently the shop who attempted to replace this one could not figure out how to “un-flare” the steering shaft and release the old worm gear, so they ground through the entire length of the old gear along both sides and cut the worm in two to release it. I just hope they weren’t charging the TR3 owner by the hour while performing this painfully slow process! I don’t know how they got the new worm installed, but it was not tight and the steering was erratic, so it ended up here to be done correctly. We did not like all of the cuts and grinding marks they left in the shaft either, so we provided a replacement shaft without the battle scars in the interest of safety.December 2, 2019
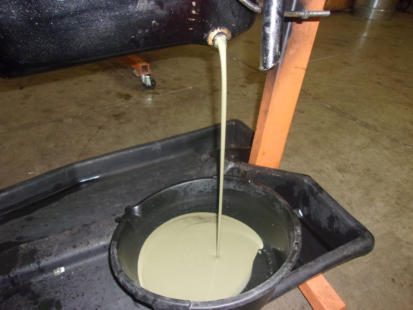
You know you have a problem when you drain your engine oil and it looks like this! This TR3A engine came to us to be rebuilt because it was blowing blue smoke out of the tailpipe. Once we got the engine out of the car and mounted onto one of our many engine stands, it was time to drain the oil prior to disassembly. The blue cloud rising from the tailpipe was so dense that I don’t think anyone even bothered to check the dip stick, which would have surely displayed this white goopy oil and water mixture. We were only suspecting a broken ring or two, but now it looks to be a bit more serious. Not that any of this changes our game plan, as we always perform a complete rebuild, and are never tempted to just “fix the problem” and throw it all back together. To learn more about our comprehensive approach to engine overhauls, be sure to read our “Engine Rebuild” page under the “INFO” Navigation button.November 25, 2019
Far too many times we’ll find generators on TR2-TR4A like the one on the right. No one has bothered to check the generator mountings for a very long time, and the bolts have loosened enough to allow the generator to wiggle and wear out the mounting holes of the soft aluminum end plate. This can happen at both the front and the rear of the generator, and as replacement end plates are not available, allowing this to occur basically renders an original generator unuseable as a core to rebuild. Since we already have a dwindling supply of original parts, not to mention the possibility of a generator falling off the engine when you’re driving far away from home, it would be a good idea to check the security of the generator mountings every time you are under the bonnet!November 18, 2019
When you see a placard like this on any TR, you should know that this a Triumph that has seen some serious competition! Shown here is Jeff’s TR3A, (which has been featured a previous blog), following the return from Europe where Jeff and his son Jeff, along with the family TR3A, competed in the Leige-Brescia-Leige rally this past July. This event was a grueling 2400 miles of European back roads over treacherous mountain passes, and we are pleased to report that the “Two Jeffs” placed 2nd with their TR3A and its “Macy’s Garage prepared” engine, gearbox, overdrive, and rear differential! You can read the entire (and lengthy) account of this European TR adventure by downloading the article Jeff wrote HERE:November 11, 2019
Brakes and steering are the two most important safety items on any car, as cars must go where you point them AND be able to stop. This week we’re looking at a steering situation that isn’t very safe! This is the steering shaft of a TR4, up near the firewall where the column enters the engine compartment. The steering components of a TR6 are assembled in the same manner. When assembling a steering column and the associated shafts, the couplers are supposed to slide down onto the splined shafts until the pinch bolt (right arrow) will pass through the smooth groove in the shaft (left arrow). This assures that the coupler is engaged sufficiently onto the shaft, and the pinch bolt running through the shaft groove will make certain that the coupler will not disconnect from the shaft. As someone in the past has failed to notice, the only thing holding this coupling and shaft together is raw friction, and not much of it at that. The bolt is passing above the top of the shaft and it’s just barely hanging on, not nearly as safe as it should be! If you drive a TR4-TR6, please take a look at your steering shaft couplings just to be certain that your steering column is assembled correctly. It’s hard to know what sort of incompetent mechanic worked on it last!November 4, 2019
Here’s another photo of the worn TR4A crankshaft hub extension (left) from last week, and a good hub extension which has not been ground away against the steering rack tube on the right. What always amazes me is that this big massive casting is always the part which wears away, and the thin (.062”) steel tubes which encase the steering racks never show much more than a tiny scratch. From this demonstration you can easily see which part is made from the softer metal! Thankfully, this was caught before the casting wore completely through and destroyed the new aluminum radiator. It wouldn’t have taken too many more miles for this catastrophe to have occurred. We do keep a large inventory of used TR parts to support the projects in our shop, so sourcing a replacement was no more difficult that pulling a part from our warehouse. No hours spent searching the internet, sending e-mails or making phone calls, and no waiting for parts to arrive and paying shipping costs. Efficiency is our middle name!October 28, 2019
What we have this week is another sad story of an unsuspecting TR owner who paid the local “I can fix any car” mechanic to mess up his Triumph. A couple of months ago, this TR4A broke a fan belt. The owner took the car to a local that he’s been using for general maintenance, and a new belt was installed (along with a new aluminum radiator). Now all of you TR4 owners out there who have done this in the past will know that to get a new belt onto these cars, either the steering rack must be removed, or the engine has to be jacked up. No other way around it. This particular mechanic chose to jack up the engine, but he took the lazy way out and didn’t bother to loosen the motor mount bolts. How do we know this? Because of all the old grease and dirt packed on the motor mount nuts! Unfortunately this “jacking up of the engine” broke both of the front motor mounts, and when the owner picked up the car and drove it home, the motor promptly shifted out of position and fell down, allowing the cast iron hub extension to ride on top of the steering rack. We’ve seen worn hub extensions before, but this one was just about to go through completely, & probably toss the fan blade into the new aluminum radiator!October 21, 2019
One more to go along with the neglected TR4 from Oct. 7. This one was just too good not to share! Once we were able to get the hood open, we found this gigantic squirrel nest inside the engine bay. When cars are neglected by humans, you can rest assured that they will not be ignored by the animals! We’ve seen our share of nut shells and mouse droppings inside of engine cylinders, and blown plenty of nesting material out of exhaust systems on cars which were coaxed back to life. We’ve also repaired plenty of chewed wiring and interior components, including a TR6 that literally had the entire interior (including the wood dash overlay) eaten by raccoons, but never have we seen an engine bay that was as completely taken over as with this one. Apparently the tarp which was draped over the car did a wonderful job of making the TR4 a nice cozy habitat for the wildlife, not to mention trapping the moisture inside which totalled the car with rust.October 14, 2019
Congratulations go out this week to Ken and Sherry from Houston, TX, for winning Best of Show honors at the VTR (Vintage Triumph Register) national meet last week in Dripping Springs, TX. Having performed the complete restoration of this car in 2017-2018, we are just as proud as Ken and Sherry to receive the top prize at the largest Triumph show in the USA! While we did not build this car specifically to be a serious concours contender like we did with Tonda’s TR4 (CT288L), we did restore this to our mid- level “Show” quality, which was apparently good enough to wow the judges! The Beige paint and Vermillion interior colors are original to this car, and quite refreshing in a sea of BRG and Signal Red cars. This car is the very first blog photo shown here on April 16, 2018 (2018-Q2), and you can see what we started with on our Before/After page under the Gallery menu. One more important fact regarding the VTR appearance last week, the car was DRIVEN to and from the show, in 90 degree heat, something between 600-700 miles for the week. We build them to drive AND make them pretty!October 7, 2019
While serving in the U.S. Air Force and stationed in England, many had the good fortune to purchase a new Triumph TR, drive it all over Europe, and then bring it home to the United States with them. They loved their TR’s and they served them faithfully for many years, taking them all over all over the USA. They wanted to restore their cars some day, and parked them under tarps in their back yards until they were ready. But the “ready” day never arrived, and 14-15 years passed by without ever taking another look at them. Unfortunately, tarps don’t breathe and they trap moisture below, causing accelerated rust and deterioration until the cars are no longer salvageable. Any of you who have a TR presently stored in a similar fashion, I suggest that you go uncover it and have a look today! Perhaps if you are lucky, it won’t be too late to save that car you loved!


America’s BEST Triumph Shop