Macy’s Garage

© 2026 - Macy’s Garage, Ltd.

Blog
WHAT we’re doing, and HOW we’re doing it!
June 27, 2022
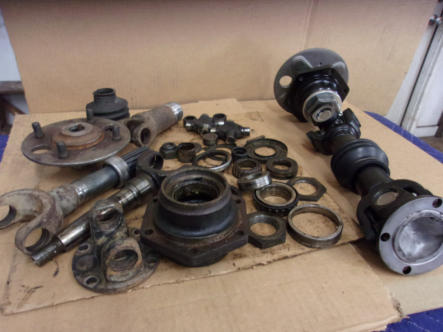
One of the very first Triumph reference books I purchased (almost 30 years ago) was Richard Newton’s Illustrated Triumph Buyer’s Guide, Motorbooks International 1994. While the Triumph values are now well out of date, it’s still a good reference for following the evolution of the TR series from TR2-TR6. The one comment that I have always remembered from reading this book is that the IRS cars (TR4A-TR6) have a lot of additional parts which need to be maintained. He sure called that one right! This photo shows one disassembled IRS axle shaft assembly (AKA half-shaft), and one that has received a complete overhaul with new U-joints and bearings. We rebuild these here in-house, and it’s quite a lengthy and complicated task. All new replacement parts can be purchased for about the same cost as overhauling an original, but you still must assemble the components and the new outer hub assemblies will usually need to be taken apart and re-assembled correctly. All that effort and lower quality parts probably explains why we have so many owners of IRS equipped cars just send their original axles here for a complete rebuild.June 20, 2022
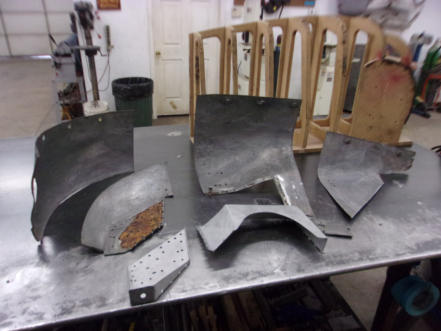
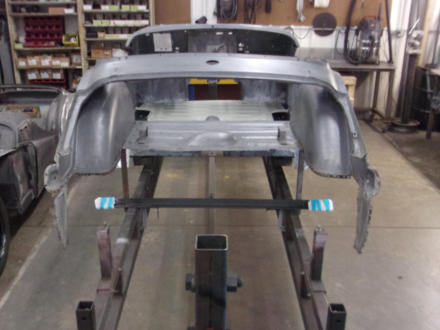
Don’t try this at home! The rear body tub of a sidescreen TR is a complicated affair, made up from multiple different panels that all have to fit together perfectly. It’s the first area that I look at when contemplating the purchase of a TR2-TR3B because it is the absolute hardest area to repair and a common place to find rust and collision damage. From the windshield inspection stickers it appears that this car originated in CA, and then spent time in OK before making it to Ohio, so the rust wasn’t much of an issue. But typical of most Triumphs that aren’t rusty, it had suffered some “minor” collision damage. The first indication was a little crinkle at the edge of the spare tire opening which should have been easy enough to repair, but when dealing with a 60+ year old car, nothing is ever as easy as it seems. Each and every panel attached to the spare tire pan and rear apron had been deformed by this relatively minor looking collision, so just as we revealed here in our May 16 post, the only way to straighten out the mess was to take it all apart and repair each piece individually. Fortunately, we have created three precision body jigs, and we’ve done this job many many times in the past, so the results will be invisible and perfect.June 13, 2022
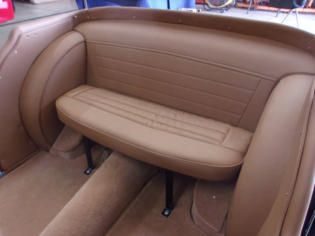
Having travelled extensively in a TR3 over the past 25+ years, I can tell you from experience that the Occasional Rear Seat (ORS) is a welcome addition to any pre-TS60K TR with the scalloped and sloping rear floor. It’s true that no one can sit back there, but without the seat to provide a flat horizontal surface, you also won’t be able to transport much in that area either. Anything moderately sized is difficult to carry in this area, as it won’t fit down into the scallops, and if placed higher up on the sloping area they tend to slide down and rub on the back of the seats. Adding the Occasional Rear Seat flattens out the surface, allowing medium sized objects to be carried easily, while still leaving the small scalloped floor areas under the ORS for packing smaller items. The TR2’s had a larger 14 gallon gas tank which further reduces the size of this area, so an ORS is probably not going to be an option for you. But when Triumph thought to start selling rear seats as an option at the introduction of the TR3 in 1956, the size of the gas tank was reduced to 12.5 gallons, adding space for the rear seat “passengers” and baggage.June 6, 2022
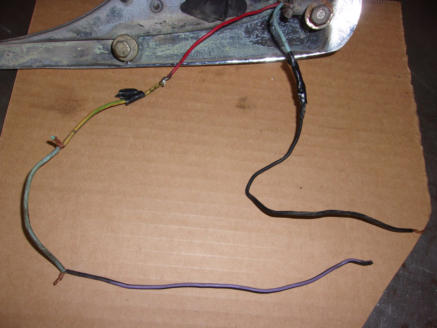
This week’s photo is yet another example of the electrical atrocities by previous owners and mechanics which have given rise to the horrible Lucas Electric reputation. Time and time again we’ve shown examples here of why the “Prince of Darkness” and “Brits drink warm beer because they have Lucas refrigerators” tales are not really the fault of the Joseph Lucas company or it’s products. The troublesome myths stem from ham fisted owners and mechanics who think it’s OK to splice 4 short pieces of wire together like this to make a 14” piece, and then connect some of the sections by simply twisting the wires together and wrapping with tape. Follow a color code so that someone later can trace the faults it’s sure to have? Forget about it. We don’t need no stinking color code! Oh, and did I mention the short splice in the ground wire? Two inches off the light socket seems to me like a good place to add another splice. Gotta use up that new roll of electrical tape somehow! We receive inquiries all the time from prospective TR owners who are contemplating their first British car, and just about every one of them ask if they can “upgrade” the troublesome Lucas electrical system. Of course we tell them right away that we always replace the old hacked-up wiring like this with a new OEM Lucas style harness, and the troubles are over until the owners or some local mechanic feel the need to start cutting into it again to add some new gee-whiz accessory. At that time, I’m afraid, the legend will return!May 31, 2022
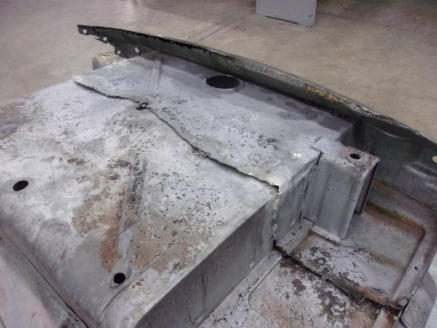
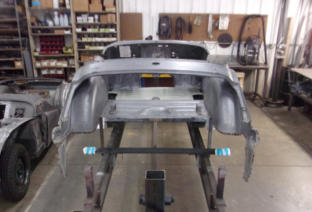
This is what the rear of a TR6 body tub looks like, flipped upside-down of course. But they don’t all look like this one, as the bottom of the spare tire pan is originally made in one piece. What evidently happened to this 1972 TR6 many years ago, was that someone hit this car in the rear end, and the body shop doing the repairs was “lucky” enough to find an entire rear 18” from another TR6 and graft it onto the damaged car. The workmanship is pretty poor, and the overlapped areas created a nice pocket to trap moisture and promote rust. They did however slather enough undercoating on it that the present owner, who acquired the car sometime around 1976, had no idea that the car had ever been wrecked and repaired in this manner. This is why every car we are going to restore and paint has to make a trip through the stripping tanks at Pro Strip Indy, so we can find all the previous sins and repair them correctly. And in the case of this TR6, the story does not end here at the tail end. When the car was hit from behind, it looks like it was pushed into the car ahead, because the front end of the body tub has been repaired in exactly the same manner, also unknown to the present long-term owner! At least the body shop way back was lucky enough to find both rear AND front sections to make the “repairs”.May 23, 2022
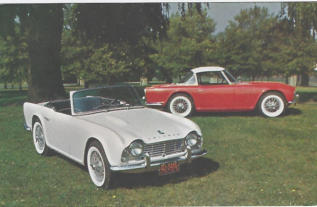
One week ago, May 15, we took Tonda’s 1961 TR4 (CT288L) to the Columbus Ohio British Car Day, where it once again won the coveted Best of Show award. That now makes 4 British car shows and 4 Best of Show awards for this car! But this week’s Blog is about the questions we continually get about this perfect 100 point car being 1) a 1961(?) TR4, and 2) why wide whitewall tires? The first question is the easiest to answer, as minimal research will show that Triumph built 2470 TR4 models in 1961, starting in August. As for the wide whitewalls, they were the worldwide norm through 1961, and then the the entire globe switched over to narrow 3/4” whitewalls in early 1962. This publicity photograph clearly shows two early (1961) TR4’s with wide whitewalls, and we also have a collection of early TR4 brochures and magazine ads which show cars with wide whites instead of the later narrow style. But the most convincing evidence that wide whites were factory installed, and not provided by the American dealers, is a factory photo on page 64 of Piggott’s “Triumph - The Sporting Cars” (2000), showing cars with wide whites on the assembly line Oct. 2, 1961. As Tonda’s CT288L was completed on Oct. 5, and “whitewall tyres” are listed on the Heritage Certificate, we had no choice than to install wide whites for a proper and authentic restoration.May 16, 2022
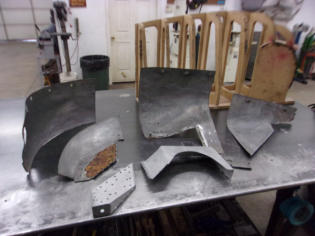
Crumpled sheet metal can usually be straightened with relative ease, as long as there aren’t any “hard” breaks (folds) or multiple pieces welded to each other which tend to lock-in the damage. In the case of multiple piece panels, they are easier to straighten if you first separate the pieces and straighten the components one at a time. Take this early TR2 inner front fender for example. This is from TS333L, and on the earliest cars like this Triumph created these panels from many smaller pieces. Later in production they could afford large stamping dies, so the inner fenders were made in one giant piece. Most sidescreen cars have been bashed in the front end at least once by now, so years ago we built bucks so we could create new fender wells from scratch. But in the case of this early car, where the panel was made from so many smaller pieces, we opted to cut everything apart at the seams and straighten all of the parts one by one. We then used the buck to reassemble the fender well in precisely the same manner as the Triumph factory did back in 1953. Making the repair in this way let us retain a larger portion of the original car, and fix the problem at a lower cost than to fabricate a completely new one.May 9, 2022
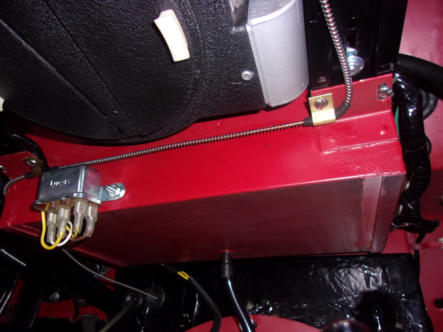
Attention to detail isn’t just about getting the visible parts of the car right, but applies to each and every hidden component as well. Take the lower battery box and under dash area of this TR3B for example. The heater has the correct black wrinkle finish on the lower plate and doors, and the doors both have bright new ivory colored plastic knobs. The aluminum elbow for the defrost hose connection is the proper silver, and the screw holding the elbow to the heater is the correct natural finish. The overdrive solenoid is mounted in the correct location at the rear of the battery box, with the proper spade wire connectors installed in the correct “down” orientation. The solenoid is attached with the original style hex nuts and slotted flat head screws that were countersunk into the battery box, necessary to keep the screw heads from wearing holes in the battery case. Don’t forget to install the battery box drain tube either! Also note the detail in routing the water temp gauge capillary tube as shown in the Standard-Triumph TR2 Service Instruction Manual (Section C, Cooling System, page 4). Not shown here, but the additional details to route the capillary tube through the engine bay as shown in Service Bulletin Sports/2/C, October 1954 were also followed. All of these details don’t need to be memorized, but it sure helps to know that references are available and where to find them!May 2, 2022
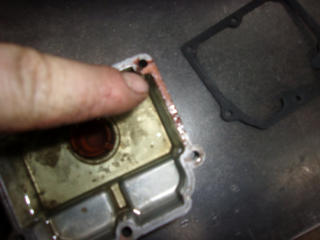
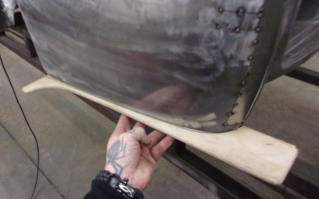
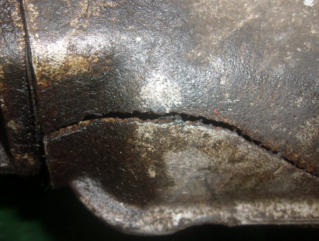
Most of the TR’s that arrive here for full restoration have been sitting in storage for a very long time, but rarely are we able to determine exactly why the cars were taken off the road and parked in the first place. The crack in the bottom of this TR3A gearbox case leaves little doubt as to why this particular car stopped providing fun transportation to it’s owner, though we still have to wonder why they didn’t look for a replacement transmission to get it back on the road? At the time this car was parked in the mid-1970’s, there were foreign car service shops and junk/salvage yards where parts and service were available, so a $25 used transmission and an afternoon’s work could have put this TR3A back into service. We’ve never seen a gearbox broken this severely before, nor have we heard one make the same noises inside when you roll it over on the bench. We’ll tear it down to see what happened, but we don’t expect to find many re-usable parts inside. The solution here will undoubtedly be to start with another gearbox from our 9000 sq ft warehouse, and upgrade to a 4-synchro TR4 box with overdrive while we’re at it! April 25, 2022 Over the many years that have elapsed since our beloved Triumphs were new cars, they’ve all taken a lot of abuse from previous owners and body men alike. Seemingly all cars and body panels have been beaten and wrinkled at some point in time, and with most cars this has happened to them multiple times throughout the years. It’s gotten to the point where original shapes have been lost to the previous 5-7 decades, and most cars are “restored” back to the “best guess” as to how they should really be shaped. Because we repair and restore the TR2-TR6 model range EXCLUSIVELY, we’ve seen and worked on more TR’s than anyone else on this side of the Atlantic. It also means that through this high volume, we occasionally find that rare body panel that has escaped the usual abuse. We then make a durable template and keep those templates here for use on every car which follows through our shop. In this photo you can see our lower rear fender (wing) template being used to confirm that our metal repairs to this crumpled rear corner have returned it to the correct original profile. April 18, 2022 We recently rebuilt a TR250 engine and the owner wanted to participate, so he “rebuilt” the carburetors himself at home. When it came time for us to mount the engine onto our test stand and run it for the proper camshaft break-in procedure (and to check for leaks and general operation), the owner delivered the freshly rebuilt carburetors for us to install and use during the test. We always pump up the oil pressure and fuel before hitting the starter, but as the fuel began to enter the carbs, they started to drip almost instantly. This new found problem meant that the test run was delayed while we removed and disassembled the carburetors to find the source of the leaks. Once the lower fuel bowls were removed, the source of the leaks was readily apparent. A portion of the old gasket still remained on the edge of the fuel bowl, and expecting the new gasket to seal around this was asking a bit much. So the lesson to be learned here is that whenever replacing ANY gasket on your car, motorcycle, or even your lawnmower, make sure that the gasket surfaces on your parts are absolutely clean and smooth. Otherwise, you may end up with a larger leak than the one you intended to fix!April 11, 2022
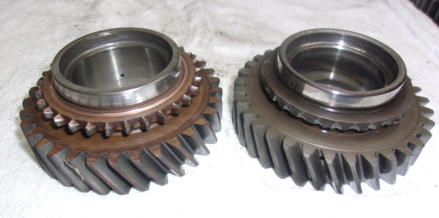
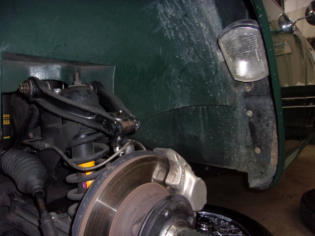
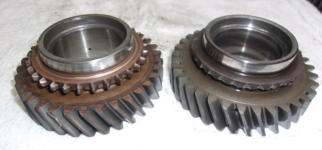
When examining transmission gears, it is the large teeth that usually get all the attention. They are the teeth which transfer all of the engine power, but they suffer little wear or abuse as they are always in constant mesh with the countershaft gears and are never supposed to move out of position. What is actually the most important feature of these gears are the smaller teeth, seen only on the gear at the left in this photo. Look closely at the gear on the right, and you can see where the small teeth were once attached, but all have now been stripped away clean. These small teeth are the place where the transmission synchronizers continually slide on and off to connect and disconnect the gear on every up-shift and down-shift. If worn enough by this action, they can cause your transmission to pop out of gear on a downshift or during deceleration. They are also the teeth that you hear when someone grinds the gears! April 4, 2022 Here’s a new one that we’ve never seen before! This TR4A had two driving lights installed in the front fenders, one on each side of the car. It might have been understandable if they had been pointed outside of the fenderwell so that they could have been used as turning lamps to illuminate the pavement around a corner. But no, they weren’t aimed at anything except the tire tread, or the brake calipers when the wheels were removed. Perhaps a previous owner was having a large amount of brake problems, and found himself always working on it in the middle of the night? Or could they have possibly raced this car at Sebring or Daytona where brake service might have been required after dark in the 12 and 24 hour races? We’ll never know for certain why these lights were mounted here, but one thing for sure is that we now have another one to add to our “What Were They Thinking?” files.
BLOG
2022-Q2
America’s BEST Triumph Shop


Macy’s Garage

© 2026 - Macy’s Garage, Ltd.

Blog
WHAT we’re doing, and HOW we’re doing it!
June 27, 2022
One of the very first Triumph reference books I purchased (almost 30 years ago) was Richard Newton’s Illustrated Triumph Buyer’s Guide, Motorbooks International 1994. While the Triumph values are now well out of date, it’s still a good reference for following the evolution of the TR series from TR2-TR6. The one comment that I have always remembered from reading this book is that the IRS cars (TR4A-TR6) have a lot of additional parts which need to be maintained. He sure called that one right! This photo shows one disassembled IRS axle shaft assembly (AKA half-shaft), and one that has received a complete overhaul with new U-joints and bearings. We rebuild these here in- house, and it’s quite a lengthy and complicated task. All new replacement parts can be purchased for about the same cost as overhauling an original, but you still must assemble the components and the new outer hub assemblies will usually need to be taken apart and re- assembled correctly. All that effort and lower quality parts probably explains why we have so many owners of IRS equipped cars just send their original axles here for a complete rebuild.June 20, 2022
Don’t try this at home! The rear body tub of a sidescreen TR is a complicated affair, made up from multiple different panels that all have to fit together perfectly. It’s the first area that I look at when contemplating the purchase of a TR2-TR3B because it is the absolute hardest area to repair and a common place to find rust and collision damage. From the windshield inspection stickers it appears that this car originated in CA, and then spent time in OK before making it to Ohio, so the rust wasn’t much of an issue. But typical of most Triumphs that aren’t rusty, it had suffered some “minor” collision damage. The first indication was a little crinkle at the edge of the spare tire opening which should have been easy enough to repair, but when dealing with a 60+ year old car, nothing is ever as easy as it seems. Each and every panel attached to the spare tire pan and rear apron had been deformed by this relatively minor looking collision, so just as we revealed here in our May 16 post, the only way to straighten out the mess was to take it all apart and repair each piece individually. Fortunately, we have created three precision body jigs, and we’ve done this job many many times in the past, so the results will be invisible and perfect.June 13, 2022
Having travelled extensively in a TR3 over the past 25+ years, I can tell you from experience that the Occasional Rear Seat (ORS) is a welcome addition to any pre-TS60K TR with the scalloped and sloping rear floor. It’s true that no one can sit back there, but without the seat to provide a flat horizontal surface, you also won’t be able to transport much in that area either. Anything moderately sized is difficult to carry in this area, as it won’t fit down into the scallops, and if placed higher up on the sloping area they tend to slide down and rub on the back of the seats. Adding the Occasional Rear Seat flattens out the surface, allowing medium sized objects to be carried easily, while still leaving the small scalloped floor areas under the ORS for packing smaller items. The TR2’s had a larger 14 gallon gas tank which further reduces the size of this area, so an ORS is probably not going to be an option for you. But when Triumph thought to start selling rear seats as an option at the introduction of the TR3 in 1956, the size of the gas tank was reduced to 12.5 gallons, adding space for the rear seat “passengers” and baggage.June 6, 2022
This week’s photo is yet another example of the electrical atrocities by previous owners and mechanics which have given rise to the horrible Lucas Electric reputation. Time and time again we’ve shown examples here of why the “Prince of Darkness” and “Brits drink warm beer because they have Lucas refrigerators” tales are not really the fault of the Joseph Lucas company or it’s products. The troublesome myths stem from ham fisted owners and mechanics who think it’s OK to splice 4 short pieces of wire together like this to make a 14” piece, and then connect some of the sections by simply twisting the wires together and wrapping with tape. Follow a color code so that someone later can trace the faults it’s sure to have? Forget about it. We don’t need no stinking color code! Oh, and did I mention the short splice in the ground wire? Two inches off the light socket seems to me like a good place to add another splice. Gotta use up that new roll of electrical tape somehow! We receive inquiries all the time from prospective TR owners who are contemplating their first British car, and just about every one of them ask if they can “upgrade” the troublesome Lucas electrical system. Of course we tell them right away that we always replace the old hacked-up wiring like this with a new OEM Lucas style harness, and the troubles are over until the owners or some local mechanic feel the need to start cutting into it again to add some new gee-whiz accessory. At that time, I’m afraid, the legend will return! May 31, 2022 This is what the rear of a TR6 body tub looks like, flipped upside-down of course. But they don’t all look like this one, as the bottom of the spare tire pan is originally made in one piece. What evidently happened to this 1972 TR6 many years ago, was that someone hit this car in the rear end, and the body shop doing the repairs was “lucky” enough to find an entire rear 18” from another TR6 and graft it onto the damaged car. The workmanship is pretty poor, and the overlapped areas created a nice pocket to trap moisture and promote rust. They did however slather enough undercoating on it that the present owner, who acquired the car sometime around 1976, had no idea that the car had ever been wrecked and repaired in this manner. This is why every car we are going to restore and paint has to make a trip through the stripping tanks at Pro Strip Indy, so we can find all the previous sins and repair them correctly. And in the case of this TR6, the story does not end here at the tail end. When the car was hit from behind, it looks like it was pushed into the car ahead, because the front end of the body tub has been repaired in exactly the same manner, also unknown to the present long-term owner! At least the body shop way back was lucky enough to find both rear AND front sections to make the “repairs”.May 23, 2022
One week ago, May 15, we took Tonda’s 1961 TR4 (CT288L) to the Columbus Ohio British Car Day, where it once again won the coveted Best of Show award. That now makes 4 British car shows and 4 Best of Show awards for this car! But this week’s Blog is about the questions we continually get about this perfect 100 point car being 1) a 1961(?) TR4, and 2) why wide whitewall tires? The first question is the easiest to answer, as minimal research will show that Triumph built 2470 TR4 models in 1961, starting in August. As for the wide whitewalls, they were the worldwide norm up through 1961, and then the entire globe switched over to narrow 3/4” whitewalls in early 1962. This publicity photograph clearly shows two early (1961) TR4’s with wide whitewalls, and we also have a collection of early TR4 brochures and magazine ads which show cars with wide whites instead of the later narrow style. But the most convincing evidence that wide whites were factory installed, and not provided by the American dealers, is a factory photo on page 64 of Piggott’s “Triumph - The Sporting Cars” (2000), showing cars with wide whites on the assembly line Oct. 2, 1961. As Tonda’s CT288L was completed on Oct. 5, and “whitewall tyres” are listed on the Heritage Certificate, we had no choice than to install wide whites for a proper and authentic restoration.May 16, 2022
Crumpled sheet metal can usually be straightened with relative ease, as long as there aren’t any “hard” breaks (folds) or multiple pieces welded to each other which tend to lock-in the damage. In the case of multiple piece panels, they are easier to straighten if you first separate the pieces and straighten the components one at a time. Take this early TR2 inner front fender for example. This is from TS333L, and on the earliest cars like this Triumph created these panels from many smaller pieces. Later in production they could afford large stamping dies, so the inner fenders were made in one giant piece. Most sidescreen cars have been bashed in the front end at least once by now, so years ago we built bucks so we could create new fender wells from scratch. But in the case of this early car, where the panel was made from so many smaller pieces, we opted to cut everything apart at the seams and straighten all of the parts one by one. We then used the buck to reassemble the fender well in precisely the same manner as the Triumph factory did back in 1953. Making the repair in this way let us retain a larger portion of the original car, and fix the problem at a lower cost than to fabricate a completely new one.May 9, 2022
Attention to detail isn’t just about getting the visible parts of the car right, but applies to each and every hidden component as well. Take the lower battery box and under dash area of this TR3B for example. The heater has the correct black wrinkle finish on the lower plate and doors, and the doors both have bright new ivory colored plastic knobs. The aluminum elbow for the defrost hose connection is the proper silver, and the screw holding the elbow to the heater is the correct natural finish. The overdrive solenoid is mounted in the correct location at the rear of the battery box, with the proper spade wire connectors installed in the correct “down” orientation. The solenoid is attached with the original style hex nuts and slotted flat head screws that were countersunk into the battery box, necessary to keep the screw heads from wearing holes in the battery case. Don’t forget to install the battery box drain tube either! Also note the detail in routing the water temp gauge capillary tube as shown in the Standard-Triumph TR2 Service Instruction Manual (Section C, Cooling System, page 4). Not shown here, but the additional details to route the capillary tube through the engine bay as shown in Service Bulletin Sports/2/C, October 1954 were also followed. All of these details don’t need to be memorized, but it sure helps to know that references are available, and where to find them!May 2, 2022
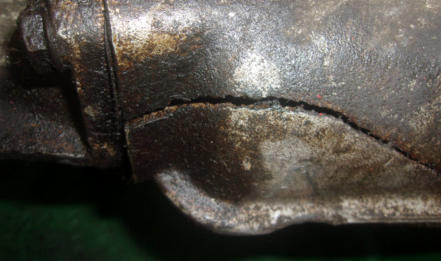
Most of the TR’s that arrive here for full restoration have been sitting in storage for a very long time, but rarely are we able to determine exactly why the cars were taken off the road and parked in the first place. The crack in the bottom of this TR3A gearbox case leaves little doubt as to why this particular car stopped providing fun transportation to it’s owner, though we still have to wonder why they didn’t look for a replacement transmission to get it back on the road? At the time this car was parked in the mid-1970’s, there were foreign car service shops and junk/salvage yards where parts and service were available, so a $25 used transmission and an afternoon’s work could have put this TR3A back into service. We’ve never seen a gearbox broken this severely before, nor have we heard one make the same noises inside when you roll it over on the bench. We’ll tear it down to see what happened, but we don’t expect to find many re-usable parts inside. The solution here will undoubtedly be to start with another gearbox from our 9000 sq ft warehouse, and upgrade to a 4-synchro TR4 box with overdrive while we’re at it!April 25, 2022
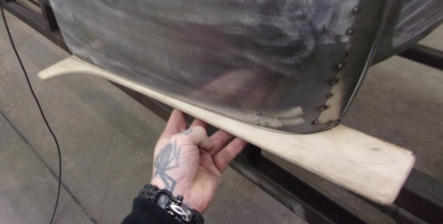
Over the many years that have elapsed since our beloved Triumphs were new cars, they’ve all taken a lot of abuse from previous owners and body men alike. Seemingly all cars and body panels have been beaten and wrinkled at some point in time, and with most cars this has happened to them multiple times throughout the years. It’s gotten to the point where original shapes have been lost to the previous 5-7 decades, and most cars are “restored” back to the “best guess” as to how they should really be shaped. Because we repair and restore the TR2-TR6 model range EXCLUSIVELY, we’ve seen and worked on more TR’s than anyone else on this side of the Atlantic. It also means that through this high volume, we occasionally find that rare body panel that has escaped the usual abuse. We then make a durable template and keep those templates here for use on every car which follows through our shop. In this photo you can see our lower rear fender (wing) template being used to confirm that our metal repairs to this crumpled rear corner have returned it to the correct original profile.April 18, 2022
We recently rebuilt a TR250 engine and the owner wanted to participate, so he “rebuilt” the carburetors himself at home. When it came time for us to mount the engine onto our test stand and run it for the proper camshaft break-in procedure (and to check for leaks and general operation), the owner delivered the freshly rebuilt carburetors for us to install and use during the test. We always pump up the oil pressure and fuel before hitting the starter, but as the fuel began to enter the carbs, they started to drip almost instantly. This new found problem meant that the test run was delayed while we removed and disassembled the carburetors to find the source of the leaks. Once the lower fuel bowls were removed, the source of the leaks was readily apparent. A portion of the old gasket still remained on the edge of the fuel bowl, and expecting the new gasket to seal around this was asking a bit much. So the lesson to be learned here is that whenever replacing ANY gasket on your car, motorcycle, or even your lawnmower, make sure that the gasket surfaces on your parts are absolutely clean and smooth. Otherwise, you may end up with a larger leak than the one you intended to fix!April 11, 2022
When examining transmission gears, it is the large teeth that usually get all the attention. They are the teeth which transfer all of the engine power, but they suffer little wear or abuse as they are always in constant mesh with the countershaft gears and are never supposed to move out of position. What is actually the most important feature of these gears are the smaller teeth, seen only on the gear at the left in this photo. Look closely at the gear on the right, and you can see where the small teeth were once attached, but all have now been stripped away clean. These small teeth are the place where the transmission synchronizers continually slide on and off to connect and disconnect the gear on every up-shift and down-shift. If worn enough by this action, they can cause your transmission to pop out of gear on a downshift or during deceleration. They are also the teeth that you hear when someone grinds the gears!April 4, 2022
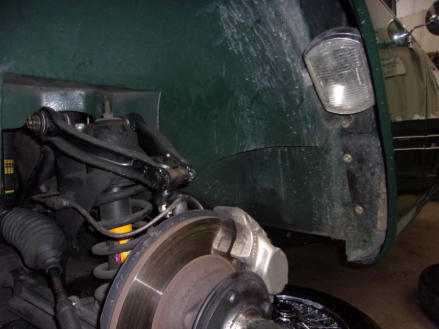
Here’s a new one that we’ve never seen before! This TR4A had two driving lights installed in the front fenders, one on each side of the car. It might have been understandable if they had been pointed outside of the fenderwell so that they could have been used as turning lamps to illuminate the pavement around a corner. But no, they weren’t aimed at anything except the tire tread, or the brake calipers when the wheels were removed. Perhaps a previous owner was having a large amount of brake problems, and found himself always working on it in the middle of the night? Or could they have possibly raced this car at Sebring or Daytona where brake service might have been required after dark in the 12 and 24 hour races? We’ll never know for certain why these lights were mounted here, but one thing for sure is that we now have another one to add to our “What Were They Thinking?” files.

America’s BEST Triumph Shop