Macy’s Garage

© 2026 - Macy’s Garage, Ltd.

Blog
WHAT we’re doing, and HOW we’re doing it!
December 31, 2018
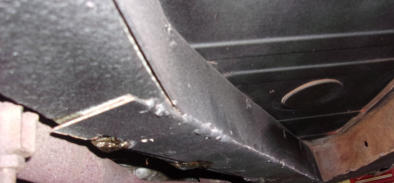
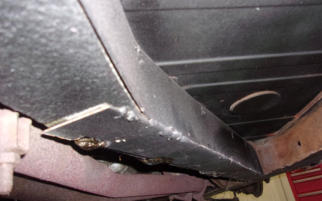
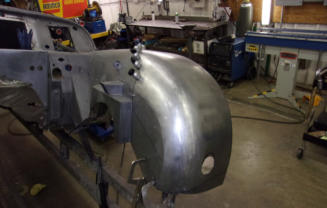
Remove the front apron from a sidescreen TR, and more times than not you’ll find that the front of the inner wings have been smashed and roughly beaten back into “shape”, and I’ll use that term very loosely! This area is well hidden behind the apron, so for most body shops and restorers over the past 60-65 years, anything which would make the car driveable again was considered to be acceptable. Expectations today are quite a bit higher, especially for Triumphs which have been restored here at Macy’s Garage! It takes plenty of expensive equipment, and talented people with very uncommon skills to make parts like this from nothing more than flat sheets of steel, but creating something out of nothing is a challenge that we are prepared to meet each and every single day!December 24, 2018
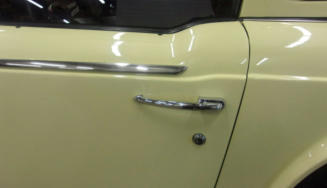
The problem with quick research, is that the first findings you run across might be wrong. Take the position of this chrome spear for example. This TR250 was here for a pre-buy inspection, and this just didn’t look right but I wanted to be positive before including it in my report to the prospective buyer. Whenever I need a memory refresh, I head to our extensive library for help. But imagine my surprise when I opened Piggott’s “Original TR4/4A/5/6” and found photos of two different restored cars, on the same page, and this piece of trim was installed differently on each one! So this shows that you can’t always trust restored cars, as the previous restorer always has a 50/50 chance of getting the details wrong (unless it was restored here!). So how did we decide which one was correct? We continued digging and located several FACTORY photos, and only then could we be certain that the trim strips had been installed upside down on the wrong doors, both here and on the Valencia Blue TR250 shown in Piggott’s book!December 17, 2018
Here are some seldom seen parts that you probably won’t recognize. They are the TR2-4A brake/clutch pedal bushings and shaft, and I’ll be that most TR restorers don’t know that they can be changed, or guess that they would ever need to be! But take one look at all of the rough rust pits on the original shaft shown at the bottom of the photo, and it’s easy to see why you might want to! Most of you are probably pretty good about changing your oil once a year, and probably hit all of the chassis grease zerks with a shot of grease at the same time, but have you ever given any thought to lubing the clutch, brake, or even the gas pedal and linkages? The big workshop manuals are quiet on the subject, but if you dig deeply enough into the owners’ manuals, you might run across the following recommendation: “The oil can should be applied to the various members of the pedal linkages, both under the bonnet and in the driving compartment”. From the looks of this pedal shaft, I’d say that the previous owners of this car never found that reference!December 10, 2018
We are well into the restoration of this TR4, and fortunately the owner has been collecting parts and parts cars for many years. He brought us two left front fenders, and both were pretty rough. But fortunately they each had a good end! One was rusted very badly at the rear half, and the front of the other had been used to stop the car against a hard object. The decision to marry the best parts of both was an easy one for our talented metal fabricators. Now if you are going to attempt a project like this, you need to measure about six times before you cut, and then another half dozen or so times before you weld. This entire process took place on and off of the car, using very long straight edges to confirm alignment, and then as a final check it helps to just stand back and visually look down all of the lines before you ever come near it with your welder! And the finished results? In bare metal it’s hard to tell that this fender was made from two, so we have no doubt that the repair will be invisible once the paint has been applied and the restoration is complete.December 3, 2018
Here is a perfect example of why we simply cannot give estimates. When working on vehicles this old, there have been a lot of “hands” on them before they come to us, and we often find that previous work was performed without any consideration whatsoever for future service. This TR3A needs a clutch. It should be a simple job, and having done hundreds of them you’d think that we’d have no trouble providing an accurate estimate. But had we issued a quote prior to the car’s arrival, we would have had no way of knowing that someone in the past has “repaired” the rusty floors by placing a sheet of new metal over them. It’s not the nicest way to repair, but better than nothing. Their big mistake was placing the new metal over the lower mounting flange of the gearbox cover (and over all of the gearbox cover attachment bolts), and then caulking the crap out of all the edges so that the “repair” patch can’t be easily removed for access. I’ll also point out that they covered all of the body mount bolts too, so if the front mounting pins for the rear leaf springs won’t slide out of the frame, we’ won’t have the option to raise the body when we change the rear springs. Even now, with all of these issues discovered, we still have no idea of how long the repairs are going to take (and cost) because we’ve found ourselves yet again in uncharted territory!November 26, 2018
Here we have the lower edge of a TR3A gas tank. Look closely and you can see that the lower section of the tank has been covered in a layer of fiberglass, and this “repair” was applied along the entire bottom of the tank. It’s no wonder that the owner complained of a strong gas smell coming from his recently acquired and previously “restored” TR3A! Whomever performed the “restoration” on this car in the past must have used fiberglass as their rust repair of choice, because we’ve also noticed it poking through numerous rust holes in the floors! Many of you who are facing a rusty gas tank will opt to order a new replacement tank, but I want to present you with another option. We prefer to send all of our original gas tanks (no matter how bad they appear) to our nearest Gas-Tank-Renu franchise for repair. They can save even the worst original tanks at a cost that is usually less than the price of a new tank, AND the original tanks fit better than a reproduction tank ever will! The nationwide lifetime warranty they offer is a big plus as well, but in all the years we’ve been using their services we’ve only had one single warranty claim, and it was promptly and cheerfully resolved!November 19, 2018
Yes, you are correct! The TR4-TR6 door panel gaps NEVER looked this good when the cars came from the factory! But this level of fit and finish is what’s expected today, especially if the cars were restored here at Macy’s Garage. Many times we’ve had cars brought to us AFTER they’ve been painted elsewhere, and the owners ask us to “adjust” their doors to achieve this level of perfection. Sorry to tell you this, but the time to get the gaps this nice is long before you put paint into the gun and start spraying. The fact is, there just isn’t enough adjustment available to bring panels that are “off” this much into alignment. The fix is to re-make the body lines by a combination of adding and removing metal (welding and grinding) from the edges of the fenders and doors. Only by planning for this well ahead of the paint application can you ever make them come out this nice.November 12, 2018
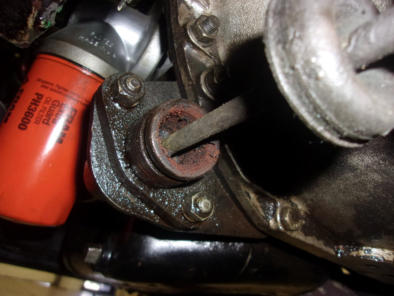
We get a very large number of TR’s here that are in need of resuscitation after many years in storage. In every single case, it is the fluid systems that need the most work, and the rubber that holds those fluids in place. These trouble areas are always going to be the fuel system, the cooling system, and the brake/clutch hydraulic systems. Once those three areas are addressed, along with a “normal” oil change for the engine, gearbox, and rear differential, most TR’s can be coaxed back to life. For a good example of what happens inside the hydraulic systems, take a look at this TR6 clutch slave cylinder. The cylinder bore is heavily rusted, and no doubt the steel piston inside as well. This car was sitting for “only” 10 years, inside a “dry” garage while this damage slowly occurred. Imagine what problems you will find if your TR is stored for 30 years on a dirt floor, inside a damp and drafty barn! Driving and maintaining your TR’s will always be better for them than lengthy periods where they sit and wait for you to get back to them! It may also be better for your own sanity as well. Have you ever seen a TR parked in front of a psychiatrists’ office?November 5, 2018
We ALWAYS tell anyone who will ask, that if you are planning to purchase a TR4A, TR250, or TR6, any of the cars with the rust prone “IRS” style frame (including the TR4A solid axle cars), you absolutely MUST get under the car for a look at the frame before parting with your hard earned money. This design frame is extremely rust prone, and there’s always a better than 50/50 chance that the metal termites have been at work. Some times it will be repairable, and some times you will need to replace the entire frame. Here’s an example where someone paid good money to have a rusty frame “repaired”. It has been “worked-on”, but it certainly hasn’t been “repaired”! When you are examining one of these frames for rust damage, you’re not just looking for holes, but for signs of metal plates or patches which have been scabbed over the holes or weak areas to make it appear “repaired” at a quick glance. If you see something that looks like this, I suggest you run just as fast and as far away as you can. There’s no telling how much of the original frame is left under these “repairs”, and tacking a new piece of metal onto a weak and rusty frame isn’t going to last very long. The owner of this car told us that it was ready to “break in two” before he had it “repaired”. We think it’s still ready to break in two!October 30, 2018
We normally won’t post to this page more than once a week, but this is so exciting that we couldn’t wait to share it! Richard Lentinello from Hemmings Motor News just posted a piece on our 100 point TR4 to the Hemmings Daily blog. Follow this link to read the article and see all of the photos and comments on the Hemmings website: Triumphant TriumphOctober 29, 2018
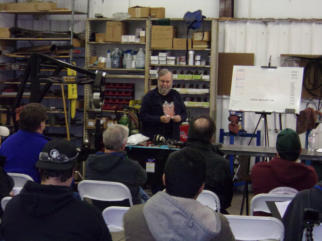
We were recently honored to have world renowned metalworking wizard Ron Covell here at Macy’s Garage to present two days of his popular seminars for beginning and experienced fabricators alike. Ron has over 50 years of metalworking experience, and held his first workshop at his home base in 1993. That first workshop was such a success, he started offering them on a regular basis, and soon started traveling the country to help fill the demand. His workshops continue to grow in popularity, and over four thousand people have attended so far. Ron markets a line of excellent instructional DVDs on his website www.covell.biz, and there is also a link there to his YouTube channel where you can view short segments from his DVD’s. His popular column, "Professor Hammer's Metalworking Tips" has run in Street Rodder Magazine since 1995, and in 2000 a second "Professor Hammer" series, focusing on issues unique to older trucks, was launched in Classic Trucks Magazine. Ron has written technical articles for Street Rodder Magazine, Classic Trucks, Super Rod, Metalcrafter's News, Sport Aviation, and Hot Bike magazines. His schedule for 2019 is already full, but we would love to have him return to Macy’s Garage again sometime in the future.October 22, 2018
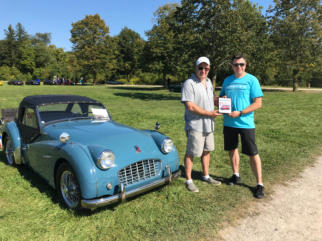
Jeff lives in KS, and he stopped by last week on his way home from New England to show off the trophy he won in the Great American Mountain Rally Revival. Jeff has owned his TR3A for over 40 years now, and has close to 400,000 miles on the car, most of them his! We rebuilt his entire drivetrain a couple of years ago, and he’s now got close to 30,000 miles on our running gear. Jeff was full of praise for the power we built into his TR3 engine, and told us how he had to use every bit of it going up some of the steep mountain roads on this 700 mile, 2-day rally. Now in all of the years Jeff has owned his TR3A, this is the very first time he has participated in any kind of a rally or motorsports competition. But now that the bug has bitten, he’ll be shipping the car to Europe next spring to compete in a 5000KM vintage car rally over there! Look up “Diehard Triumph Owner” in the dictionary, and you’ll surely see Jeff’s picture there. We’re happy we could help him to continue “living the dream”!October 15, 2018
George was restoring his TR3A at home, and doing a pretty good job of installing new floors and outer sills, repairing the rear floor sections, and even installing a new trunk floor. But when it came time to install the new replacement rear apron, he discovered that things just weren’t lining up right and he wisely decided to call in the Cavalry! The rear apron is the most complicated area on a sidescreen TR body, and it’s the first place I check for rust when evaluating a TR2/3 to purchase. It’s a place where multiple panels join together, and they all have to fit together like a glove if you want to have any chance of closing the boot lid or having the fender, bumper, and body mount holes align during final assembly. It also doesn’t help that the new reproduction panels are always off just a tick from original OEM parts, so you have to know where to cut and modify the new parts or they’re never going to work. Fortunately, our team has done this enough times that they could almost do it in their sleep, making a difficult job for anyone else look easy!October 8, 2018
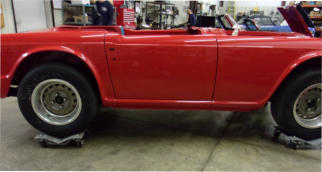
It’s always fun to come in on Monday morning and open e-mails with stories of events and photos of the cars we’ve restored. Last Monday we got this photo from Andrew in Canada, taken at the Toronto British Car Day in Bronte Park. This is the largest British car show in North America, with typically over 1100 cars and motorcycles in attendance. Andrew’s 1957 TR3 which we restored for him in the original (rare) color scheme of Winchester Blue with Grey leather interior handily won the TR 2-3-4 class, and he was told repeatedly that if they had awarded a Best of Show trophy, it would have been his as well! In this photo you can see that Andrew has the soft top and side curtains installed, but this car is also equipped with a factory hardtop and our perfect rear hardtop window. You can see other photos of this car on our June 4, 2018 blog, the TR2/3 gallery page, and in the opening photo of our HOME page. The Winchester Blue is such a striking color today, that I can’t imagine why it didn’t sell well in 1957. With lack-luster sales, the Winchester Blue was dropped for 1958 and replaced with Powder Blue, which then proved to be extremely popular!October 1, 2018
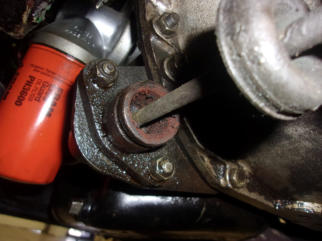
It is very rare to see a broken crankshaft in the 4-cylinder TR2-TR4A engine, so when we find one like this we know we need to dig deeply to find the cause. This engine was just rebuilt by the long term TR3 owner and had only been driven 250 miles before this catastrophy happened. He decided that he would be better off bringing it to us for a “proper” rebuild, and to help his chances that it doesn’t happen again. When the owner delivered the engine and all of his spare parts to us, he happened to have a box containing an extra set of main bearing caps which he suggested we could use if his old ones were damaged. BINGO! The light went on and we had the clue we needed to explain the broken crankshaft. The owner/rebuilder had “swapped” in a set of main bearing caps from another engine block, which is something to be avoided unless you then have the block “align bored”, which he did not. The mis-matched bearing caps were not in perfect alignment, which obviously put a twisting stress on the crank, resulting in the failure you see here. Since we don’t now know which caps are original to what block, we’ll choose a set and have the align-bore done to re-establish a straight crankshaft center line, so this won’t happen again!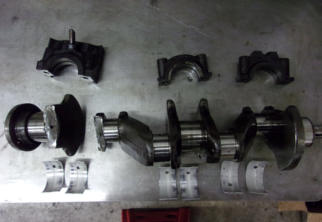

BLOG
2018-Q4
America’s BEST Triumph Shop


Macy’s Garage

© 2026 - Macy’s Garage, Ltd.

Blog
WHAT we’re doing, and HOW we’re doing it!
December 31, 2018
Remove the front apron from a sidescreen TR, and more times than not you’ll find that the front of the inner wings have been smashed and roughly beaten back into “shape”, and I’ll use that term very loosely! This area is well hidden behind the apron, so for most body shops and restorers over the past 60-65 years, anything which would make the car driveable again was considered to be acceptable. Expectations today are quite a bit higher, especially for Triumphs which have been restored here at Macy’s Garage! It takes plenty of expensive equipment, and talented people with very uncommon skills to make parts like this from nothing more than flat sheets of steel, but creating something out of nothing is a challenge that we are prepared to meet each and every single day!December 24, 2018
The problem with quick research, is that the first findings you run across might be wrong. Take the position of this chrome spear for example. This TR250 was here for a pre-buy inspection, and this just didn’t look right but I wanted to be positive before including it in my report to the prospective buyer. Whenever I need a memory refresh, I head to our extensive library for help. But imagine my surprise when I opened Piggott’s “Original TR4/4A/5/6” and found photos of two different restored cars, on the same page, and this piece of trim was installed differently on each one! So this shows that you can’t always trust restored cars, as the previous restorer always has a 50/50 chance of getting the details wrong (unless it was restored here!). So how did we decide which one was correct? We continued digging and located several FACTORY photos, and only then could we be certain that the trim strips had been installed on the wrong doors, both here and on the Valencia Blue TR250 in Piggott’s book!December 17, 2018
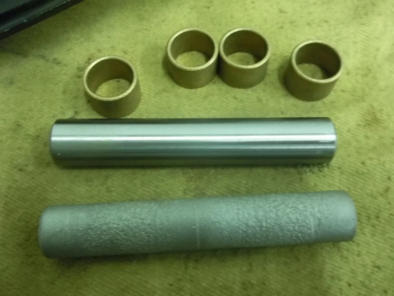
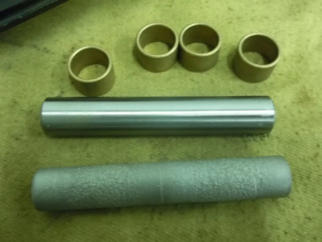
Here are some seldom seen parts that you probably won’t recognize. They are the TR2-4A brake/clutch pedal bushings and shaft, and I’ll be that most TR restorers don’t know that they can be changed, or guess that they would ever need to be! But take one look at all of the rough rust pits on the original shaft shown at the bottom of the photo, and it’s easy to see why you might want to! Most of you are probably pretty good about changing your oil once a year, and probably hit all of the chassis grease zerks with a shot of grease at the same time, but have you ever given any thought to lubing the clutch, brake, or even the gas pedal and linkages? The big workshop manuals are quiet on the subject, but if you dig deeply enough into the owners’ manuals, you might run across the following recommendation: “The oil can should be applied to the various members of the pedal linkages, both under the bonnet and in the driving compartment”. From the looks of this pedal shaft, I’d say that the previous owners of this car never found that reference!December 10, 2018
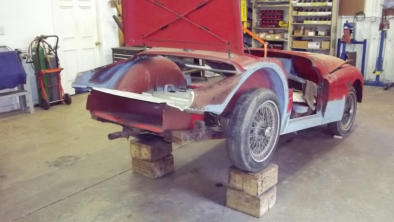
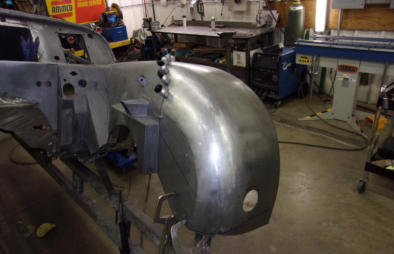
We are well into the restoration of this TR4, and fortunately the owner has been collecting parts and parts cars for many years. He brought us two left front fenders, and both were pretty rough. But fortunately they each had a good end! One was rusted very badly at the rear half, and the front of the other had been used to stop the car against a hard object. The decision to marry the best parts of both was an easy one for our talented metal fabricator Matt. Now if you are going to attempt a project like this, you need to measure about six times before you cut, and then another half dozen or so times before you weld. This entire process took place on and off of the car, using very long straight edges to confirm alignment, and then as a final check it helps to just stand back and visually look down all of the lines before you ever come near it with your welder! And the finished results? In bare metal it’s hard to tell that this fender was made from two, so we have no doubt that the repair will be invisible once the paint has been applied and the restoration is complete.December 3, 2018
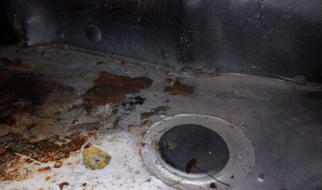
Here is a perfect example of why we simply cannot give estimates. When working on vehicles this old, there have been a lot of “hands” on them before they come to us, and we often find that previous work was performed without any consideration whatsoever for future service. This TR3A needs a clutch. It should be a simple job, and having done hundreds of them you’d think that we’d have no trouble providing an accurate estimate. But had we issued a quote prior to the car’s arrival, we would have had no way of knowing that someone in the past has “repaired” the rusty floors by placing a sheet of new metal over them. It’s not the nicest way to repair, but better than nothing. Their big mistake was placing the new metal over the lower mounting flange of the gearbox cover (and over all of the gearbox cover attachment bolts), and then caulking the crap out of all the edges so that the “repair” patch can’t be easily removed for access. I’ll also point out that they covered all of the body mount bolts too, so if the front mounting pins for the rear leaf springs won’t slide out of the frame, we’ won’t have the option to raise the body when we change the rear springs. Even now, with all of these issues discovered, we still have no idea of how long the repairs are going to take (and cost) because we’ve found ourselves yet again in uncharted territory!November 26, 2018
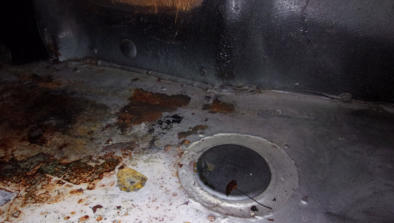
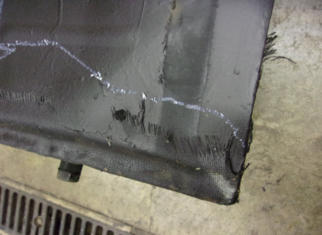
Here we have the lower edge of a TR3A gas tank. Look closely and you can see that the lower section of the tank has been covered in a layer of fiberglass, and this “repair” was applied along the entire bottom of the tank. It’s no wonder that the owner complained of a strong gas smell coming from his recently acquired and previously “restored” TR3A! Whomever performed the “restoration” on this car in the past must have used fiberglass as their rust repair of choice, because we’ve also noticed it poking through numerous rust holes in the floors! Many of you who are facing a rusty gas tank will opt to order a new replacement tank, but I want to present you with another option. We prefer to send all of our original gas tanks (no matter how bad they appear) to our nearest Gas-Tank-Renu franchise for repair. They can save even the worst original tanks at a cost that is usually less than the price of a new tank, AND the original tanks fit better than a reproduction tank ever will! The nationwide lifetime warranty they offer is a big plus as well, but in all the years we’ve been using their services we’ve only had one single warranty claim, and it was promptly and cheerfully resolved!November 19, 2018
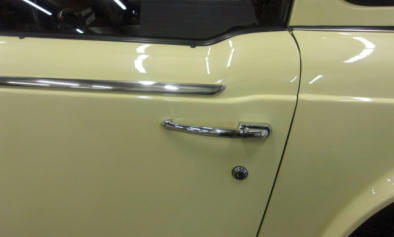
Yes, you are correct! The TR4-TR6 door panel gaps NEVER looked this good when the cars came from the factory! But this level of fit and finish is what’s expected today, especially if the cars were restored here at Macy’s Garage. Many times we’ve had cars brought to us AFTER they’ve been painted elsewhere, and the owners ask us to “adjust” their doors to achieve this level of perfection. Sorry to tell you this, but the time to get the gaps this nice is long before you put paint into the gun and start spraying. The fact is, there just isn’t enough adjustment available to bring panels that are “off” this much into alignment. The fix is to re-make the body lines by a combination of adding and removing metal (welding and grinding) from the edges of the fenders and doors. Only by planning for this well ahead of the paint application can you ever make them come out this nice.November 12, 2018
We get a very large number of TR’s here that are in need of resuscitation after many years in storage. In every single case, it is the fluid systems that need the most work, and the rubber that holds those fluids in place. These trouble areas are always going to be the fuel system, the cooling system, and the brake/clutch hydraulic systems. Once those three areas are addressed, along with a “normal” oil change for the engine, gearbox, and rear differential, most TR’s can be coaxed back to life. For a good example of what happens inside the hydraulic systems, take a look at this TR6 clutch slave cylinder. The cylinder bore is heavily rusted, and no doubt the steel piston inside as well. This car was sitting for “only” 10 years, inside a “dry” garage while this damage slowly occurred. Imagine what problems you will find if your TR is stored for 30 years on a dirt floor, inside a damp and drafty barn! Driving and maintaining your TR’s will always be better for them than lengthy periods where they sit and wait for you to get back to them! It may also be better for your own sanity as well. Have you ever seen a TR parked in front of a psychiatrists’ office?November 5, 2018
We ALWAYS tell anyone who will ask, that if you are planning to purchase a TR4A, TR250, or TR6, any of the cars with the rust prone “IRS” style frame (including the TR4A solid axle cars), you absolutely MUST get under the car for a look at the frame before parting with your hard earned money. This design frame is extremely rust prone, and there’s always a better than 50/50 chance that the metal termites have been at work. Some times it will be repairable, and some times you will need to replace the entire frame. Here’s an example where someone paid good money to have a rusty frame “repaired”. It has been “worked-on”, but it certainly hasn’t been “repaired”! When you are examining one of these frames for rust damage, you’re not just looking for holes, but for signs of metal plates or patches which have been scabbed over the holes or weak areas to make it appear “repaired” at a quick glance. If you see something that looks like this, I suggest you run just as fast and as far away as you can. There’s no telling how much of the original frame is left under these “repairs”, and tacking a new piece of metal onto a weak and rusty frame isn’t going to last very long. The owner of this car told us that it was ready to “break in two” before he had it “repaired”. We think it’s still ready to break in two!October 30, 2018
Richard Lentinello from Hemmings Motor News just posted a piece on our 100 point TR4 to the Hemmings Daily blog. Follow this link to read the article and see all of the photos and comments on the Hemmings website: Triumphant TriumphOctober 29, 2018
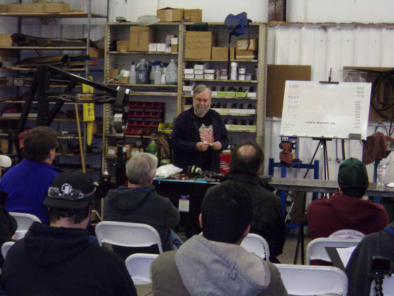
We were recently honored to have world renowned metalworking wizard Ron Covell here at Macy’s Garage to present two days of his popular seminars for beginning and experienced fabricators alike. Ron has over 50 years of metalworking experience, and held his first workshop at his home base in 1993. That first workshop was such a success, he started offering them on a regular basis, and soon started traveling the country to help fill the demand. His workshops continue to grow in popularity, and over four thousand people have attended so far. Ron markets a line of excellent instructional DVDs on his website www.covell.biz, and there is also a link there to his YouTube channel where you can view short segments from his DVD’s. His popular column, "Professor Hammer's Metalworking Tips" has run in Street Rodder Magazine since 1995, and in 2000 a second "Professor Hammer" series, focusing on issues unique to older trucks, was launched in Classic Trucks Magazine. Ron has written technical articles for Street Rodder Magazine, Classic Trucks, Super Rod, Metalcrafter's News, Sport Aviation, and Hot Bike magazines. His schedule for 2019 is already full, but we would love to have him return to Macy’s Garage again sometime in the future.October 22, 2018
Jeff lives in KS, and he stopped by last week on his way home from New England to show off the trophy he won in the Great American Mountain Rally Revival. Jeff has owned his TR3A for over 40 years now, and has close to 400,000 miles on the car, most of them his! We rebuilt his entire drivetrain a couple of years ago, and he’s now got close to 30,000 miles on our running gear. Jeff was full of praise for the power we built into his TR3 engine, and told us how he had to use every bit of it going up some of the steep mountain roads on this 700 mile, 2- day rally. Now in all of the years Jeff has owned his TR3A, this is the very first time he has participated in any kind of a rally or motorsports competition. But now that the bug has bitten, he’ll be shipping the car to Europe next spring to compete in a 5000KM vintage car rally over there! Look up “Diehard Triumph Owner” in the dictionary, and you’ll surely see Jeff’s picture there. We’re happy we could help him to continue “living the dream”!October 15, 2018
George was restoring his TR3A at home, and doing a pretty good job of installing new floors and outer sills, repairing the rear floor sections, and even installing a new trunk floor. But when it came time to install the new replacement rear apron, he discovered that things just weren’t lining up right and he wisely decided to call in the Cavalry! The rear apron is the most complicated area on a sidescreen TR body, and it’s the first place I check for rust when evaluating a TR2/3 to purchase. It’s a place where multiple panels join together, and they all have to fit together like a glove if you want to have any chance of closing the boot lid or having the fender, bumper, and body mount holes align during final assembly. It also doesn’t help that the new reproduction panels are always off just a tick from original OEM parts, so you have to know where to cut and modify the new parts or they’re never going to work. Fortunately, our team has done this enough times that they could almost do it in their sleep, making a difficult job for anyone else look easy!October 8, 2018
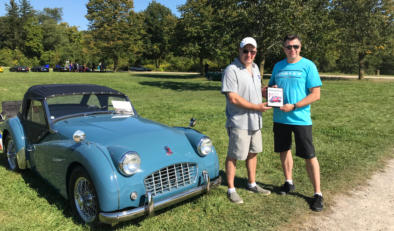
It’s always fun to come in on Monday morning and open e-mails with stories of events and photos of the cars we’ve restored. Last Monday we got this photo from Andrew in Canada, taken at the Toronto British Car Day in Bronte Park. This is the largest British car show in North America, with typically over 1100 cars and motorcycles in attendance. Andrew’s 1957 TR3 which we restored for him in the original (rare) color scheme of Winchester Blue with Grey leather interior handily won the TR 2-3-4 class, and he was told repeatedly that if they had awarded a Best of Show trophy, it would have been his as well! In this photo you can see that Andrew has the soft top and side curtains installed, but this car is also equipped with a factory hardtop and our perfect rear hardtop window. You can see other photos of this car on our June 4, 2018 blog, the TR2/3 gallery page, and in the opening photo of our HOME page. The Winchester Blue is such a striking color today, that I can’t imagine why it didn’t sell well in 1957. With lack-luster sales, the Winchester Blue was dropped for 1958 and replaced with Powder Blue, which then proved to be extremely popular!October 1, 2018
It is very rare to see a broken crankshaft in the 4- cylinder TR2-TR4A engine, so when we find one like this we know we need to dig deeply to find the cause. This engine was just rebuilt by the long term TR3 owner and had only been driven 250 miles before this catastrophy happened. He decided that he would be better off bringing it to us for a “proper” rebuild, and to help his chances that it doesn’t happen again. When the owner delivered the engine and all of his spare parts to us, he happened to have a box containing an extra set of main bearing caps which he suggested we could use if his old ones were damaged. BINGO! The light went on and we had the clue we needed to explain the broken crankshaft. The owner/rebuilder had “swapped” in a set of main bearing caps from another engine block, which is something to be avoided unless you then have the block “line bored”, which he did not. The mis-matched bearing caps were not in perfect alignment, which obviously put a twisting stress on the crank, resulting in the failure you see here. Since we don’t know now which caps are original to what block, we’ll choose a set and have the align-bore done to re- establish a straight crankshaft center line, so this won’t happen again!


America’s BEST Triumph Shop