Macy’s Garage

© 2026 - Macy’s Garage, Ltd.

Blog
WHAT we’re doing, and HOW we’re doing it!
March 25, 2024
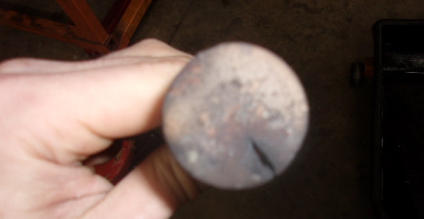
While uncommon today, most car guys have at least heard the term “Burnt Valve” at some time during their life. But actually having seen one is a rare thing anymore. The termonology brings up images of a half burnt log that was pulled from a fire, but the reality is that it’s generally a split in the valve head as shown here. This usually happens when an exhaust valve gets red hot from still-burning exhaust gasses rushing past the thin edge of a partially open valve, then cooling rapidly and causing the metal to contract quickly and shrink too much. How do still burning exhaust gasses get past the thin edge of a valve? Most common would be due to an owner or mechanic that adjusted the valve lash too tight, or possibly a small piece of carbon that holds the valve open just ever so slightly. If the spark plug lights the compressed gas and oxygen mixture in a cylinder where the exhaust valve is not completely sealed, this will be the result. Why doesn’t this happen to intake valves? It’s because a partially open intake valve will let super heated cumbustion gasses into the intake port and cause one heck of a backfire through the carburetor when it ignites the fuel in the intake manifold. Most drivers will hear this and stop the engine before the intake valve can be overheated and “burned”!March 18, 2024
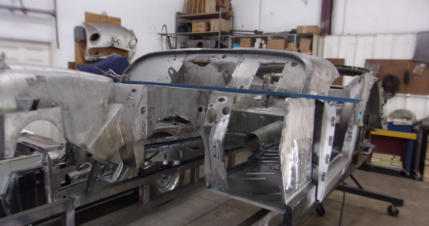
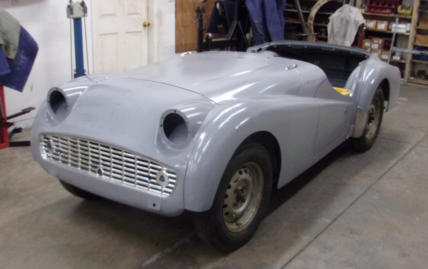
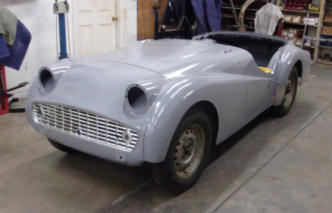
And here’s the finished product from last week. What started out as a “lost-cause” that most knowledgeable restorers would have avoided, has been brought back to a superb starting point for just about any home restorer or average paint and body guy. There are still plenty of small dents and dings which are hard to see while in bare metal, but from here forward it’s simply basic and routine paint prep that remains to be done. All of the gaping rust holes and missing sections of panels have been replaced with new metal, and done so in a manner which is nearly impossible to detect, even at this stage with the body in basic epoxy primer. All of the bolt-on panels are in perfect alignment with even and proper panel gaps, all at a level which is probably better than when the car first rolled out of the Triumph factory. We did replace the two front fenders which had been butchered beyond salvation during prior “repairs” when the owner was in high school, but the rest of the car is still HIS old car. Needless to say, he’s very excited to see it move along this far on the path to the restoration he’s wanted for over 5 decades.March 11, 2024
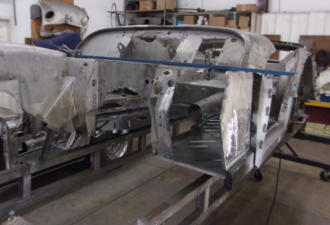
Our photo this week isn’t really recent, but it’s a prelude to what we’ll show you next week. This TR3A came to us for metalwork only, and then the owner and a painter buddy will complete the restoration. It was pretty rough, as you can imagine by this photo showing half of the firewall removed. New floors plus inner & outer sills have already been installed, and the right side of the firewall will also require these same repairs. Then there’s the rear half of the tub that is also badly rusted, banged-up, and poorly repaired. If that isn’t enough, all of the removeable panels were equally appalling. When TRA attendees visited our shop this past June, all of this front- half work had been completed, yet based on just the rear half, they were amazed that we were saving a car in such poor condition. What they didn’t know was that this was the owner’s high school car and he’s hung onto it for over 50 years now, dreaming of restoring and driving it for all that time. Perhaps starting with a “better” body tub might have been an option 30+ years ago, but today all of the “better” cars have already been restored. And after replacing a major component like the entire body, would it really still be his old car?March 4, 2024
We normally avoid vendor-bashing, as in most cases where there’s only one choice the “inferior product is usually better than nothing. But we recently had a TR6 body tub brought to us and the owner had already purchased his own floor pan, so we agreed to use it. But this is a case where more than one option was available, and our client purchased the lower priced one which ended up costing more in the long run. The low quality floor pan is from Current 2 Classic Fabrication in MI, and while the $169.95 price of their pan is attractive when compared to $439.99 for a British Heritage (BMH) floor from Moss, having us fabricate the missing inner rail (shown by the WHITE arrow) would have resulted in the more expensive BMH pan actually costing less. The C2C pans stop with a simple 90 degree bend along the inner edge (shown by the RED arrow), leaving the pan about 1” short of reaching into the car as far as it needs to. This company also makes the earlier TR2-3B floor pans, and they have the exact same problem. In most cases, an ill-fitting reproduction part is always going to be better than starting with nothing (UNLESS there’s an alternative piece available), and in those cases you need to be sure exactly what you are buying and don’t make the decision based just upon the price.February 26, 2024
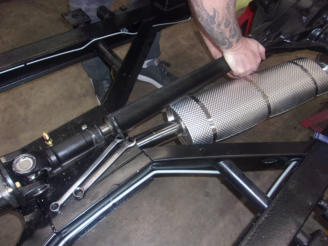
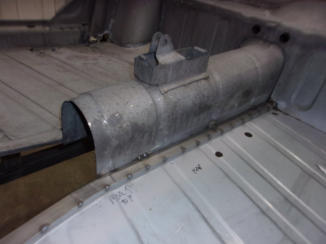
When it comes time to begin reassembly of a complete restoration, we always finish as much of the chassis as possible BEFORE placing the painted body shell on top of it. The chassis is not the first thing that we restore because the metal repair, bodywork, and painting processes will ALL make quite a mess on top of a freshly restored chassis. No, we use the unrestored rolling chassis as a “dolly” to hold the body for much of the final bodywork and paint prep. Then when it all comes back apart for paint, we’ll restore the chassis. We use the unrestricted access we then have to make the chassis and running gear as complete as possible, including engine, transmission, rear axle and driveshaft, all fuel and hydraulic lines, and especially the exhaust. Modern replacement exhaust systems don’t fit perfectly, and it’s much easier to get all of the pieces aligned without the body tub in the way, making sure that no part of the exhaust system touches any the chassis where it could cause an annoying rattle. We also take this opportunity to install this awesome DEI heat shield on the front muffler (available in our eBay store) which sits very close to the rear floor. More than one unsuspecting TR owner has burned the piece of floor carpet that lays just above this front muffler, and we want to do all that we can to assure that it won’t happen on one of OUR restored Triumphs!February 19, 2024
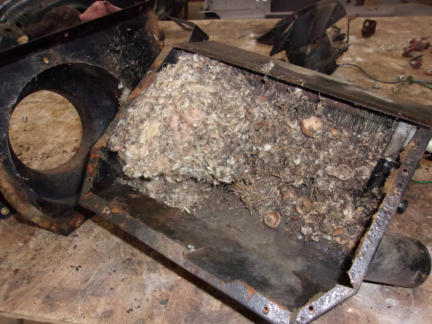
I don’t klnow what it is about mice and old cars, but they sure love ‘em! With most old Triumphs that arrive here after a long slumber, we’ll usually find evidence that a rodent family has moved in at one time or another. The TR6 that we removed this heater from wins the prize though, as we found this same nasty, smelly, and potentially dangerous debris with every hidden spot we opend up: Inside the doors, the cowl vent area under the scuttle, inside the engine (they come up through the exhaust system), inside the trunk and on top of the gas tank, packed in around the spare tire, etc., etc., etc. Any car that you bring home from a barn, field, warehouse, or rickety old garage will need to be thoroughly inspected before you return it to service, and your nose will be the first clue that the mice have been inhabiting the car. Just putting in fresh gas and a new battery and making the engine run does not mean that the car is safe to sit in or drive. And when you find evidence like this, don’t assume that it was this one single spot and you’re done. Use this as another clue that you need to keep digging. Be sure to suit-up like you’re about to enter a Haz-Mat site. Exposure to mouse/rodent nesting materials, urine, and feces can cause serious illness from contact or breathing in the vapors, so treat the removal process like the serious business that it is.February 12, 2024
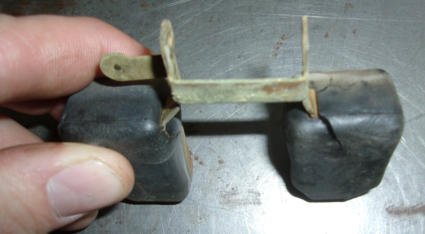
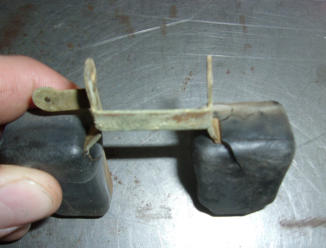
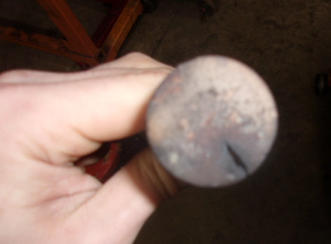
Fuel pumps draw gasoline from your car’s fuel tank, and pump it into a reservoir (fuel bowl) in the carburetor(s). A float like this inside a carburetor rises with the fuel level, and closes off a valve when the fuel bowl gets full, just the same as the float in your toilet tank at home. It’s a simple process which keeps a toilet from overflowing, and also keeps gasoline from flooding your Triumph engine. Carburetor floats were originally hollow brass chambers, but over time they could crack from vibration and let fuel inside. If the float took on gasoline through the crack, the float would get heavy and stop rising to where it would shut off the fuel. The engine would run rich, then eventually flood out and die. As a solution to the brass cracks, carburetor manufacturers went to “composite” (plastic) floats in the early 1960’s, which were unaffected by vibrations and wouldn’t crack. But they weren’t supposed to last for 50-60 years either, and over time the plastic floats would eventually succumb to decades of attack from gasoline molecules and split open, as shown in this week’s photo. Composite floats are semi-solid and somewhat porous inside, so gasoline eventually makes it’s way in through the cracks. The float becomes heavy and can’t rise enough to shut-off the gas inflow, all with the same problems that composite floats were supposed to fix in the first place!February 5, 2024
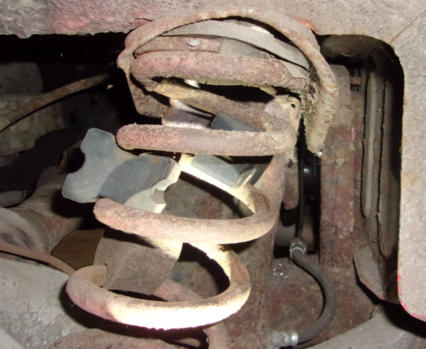
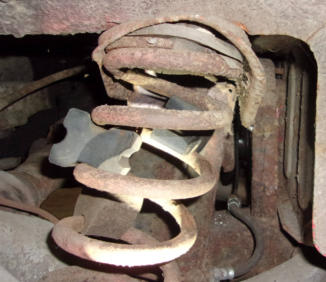
Here is another of those times when we had to step back and shake our heads in disbelief. This TR4A came in listing over quite severely to the right side, and this is what we found after removing the wheels & tires. The upper spring pan on the right rear had pulled away from the frame and rotated up, allowing the right rear corner of the car to sink toward the ground (see red arrow). From the rust and dirt in the area, the problem had been diagnosed as the RR spring several years ago, as indicated by the three (3) spring blocks that were inserted in an attempt to bring the “weak spring” back up to the correct level. While this failure is not something we’ve ever seen before, we were smart enough to know what this area was supposed to look like and perform a quick and lasting repair in a short amount of time. After removing the spring and moving the pan back into position, we were able to weld it solidly into place and reinstall the spring (less the spacers) to return the car to a level stance. Repairing these cars is never rocket science, but familiarity and experience certainly goes a long way toward getting even the smallest problems resolved in a quick and efficient manner.January 29, 2024
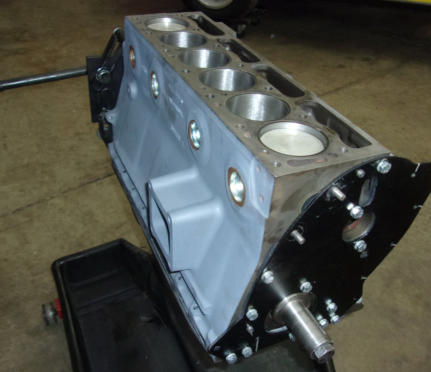
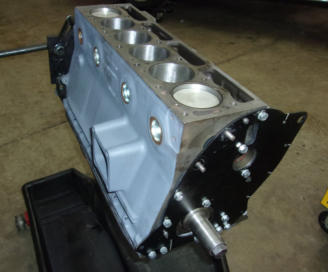
When servicing vintage Triumphs, it’s not uncommon for us to find TRoubles caused by inept owners and mechanics sometime over the past 50-60-70 years. Take this TR6 engine rebuild for example. The new owner complained of low compression and a lack of power, and assumed that an engine rebuild would be the cure. Our test drives and compression test confirmed his suspicions, so we pulled it apart and shipped the block, head, and crank, along with the original rods and new pistons off to the machine shop for their part of the process. It wasn’t until re- assembly that we noticed that the pistons weren’t reaching the top of the block. There are only 3 positions where the pistons are at top dead center, and during disassembly there was no expectation of seeing a couple of pistons up at the top in one of those three precise locations. Reassembly is another matter though, as we’re rotating the crankshaft multiple times and locating top dead center to degree the new camshaft. After digging in a little deeper, we determined that someone in years past (or at least up until the car was offered for sale) had installed a GT6 crankshaft with a shorter stroke. TR6 and GT6 connecting rods are the same, but the shorter stroke of the GT6 2-litre engine meant that the wrist (gudgeon) pin locations on the pistons were different, even though the bore size was the same. Two possible solutions were to install GT6 pistons and make a 2.0L TR6, or acquire, machine, and balance a TR6 crankshaft and keep the 2.5L. Our client chose the latter but more costly option. NOTE: There was no BLOG post last week (January 22, 2024).January 15, 2024
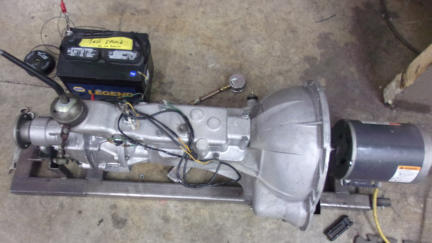
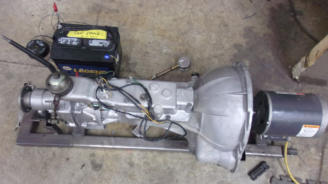
Gearbox and overdrive rebuilds (and conversions) are routine here, so much so that we built this overdrive test stand several years ago. Since that time, not a month has gone by that we didn’t use it at least once to test an overdrive prior to installation or shipment back to the owner. Maybe it’s just me, but it seems that the older I get, the heavier these beasts seem to be! By testing all conversions and overhauls on this rig first, we can check oil pressures, leaks, and overall operation BEFORE wrestling these heavy buggers into (and possibly back out of) the car. What would be even worse is if we shipped the unit home to some anxious shop or owner and then THEY had to pull it back out and return it to us! Internet chatter has it that this is a frequent occurrence from a well known “east coast“ gearbox shop, and we don’t ever want to have similar discussions begin from Macy’s Garage! To that end, we even hook up a battery as shown here, and check the isolation switches as part of the testing process.January 8, 2024
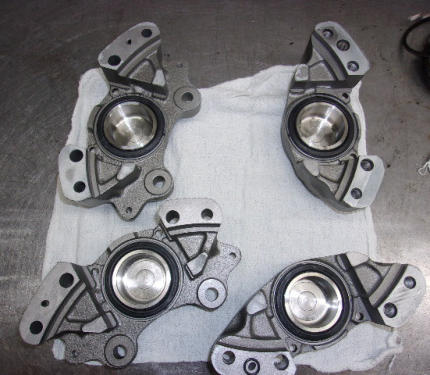
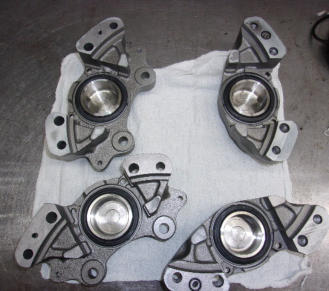
For a very long time, British car lore and internet chatter have warned that you should NOT split the Girling front brake calipers when rebuilding them. This would apply to either Type “B” or Type “C” calipers only, because the Type “A” calipers were cast in one piece. Arguments were that you couldn’t get new internal seals (between the two castings), and there were no torque specs to tell you how tight to make the bolts during re-assembly. To this we politely say “BUNK”! When we split our first caliper nearly 20 years ago, we were able to match up and obtain new seals. Moss finally has them available today under 583-821 (“B” style,) and 583-820 (“C” Type). But what about torque specs for the bolts? I truly doubt that there are many among you who actually use torque specs outside of head bolts and internal engine components, as most folks refer to the time honored German torque called “Good-N-Tight”. I can’t imagine that regarding brake components someone would stop before a bolt was really tight, but there is a spec available for just about any fastener if you’re afraid of doing something wrong We always replace caliper bolts with NEW Grade 8 bolts, and look up the specs for them in our copy of “Pocket Ref”. (Everyone should have a copy of this in their tool box!) You can also find the specs just as quickly using a Google search if you’d prefer. The bolt sizes (and GR8 torque specs) for caliper bolts are 7/16-20 x 2.25” (77.9 ft.lb.), and 3/8-24 x 2.25” (49.4 ft.lb.).January 2, 2024
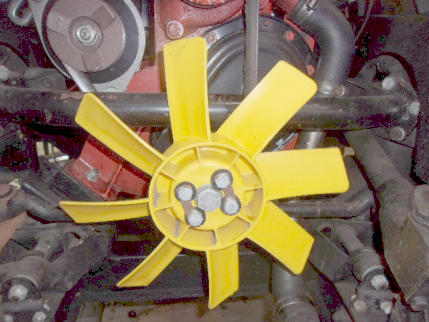
Fan blades are designed to be directional, meaning that they are most efficient when facing a certain way and rotated in a specific direction. The designs are planned to primarily push air or to pull air, although when facing correctly and rotated in the right direction, the air pulled into the blade should equal the air pushed out of the back. A fan blade is basically an airfoil, like an airplane wing. The camber of an airfoil creates “lift” by means of a curved surface, and a flat (or lesser curved) surface. This makes the air accelerate along the longer of the two surfaces, lowering the air pressure (think vacuum) . What that means to an engine cooling fan is that the curved or cambered surface should face the radiator, drawing air through the radiator by lowering the air pressure in front of the blade. A flat but angled blade will not “screw” itself into the air ahead of a radiator, which is why the stock TR2-TR4A fan blades were inefficient at keeping our Triumph engines cool. The first improved blade to come out of the Triumph factory was the yellow plastic TR250 fan blade shown here. Over the years, many of these have been sold to TR2-4A owners as a “solution” to their cooling troubles, but the blades had to be mounted backwards for clearance, like this one. An installation like this is great for drawing hot air out of the engine bay and pushing it forward through the radiator, but of little help in cooling the engine. The only choice to really improve the performance of your TR2-4A fan blade is to install one of our Hurricane blades, which were designed specifically to work on these cars.
BLOG
2024-Q1
America’s BEST Triumph Shop


Macy’s Garage

© 2026 - Macy’s Garage, Ltd.

Blog
WHAT we’re doing, and HOW we’re doing it!
March 25, 2024
While uncommon today, most car guys have at least heard the term “Burnt Valve” at some time during their life. But actually having seen one is a rare thing anymore. The termonology brings up images of a half burnt log that was pulled from a fire, but the reality is that it’s generally a split in the valve head as shown here. This usually happens when an exhaust valve gets red hot from still-burning exhaust gasses rushing past the thin edge of a partially open valve, then cooling rapidly and causing the metal to contract quickly and shrink too much. How do still burning exhaust gasses get past the thin edge of a valve? Most common would be due to an owner or mechanic that adjusted the valve lash too tight, or possibly a small piece of carbon that holds the valve open just ever so slightly. If the spark plug lights the compressed gas and oxygen mixture in a cylinder where the exhaust valve is not completely sealed, this will be the result. Why doesn’t this happen to intake valves? It’s because a partially open intake valve will let super heated cumbustion gasses into the intake port and cause one heck of a backfire through the carburetor when it ignites the fuel in the intake manifold. Most drivers will hear this and stop the engine before the intake valve can be overheated and “burned”!March 18, 2024
And here’s the finished product from last week. What started out as a “lost-cause” that most knowledgeable restorers would have avoided, has been brought back to a superb starting point for just about any home restorer or average paint and body guy. There are still plenty of small dents and dings which are hard to see while in bare metal, but from here forward it’s simply basic and routine paint prep that remains to be done. All of the gaping rust holes and missing sections of panels have been replaced with new metal, and done so in a manner which is nearly impossible to detect, even at this stage with the body in basic epoxy primer. All of the bolt-on panels are in perfect alignment with even and proper panel gaps, all at a level which is probably better than when the car first rolled out of the Triumph factory. We did replace the two front fenders which had been butchered beyond salvation during prior “repairs” when the owner was in high school, but the rest of the car is still HIS old car. Needless to say, he’s very excited to see it move along this far on the path to the restoration he’s wanted for over 5 decades.March 11, 2024
Our photo this week isn’t really recent, but it’s a prelude to what we’ll show you next week. This TR3A came to us for metalwork only, and then the owner and a painter buddy will complete the restoration. It was pretty rough, as you can imagine by this photo showing half of the firewall removed. New floors plus inner & outer sills have already been installed, and the right side of the firewall will also require these same repairs. Then there’s the rear half of the tub that is also badly rusted, banged-up, and poorly repaired. If that isn’t enough, all of the removeable panels were equally appalling. When TRA attendees visited our shop this past June, all of this front-half work had been completed, yet based on just the rear half, they were amazed that we were saving a car in such poor condition. What they didn’t know was that this was the owner’s high school car and he’s hung onto it for over 50 years now, dreaming of restoring and driving it for all that time. Perhaps starting with a “better” body tub might have been an option 30+ years ago, but today all of the “better” cars have already been restored. And after replacing a major component like the entire body, would it still be his old car?March 4, 2024
We normally avoid vendor-bashing, as in most cases where there’s only one choice the “inferior product is usually better than nothing. But we recently had a TR6 body tub brought to us and the owner had already purchased his own floor pan, so we agreed to use it. But this is a case where more than one option was available, and our client purchased the lower priced one which ended up costing more in the long run. The low quality floor pan is from Current 2 Classic Fabrication in MI, and while the $169.95 price of their pan is attractive when compared to $439.99 for a British Heritage (BMH) floor from Moss, having us fabricate the missing inner rail (shown by the WHITE arrow) would have resulted in the more expensive BMH pan actually costing less. The C2C pans stop with a simple 90 degree bend along the inner edge (shown by the RED arrow), leaving the pan about 1” short of reaching into the car as far as it needs to. This company also makes the earlier TR2-3B floor pans, and they have the exact same problem. In most cases, an ill-fitting reproduction part is always going to be better than starting with nothing (UNLESS there’s an alternative piece available), and in those cases you need to be sure exactly what you are buying and don’t make the decision based just upon the price.February 26, 2024
When it comes time to begin reassembly of a complete restoration, we always finish as much of the chassis as possible BEFORE placing the painted body shell on top of it. The chassis is not the first thing that we restore because the metal repair, bodywork, and painting processes will ALL make quite a mess on top of a freshly restored chassis. No, we use the unrestored rolling chassis as a “dolly” to hold the body for much of the final bodywork and paint prep. Then when it all comes back apart for paint, we’ll restore the chassis. We use the unrestricted access we then have to make the chassis and running gear as complete as possible, including engine, transmission, rear axle and driveshaft, all fuel and hydraulic lines, and especially the exhaust. Modern replacement exhaust systems don’t fit perfectly, and it’s much easier to get all of the pieces aligned without the body tub in the way, making sure that no part of the exhaust system touches any the chassis where it could cause an annoying rattle. We also take this opportunity to install this awesome DEI heat shield on the front muffler (available in our eBay store) which sits very close to the rear floor. More than one unsuspecting TR owner has burned the piece of floor carpet that lays just above this front muffler, and we want to do all that we can to assure that it won’t happen on one of OUR restored Triumphs!February 19, 2024
I don’t klnow what it is about mice and old cars, but they sure love ‘em! With most old Triumphs that arrive here after a long slumber, we’ll usually find evidence that a rodent family has moved in at one time or another. The TR6 that we removed this heater from wins the prize though, as we found this same nasty, smelly, and potentially dangerous debris with every hidden spot we opend up: Inside the doors, the cowl vent area under the scuttle, inside the engine (they come up through the exhaust system), inside the trunk and on top of the gas tank, packed in around the spare tire, etc., etc., etc. Any car that you bring home from a barn, field, warehouse, or rickety old garage will need to be thoroughly inspected before you return it to service, and your nose will be the first clue that the mice have been inhabiting the car. Just putting in fresh gas and a new battery and making the engine run does not mean that the car is safe to sit in or drive. And when you find evidence like this, don’t assume that it was this one single spot and you’re done. Use this as another clue that you need to keep digging. Be sure to suit-up like you’re about to enter a Haz-Mat site. Exposure to mouse/rodent nesting materials, urine, and feces can cause serious illness from contact or breathing in the vapors, so treat the removal process like the serious business that it is.February 12, 2024
Fuel pumps draw gasoline from your car’s fuel tank, and pump it into a reservoir (fuel bowl) in the carburetor(s). A float like this inside a carburetor rises with the fuel level, and closes off a valve when the fuel bowl gets full, just the same as the float in your toilet tank at home. It’s a simple process which keeps a toilet from overflowing, and also keeps gasoline from flooding your Triumph engine. Carburetor floats were originally hollow brass chambers, but over time they could crack from vibration and let fuel inside. If the float took on gasoline through the crack, the float would get heavy and stop rising to where it would shut off the fuel. The engine would run rich, then eventually flood out and die. As a solution to the brass cracks, carburetor manufacturers went to “composite” (plastic) floats in the early 1960’s, which were unaffected by vibrations and wouldn’t crack. But they weren’t supposed to last for 50-60 years either, and over time the plastic floats would eventually succumb to decades of attack from gasoline molecules and split open, as shown in this week’s photo. Composite floats are semi-solid and somewhat porous inside, so gasoline eventually makes it’s way in through the cracks. The float becomes heavy and can’t rise enough to shut-off the gas inflow, all with the same problems that composite floats were supposed to fix in the first place!February 5, 2024
Here is another of those times when we had to step back and shake our heads in disbelief. This TR4A came in listing over quite severely to the right side, and this is what we found after removing the wheels & tires. The upper spring pan on the right rear had pulled away from the frame and rotated up, allowing the right rear corner of the car to sink toward the ground (see red arrow). From the rust and dirt in the area, the problem had been diagnosed as the RR spring several years ago, as indicated by the three (3) spring blocks that were inserted in an attempt to bring the “weak spring” back up to the correct level. While this failure is not something we’ve ever seen before, we were smart enough to know what this area was supposed to look like and perform a quick and lasting repair in a short amount of time. After removing the spring and moving the pan back into position, we were able to weld it solidly into place and reinstall the spring (less the spacers) to return the car to a level stance. Repairing these cars is never rocket science, but familiarity and experience certainly goes a long way toward getting even the smallest problems resolved in a quick and efficient manner.January 29, 2024
When servicing vintage Triumphs, it’s not uncommon for us to find TRoubles caused by inept owners and mechanics sometime over the past 50-60-70 years. Take this TR6 engine rebuild for example. The new owner complained of low compression and a lack of power, and assumed that an engine rebuild would be the cure. Our test drives and compression test confirmed his suspicions, so we pulled it apart and shipped the block, head, and crank, along with the original rods and new pistons off to the machine shop for their part of the process. It wasn’t until re-assembly that we noticed that the pistons weren’t reaching the top of the block. There are only 3 positions where the pistons are at top dead center, and during disassembly there was no expectation of seeing a couple of pistons up at the top in one of those three precise locations. Reassembly is another matter though, as we’re rotating the crankshaft multiple times and locating top dead center to degree the new camshaft. After digging in a little deeper, we determined that someone in years past (or at least up until the car was offered for sale) had installed a GT6 crankshaft with a shorter stroke. TR6 and GT6 connecting rods are the same, but the shorter stroke of the GT6 2-litre engine meant that the wrist (gudgeon) pin locations on the pistons were different, even though the bore size was the same. Two possible solutions were to install GT6 pistons and make a 2.0L TR6, or obtain, machine, and balance a TR6 crankshaft and keep the 2.5L. Our client chose the latter but more costly option.Note: There was no BLOG post last week (1/22/24).
January 15, 2024
Gearbox and overdrive rebuilds (and conversions) are routine here, so much so that we built this overdrive test stand several years ago. Since that time, not a month has gone by that we didn’t use it at least once to test an overdrive prior to installation or shipment back to the owner. Maybe it’s just me, but it seems that the older I get, the heavier these beasts seem to be! By testing all conversions and overhauls on this rig first, we can check oil pressures, leaks, and overall operation BEFORE wrestling these heavy buggers into (and possibly back out of) the car. What would be even worse is if we shipped the unit home to some anxious shop or owner and then THEY had to pull it back out and return it to us! Internet chatter has it that this is a frequent occurrence from a well known “east coast“ gearbox shop, and we don’t ever want to have similar discussions begin from Macy’s Garage! To that end, we even hook up a battery as shown here, and check the isolation switches as part of the testing process.January 8, 2024
For a very long time, British car lore and internet chatter have warned that you should NOT split the Girling front brake calipers when rebuilding them. This would apply to either Type “B” or Type “C” calipers only, because the Type “A” calipers were cast in one piece. Arguments were that you couldn’t get new internal seals (between the two castings), and there were no torque specs to tell you how tight to make the bolts during re-assembly. To this we politely say “BUNK”! When we split our first caliper nearly 20 years ago, we were able to match up and obtain new seals. Moss finally has them available today under 583- 821 (“B” style,) and 583-820 (“C” Type). But what about torque specs for the bolts? I truly doubt that there are many among you who actually use torque specs outside of head bolts and internal engine components, as most folks refer to the time honored German torque called “Good-N- Tight”. I can’t imagine that regarding brake components someone would stop before a bolt was really tight, but there is a spec available for just about any fastener if you’re afraid of doing something wrong We always replace caliper bolts with NEW Grade 8 bolts, and look up the specs for them in our copy of “Pocket Ref”. (Everyone should have a copy of this in their tool box!) You can also find the specs just as quickly using a Google search if you’d prefer. The bolt sizes (and GR8 torque specs) for caliper bolts are 7/16-20 x 2.25” (77.9 ft.lb.), and 3/8-24 x 2.25” (49.4 ft.lb.).January 2, 2024
Fan blades are designed to be directional, meaning that they are most efficient when facing a certain way and rotated in a specific direction. The designs are planned to primarily push air or to pull air, although when facing correctly and rotated in the right direction, the air pulled into the blade should equal the air pushed out of the back. A fan blade is basically an airfoil, like an airplane wing. The camber of an airfoil creates “lift” by means of a curved surface, and a flat (or lesser curved) surface. This makes the air accelerate along the longer of the two surfaces, lowering the air pressure (think vacuum) . What that means to an engine cooling fan is that the curved or cambered surface should face the radiator, drawing air through the radiator by lowering the air pressure in front of the blade. A flat but angled blade will not “screw” itself into the air ahead of a radiator, which is why the stock TR2- TR4A fan blades were inefficient at keeping our Triumph engines cool. The first improved blade to come out of the Triumph factory was the yellow plastic TR250 fan blade shown here. Over the years, many of these have been sold to TR2-4A owners as a “solution” to their cooling troubles, but the blades had to be mounted backwards for clearance, like this one. An installation like this is great for drawing hot air out of the engine bay and pushing it forward through the radiator, but of little help in cooling the engine. The only choice to really improve the performance of your TR2-4A fan blade is to install one of our Hurricane blades, which were designed specifically to work on these cars.

America’s BEST Triumph Shop