Macy’s Garage

© 2026 - Macy’s Garage, Ltd.

Blog
WHAT we’re doing, and HOW we’re doing it!
March 31, 2025
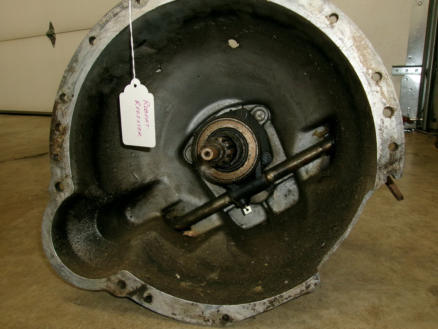
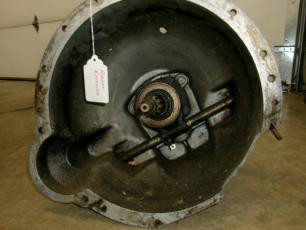
Another TR2-TR4A gearbox with a broken case on the lower left, right where the clutch slave cylinder attaches. We’ve lost count of how many times we’ve seen this, but the cause is always the same. There should be a clutch slave cylinder “Stay-Rod” running forward from the slave cylinder mount bracket to an oil pan bolt. This keeps the gearbox flange from flexing (and eventually snapping off) every time the clutch pedal is depressed. This is primarily a 4-cylinder TR problem, as the flange was thickened sometime during TR4 or TR4A production, and the brace was not needed after that time. For some reason, owners and mechanics through the years have decided to leave this rod off after gearbox or clutch service, and eventually this will be the result. It’s true that installing this rod can be a little fiddly, with two nuts to adjust the length on the slave cylinder end, and a small round spacer and longer bolt up by the oil pan, but nothing to delay the installation more than an additional 5 minutes at most. I’m pretty sure that the old timers would have made a wiser choice and re-installed the stay rod had they known this would be the result.March 24, 2025
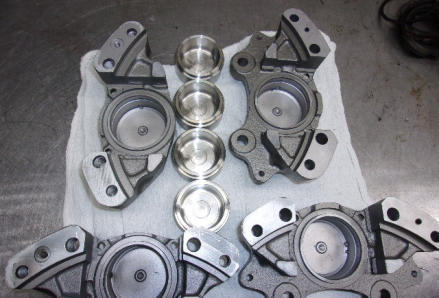
Over the years, there has been MUCH internet chatter warning Triumph owners that they should NOT split their front disc brake calipers when servicing them. The excuses for this prohibition were twofold. The first reason was there were no torque specs for the bolts to re- tighten them. The second excuse was that the small round fluid seals between the halves were not available. To all of this, we politely say BUNK! We rebuild ALL of our own calipers for cars here in our shop, and a good many more for clients who ship their old calipers to us for rebuild. Let’s tackle the faulty reasoning in reverse order, starting with seals being N/A. Originally, we were able to simply measure the rubber O-Rings, and order replacements of equal size in a brake fluid resistant rubber. Simple solution if you need quantities of 100 (which we did), but easier now that Moss offeres these seals right from their catalog (583-820). Solving the bolt torque spec was almost as easy. First we decided to replace all of the old bolts with NEW Grade-8 hardware, so sizes were measured and sourced. Small bolts are 3/8”-24 x 2.25”, and the larger bolts are 7/16”-20 x 2.25”. Then we just looked up the specs for those exact bolts.March 17, 2025
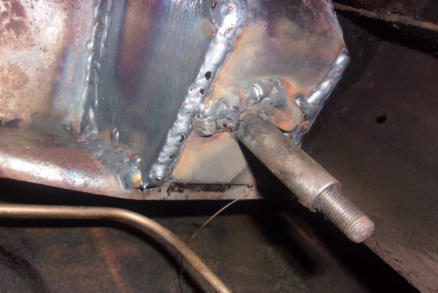
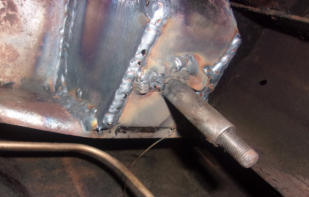
The differential (rear end) mounting pins on the frame of IRS cars are notorious for cracking the brackets which hold them to the frame. Of the four pins locating the differential, we can almost guarantee that the right front pin bracket and the frame crossmember at the top will be cracked. This causes a loud “SNAP” sound when driving, and leads to additional strain on the other three pins. We have witnessed many previous repairs that were simply welded at one time, and they always seem to crack again. The only “permanent” fix is to reinforce the cracks and the bracketry with reinforcement plates, as shown here. This repair usually requires access to the top of the chassis to get at the top crossmember crack, but we have devised a method of modifying the upper reinforcement plate (not shown) so that the entire repair can be accomplished from below, without the need to remove the body from the frame or cut a large access hole in the rear floor. The welds here still need to be “dressed” with a small grinder, but through experience with this procedure, we’ve been able to reduce the required time about 60%.March 10, 2025
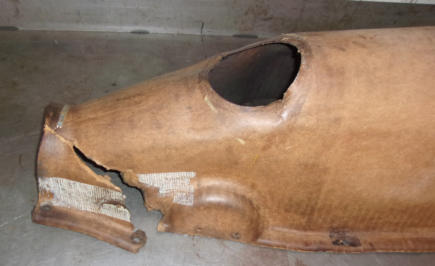
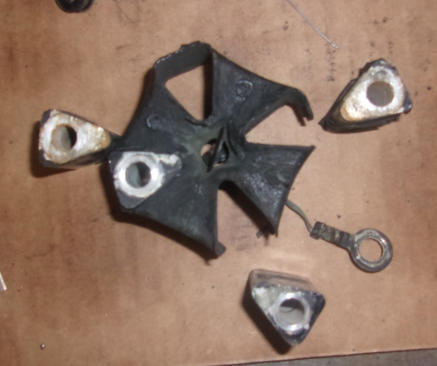
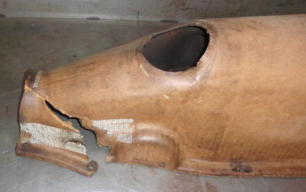
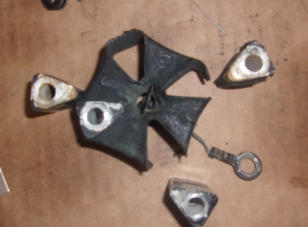
Buy a new car and immediately lock it away under ideal climate conditions, and some parts will still deteriorate over a large number of years. Bare steel will rust and rubber parts will disintegrate at the very least. The rubber parts are probably the most susceptible, and we get enough Triumphs here with boxes of “new” hard/cracked rubber parts (purchased 20-30 years ago) to prove it. What we have here in this week’s photo is a flexible steering shaft coupler as used on all TR4-TR6 models, and while not a “new” part, this one served a long life connecting the steering wheel to the steering rack and the front tires. The aluminum triangles are supposed to be securely attached to the rubber center, but over the years the rubber let go and the aluminum bits were held in place strictly out of habit! When removed from the car, it all fell apart as shown in this photo. Since having the steering wheel actually connected to the front wheels is a pretty big safety factor, this is a component which should be inspected at least annually if you own a TR4-TR6. Any signs that the aluminum is no longer securely attached to the rubber should be a BIG red flag indicating mandatory replacement in the very near future.March 3, 2025
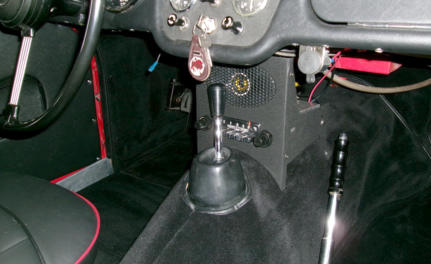
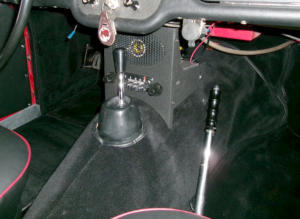
Continuing with some of the small changes/additions to Jeff’s TR3A from last week, he wanted to add a radio. Now there isn’t much space for a radio OR speakers in a sidescreen TR, but it’s been done since the cars were new and right off the boat. Most were dealer installed in the USA because if factory installed before shipping, the sailors would strip them out during the voyage (so we’ve been told)! The most common radio the USA dealers installed was this Smith’s Radiomobile kit with speaker and radio mounted on the gearbox cover, just ahead of the gearshift lever. Reproductions of these brackets are available today but the radio hole is too large to mount the pushbutton TR4 radio that Jeff had converted to AM/FM Bluetooth, so we had to strip the wrinkle finish, weld a steel plate into the opening and finish it smooth. Then we re- cut an opening for this particular radio and welded studs behind to mount a speaker before re- wrinkle painting the whole works again. We had to locate a speaker that was the right size and create a speaker grille on our 3D printer because a speaker and grille are not included in the new kits. Another of those little projects which should be simple but ends up as anything but!February 24, 2025
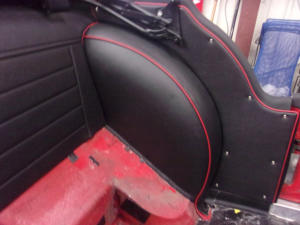
Jeff has owned his TR3A well for 40 years now and during that time he’s “driven the wheels off of it”, accumulating over 400,000 miles. It’s nothing for him to take the car cross country from coast to coast, and has even shipped it to Europe (twice!) to participate in competitive rallys. Now you don’t own and drive a Triumph for that many years or that many miles without learning how to take care of the maintenance yourself, but when it’s time for something major the car always finds its way here to Macy’s Garage. This time Jeff’s old friend was treated to a new interior, and he decided to make it “POP” by matching the red paint with red piping on the panels and seats. This isn’t the first time we’ve installed this “non-standard” color configuration, but it’s been a BIG hit every time we’ve done it. There’s a belief out there that we only do original factory concours restorations, but this is just one example that the rumor is false. Being firm believers in the “Fun With Cars” credo, our staff of old custom car guys actually enjoy thinking outside of the box for those Triumph owners who tend to lean that way!February 17,2025
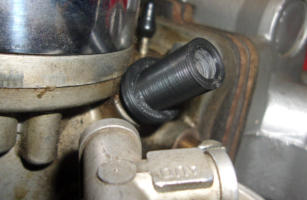
Why is it that the smallest things can often cause the biggest problems? These plastic TR6 hose adaptors have been N/A for long enough now that we finally had to tool up and make them here. When you repair and restore the same cars over and over again, you not only get very good at doing so, but you also run into the same roadblocks and difficulties repeatedly. These carb adaptors are just one small part of a growing list of scarcities that we’ve had to roll up our sleeves and solve, primarily to smooth the workflow in our own shop. But once sources or solutions have been found which often involve (small) quantity production, we also make these once rare bits available to the Triumph community. Take a browse through our eBay store under the Parts button on our navigation bar and peruse the growing quantity of hard to get pieces we manufacture here, as well as some of our excess used inventory. We might just have that small piece you’ve been looking for.February 10, 2025
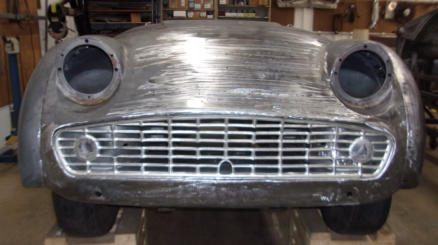
And here’s the finished product. Not flawless enough for shiny paint, but close enough that filler requirements are now down to the thickness of a manilla file folder. It’s quite a change from the areas of 1” thick bondo that had been used previously to sculpt a front apron! By careful study of how the metal had been deformed in the original collision (or perhaps multiple collisions), and then correcting all of the damage inflicted when it was ‘pounded out” by some hack with a hammer, our talented metal shop was able to move the metal back into position, and shrink the areas that had been stretched during the accident and following “repairs”. Thin body sheet metal typically deforms by stretching, and it is the shrinking proceedure that is the most difficult to accomplish. Stretched sheet metal becomes thinner than it was originally, spreading out over more square inches, and the process to make it shrink up and become thicker again takes a wealth of knowledge and practice, not to mention several special tools and secret techniques. If you have any body parts which appear to be beyond hope, let us take a look at them before ordering any expensive and ill fitting reproductions. Repairs here may actually save you money over buying pricey “repops” and investing even more to make them fit.February 3, 2025
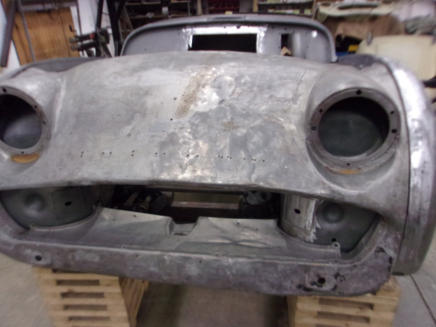
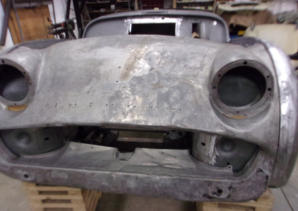
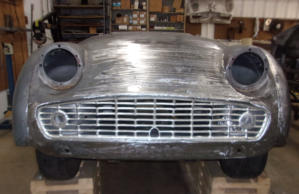
And here’s the bad news; The front apron looks like it’s been in a demolition derby. The fact is, we would have been surprised if it hadn’t been mangled like this. People in big American cars could never see a little TR parked behind them in the mirrors, and this is the result for every front apron we’ve ever seen (and that’s a BIG number of examples). The real surprise was that with the paint and bondo removed, we could see that the entire car had been abused and beaten just as badly! Looking at “decent” paint gave no clue of what lay beneath the surface, that is until it eventually started shrinking and cracking, or bubbling up through the small rust holes that were “repaired” by just smearing bondo over them. Furtunately, the initial purchase price was low, AND the biggest plus is that the current owner did own this exact car in high school. He and his wife dated in this car, so she’s on-board with the cost and complexity of a full restoration. And then there’s the added bonus of sending the car here as the first (and only) stop on this journey, where everyone who touches the car has a wealth of Triumph knowledge and experience that is unmatched anywhere else in North America.January 27, 2025
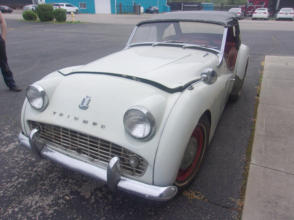
Whenever most folks set out to buy a car, any car, shiny paint is the first thing that catches their eye. It can easily dazzle the buyer into overlooking a poor fit for the intended use, or with regard to used cars, the inevitable problem areas needing attention. This is especially true for classic cars that are 50-60-70 years old. More than likely, the cost to bring those problem areas up to speed will be costly, and could even be the reason that the car was offered for sale in the first place. Is that OK if you are purchasing a vintage car with the idea of performing a full restoration on it? Should you pay extra for something that looks somewhat decent, with smooth body lines and semi-shiny paint as pictured here, or do you pay less for an untouched original, straight out of the barn? Paying less for the rougher car is actually the better deal in the long run than paying more for a car that looks “better”, because you’re undoubtedly paying for things that will need to be re-done during the restoration. The extra premium paid for something “nice” is going to be promptly thrown out. Personally, we’ll take the untouched original every time, as much of the work we do here is to repair the sins of the last 6 decades. Next week we’ll show you what was hiding beneath the “acceptable” paint that was on this TR3A purchase.January 20, 2025
How long should you expect a piece of cardboard to last, especially in a hot and oily environment? Turns out, quite a long time! Triumph installed pressed cardboard gearbox covers beginning with the first TR4’s in 1961, and it’s surprising how many 50-60 year old TR’s we get here with the original covers still in place. Generally, they don’t look too good, and this is one of the better examples! They seem to get more abuse from being removed and re-installed numerous times over the years for service than they got from heat and oil exposure. New replacement covers are made from heavy duty molded plastic, and should last from here to eternity. The most recent versions have a removeable rear half, which makes it possible to service and adjust an overdrive without having to remove the whole cover, which is a VERY welcome upgrade. If you are planning any clutch or gearbox work, or changing out your carpet/interior, it would be wise to peek under your carpet and see if you still have a cardboard cover. If so, just go ahead and order a new cover along with the other bits needed for the job.January 13, 2025
Every time you take to the road for an enjoyable drive in your Triumph, it is the interior that you see and feel the most. You can’t see that small scratch or dent where the grandkids got too close with their bikes, nor any of the small rust bubbles that are slowly raising to the surface. The sound from the tail pipe and the snick of the gear lever join together with feedback from the steering wheel to enhance the experience, but it is the feel from the seats and the visuals of the interior that are front and center to a pleasant Triumph drive. Collapsed seat springs and padding, worn and dirty carpets, and sagging door panels and ripped seat seams only detract from a pleasant drive, whether you realize it or not. But make an easy upgrade to the interior components (including the instrument panel and gauges) and it’s almost like driving a brand new Triumph would have been all those many decades ago. You can spend a small fortune on “upgrades” that are the talk of the internet chat rooms, but how much quicker will those competition parts really get you to the doughnut shop next Saturday morning? To get the most bang for your buck, a complete interior refresh is hard to beat!January 6, 2025
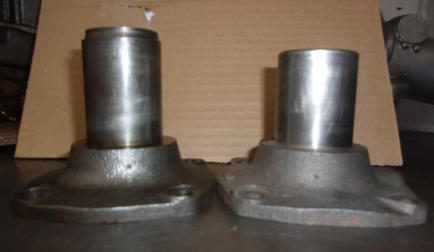
Front bearing covers on TR2-TR6 transmissions (gearboxes) come in two different lengths. The longer of the two (shown on the left) measures 2-3/8” in length, and the shorter one (right) is only 1-31/32” long. The longer of the two is the “early” design, originally used on the TR2-TR4, and the short cover is the “late” design originally used on TR4A-TR6 models. But over the years, salvage yard parts were swapped between early and late cars, so today we’re liable to find either version in the “incorrect” model of car. This length difference was necessitated by the type of clutch installed; the early cars with the long cover used a 3-finger style clutch and the later cars with the diaphragm style clutch (multiple flat steel fingers) needed the shorter cover. Release (throw-out) bearings and the sleeves they press onto are also different, according to the type of clutch installed. Mix any of these components with peices from the other “set” and trouble will follow. The long cover shown here has a strange groove worn into the end, caused from rubbing the diaphragm clutch in a TR250. Checking the serial number of the transmission in the car shows it to be from a TR4, probably a junk yard swap, which explains the mis-match and the unusual wear, not to mention the strange noises coming from the clutch area!
BLOG
2025-Q1
America’s BEST Triumph Shop


Macy’s Garage

© 2026 - Macy’s Garage, Ltd.

Blog
WHAT we’re doing, and HOW we’re doing it!
March 31, 2025
Another TR2-TR4A gearbox with a broken case on the lower left, right where the clutch slave cylinder attaches. We’ve lost count of how many times we’ve seen this, but the cause is always the same. There should be a clutch slave cylinder “Stay-Rod” running forward from the slave cylinder mount bracket to an oil pan bolt. This keeps the gearbox flange from flexing (and eventually snapping off) every time the clutch pedal is depressed. This is primarily a 4-cylinder TR problem, as the flange was thickened sometime during TR4 or TR4A production, and the brace was not needed after that time. For some reason, owners and mechanics through the years have decided to leave this rod off after gearbox or clutch service, and eventually this will be the result. It’s true that installing this rod can be a little fiddly, with two nuts to adjust the length on the slave cylinder end, and a small round spacer and longer bolt up by the oil pan, but nothing to delay the installation more than an additional 5 minutes at most. I’m pretty sure that the old timers would have made a wiser choice and re- installed the stay rod had they known this would be the result.March 24, 2025
Over the years, there has been MUCH internet chatter warning Triumph owners that they should NOT split their front disc brake calipers when servicing them. The excuses for this prohibition were twofold. The first reason was there were NO torque specs for the bolts to re-tighten them. The second excuse was that the small round fluid seals between the halves were not available. To all of this, we politely say BUNK! We rebuild ALL of our own calipers for cars here in our shop, and a good many more for clients who ship their old calipers to us for rebuild. Let’s tackle the faulty reasoning in reverse order, starting with seals being N/A. Originally, we were able to simply measure the rubber O-Rings, and order replacements of equal size in a brake fluid resistant rubber. Simple solution if you need quantities of 100 (which we did), but easier now that Moss offeres these seals right from their catalog (583-820). Solving the bolt torque spec was almost as easy. First we decided to replace all of the old bolts with NEW Grade-8 hardware, so sizes were measured and sourced. Small bolts are 3/8”-24 x 2.25”, and the larger bolts are 7/16”-20 x 2.25”. Then we just looked up the specs for those exact bolts.March 17, 2025
The differential (rear end) mounting pins on the frame of IRS cars are notorious for cracking the brackets which hold them to the frame. Of the four pins locating the differential, we can almost guarantee that the right front pin bracket and the frame crossmember at the top will be cracked. This causes a loud “SNAP” sound when driving, and leads to additional strain on the other three pins. We have witnessed many previous repairs that were simply welded at one time, and they always seem to crack again. The only “permanent” fix is to reinforce the cracks and the bracketry with reinforcement plates, as shown here. This repair usually requires access to the top of the chassis to get at the top crossmember crack, but we have devised a method of modifying the upper reinforcement plate (not shown) so that the entire repair can be accomplished from below, without the need to remove the body from the frame or cut a large access hole in the rear floor. The welds here still need to be “dressed” with a small grinder, but through experience with this procedure, we’ve been able to reduce the required time about 60%.March 10, 2025
Buy a new car and immediately lock it away under ideal climate conditions, and some parts will still deteriorate over a large number of years. Bare steel will rust and rubber parts will disintegrate at the very least. The rubber parts are probably the most susceptible, and we get enough Triumphs here with boxes of “new” hard/cracked rubber parts (purchased 20-30 years ago) to prove it. What we have here in this week’s photo is a flexible steering shaft coupler as used on all TR4-TR6 models, and while not a “new” part, this one served a long life connecting the steering wheel to the steering rack and the front tires. The aluminum triangles are supposed to be securely attached to the rubber center, but over the years the rubber let go and the aluminum bits were held in place strictly out of habit! When removed from the car, it all fell apart as shown in this photo. Since having the steering wheel actually connected to the front wheels is a pretty big safety factor, this is a component which should be inspected at least annually if you own a TR4-TR6. Any signs that the aluminum is no longer securely attached to the rubber should be a BIG red flag indicating mandatory replacement in the very near future.March 3, 2025
Continuing with some of the small changes/additions to Jeff’s TR3A from last week, he wanted to add a radio. Now there isn’t much space for a radio OR speakers in a sidescreen TR, but it’s been done since the cars were new and right off the boat. Most were dealer installed in the USA because if factory installed before shipping, the sailors would strip them out during the voyage (so we’ve been told)! The most common radio the USA dealers installed was this Smith’s Radiomobile kit with speaker and radio mounted on the gearbox cover, just ahead of the gearshift lever. Reproductions of these brackets are available today but the radio hole is too large to mount the pushbutton TR4 radio that Jeff had converted to AM/FM Bluetooth, so we had to strip the wrinkle finish, weld a steel plate into the opening and finish it smooth. Then we re-cut an opening for this particular radio and welded studs behind to mount a speaker before re-wrinkle painting the whole works again. We had to locate a speaker that was the right size and create a speaker grille on our 3D printer because a speaker and grille are not included in the new kits. Another of those little projects which should be simple but ends up as anything but!February 24, 2025
Jeff has owned his TR3A for well over 40 years now and during that time he’s “driven the wheels off of it”, accumulating over 400,000 miles. It’s nothing for him to take the car cross country from coast to coast, and has even shipped it to Europe (twice!) to participate in competitive rallys. Now you don’t own and drive a Triumph for that many years or that many miles without learning how to take care of the maintenance yourself, but when it’s time for something major the car always finds its way here to Macy’s Garage. This time Jeff’s old friend was treated to a new interior, and he decided to make it “POP” by matching the red paint with red piping on the panels and seats. This isn’t the first time we’ve installed this “non-standard” color configuration, but it’s been a BIG hit every time we’ve done it. There’s a belief out there that we only do original factory concours restorations, but this is just one example that the rumor is false. Being firm believers in the “Fun With Cars” credo, our staff of old custom car guys actually enjoy thinking outside of the box for those Triumph owners who tend to lean that way!February 17, 2025
Why is it that the smallest things can often cause the biggest problems? These plastic TR6 hose adaptors have been N/A for long enough now that we finally had to tool up and make them here. When you repair and restore the same cars over and over again, you not only get very good at doing so, but you also run into the same roadblocks and difficulties repeatedly. These carb adaptors are just one small part of a growing list of scarcities that we’ve had to roll up our sleeves and solve, primarily to smooth the workflow in our own shop. But once sources or solutions have been found which often involve (small) quantity production, we also make these once rare bits available to the Triumph community. Take a browse through our eBay store under the Parts button on our navigation bar and peruse the growing quantity of hard to get pieces we manufacture here, as well as some of our excess used inventory. We might just have that small piece you’ve been looking for.February 10, 2025
And here’s the finished product. Not flawless enough for shiny paint, but close enough that filler requirements are now down to the thickness of a manilla file folder. It’s quite a change from the areas of 1” thick bondo that had been used previously to sculpt a front apron! By careful study of how the metal had been deformed in the original collision (or perhaps multiple collisions), and then correcting all of the damage inflicted when it was ‘pounded out” by some hack with a hammer, our talented metal shop was able to move the metal back into position, and shrink the areas that had been stretched during the accident and following “repairs”. Thin body sheet metal typically deforms by stretching, and it is the shrinking proceedure that is the most difficult to accomplish. Stretched sheet metal becomes thinner than it was originally, spreading out over more square inches, and the process to make it shrink up and become thicker again takes a wealth of knowledge and practice, not to mention several special tools and secret techniques. If you have any body parts which appear to be beyond hope, let us take a look at them before ordering any expensive and ill fitting reproductions. Repairs here may actually save you money over buying pricey “repops” and investing even more to make them fit.February 3, 2025
And here’s the bad news; The front apron looks like it’s been in a demolition derby. The fact is, we would have been surprised if it hadn’t been mangled like this. People in big American cars could never see a little TR parked behind them in the mirrors, and this is the result for every front apron we’ve ever seen (and that’s a BIG number of examples). The real surprise was that with the paint and bondo removed, we could see that the entire car had been abused and beaten just as badly! Looking at “decent” paint gave no clue of what lay beneath the surface, that is until it eventually started shrinking and cracking, or bubbling up through the small rust holes that were “repaired” by just smearing bondo over them. Furtunately, the initial purchase price was low, AND the biggest plus is that the current owner did own this exact car in high school. He and his wife dated in this car, so she’s on-board with the cost and complexity of a full restoration. And then there’s the added bonus of sending the car here as the first (and only) stop on this journey, where everyone who touches the car has a wealth of Triumph knowledge and experience that is unmatched anywhere else in North America.January 27, 2025
Whenever most folks set out to buy a car, any car, shiny paint is the first thing that catches their eye. It can easily dazzle the buyer into overlooking a poor fit for the intended use, or with regard to used cars, the inevitable problem areas needing attention. This is especially true for classic cars that are 50-60-70 years old. More than likely, the cost to bring those problem areas up to speed will be costly, and could even be the reason that the car was offered for sale in the first place. Is that OK if you are purchasing a vintage car with the idea of performing a full restoration on it? Should you pay extra for something that looks somewhat decent, with smooth body lines and semi-shiny paint as pictured here, or do you pay less for an untouched original, straight out of the barn? Paying less for the rougher car is actually the better deal in the long run than paying more for a car that looks “better”, because you’re undoubtedly paying for things that will need to be re-done during the restoration. The extra premium paid for something “nice” is going to be promptly thrown out. Personally, we’ll take the untouched original every time, as much of the work we do here is to repair the sins of the last 6 decades. Next week we’ll show you what was hiding beneath the “acceptable” paint that was on this TR3A purchase.January 20, 2025
How long should you expect a piece of cardboard to last, especially in a hot and oily environment? Turns out, quite a long time! Triumph installed pressed cardboard gearbox covers beginning with the first TR4’s in 1961, and it’s surprising how many 50-60 year old TR’s we get here with the original covers still in place. Generally, they don’t look too good, and this is one of the better examples! They seem to get more abuse from being removed and re- installed numerous times over the years for service than they got from heat and oil exposure. New replacement covers are made from heavy duty molded plastic, and should last from here to eternity. The most recent versions have a removeable rear half, which makes it possible to service and adjust an overdrive without having to remove the whole cover, which is a VERY welcome upgrade. If you are planning any clutch or gearbox work, or changing out your carpet/interior, it would be wise to peek under your carpet and see if you still have a cardboard cover. If so, just go ahead and order a new cover along with the other bits needed for the job.January 13, 2025
Every time you take to the road for an enjoyable drive in your Triumph, it is the interior that you see and feel the most. You can’t see that small scratch or dent where the grandkids got too close with their bikes, nor any of the small rust bubbles that are slowly raising to the surface. The sound from the tail pipe and the snick of the gear lever join together with feedback from the steering wheel to enhance the experience, but it is the feel from the seats and the visuals of the interior that are front and center to a pleasant Triumph drive. Collapsed seat springs and padding, worn and dirty carpets, and sagging door panels and ripped seat seams only detract from a pleasant drive, whether you realize it or not. But make an easy upgrade to the interior components (including the instrument panel and gauges) and it’s almost like driving a brand new Triumph would have been all those many decades ago. You can spend a small fortune on “upgrades” that are the talk of the internet chat rooms, but how much quicker will those competition parts really get you to the doughnut shop next Saturday morning? To get the most bang for your buck, a complete interior refresh is hard to beat!January 6, 2025
Front bearing covers on TR2-TR6 transmissions (gearboxes) come in two different lengths. The longer of the two (shown on the left) measures 2-3/8” in length, and the shorter one (right) is only 1-31/32” long. The longer of the two is the “early” design, originally used on the TR2- TR4, and the short cover is the “late” design originally used on TR4A-TR6 models. But over the years, salvage yard parts were swapped between early and late cars, so today we’re liable to find either version in the “incorrect” model of car. This length difference was necessitated by the type of clutch installed; the early cars with the long cover used a 3- finger style clutch and the later cars with the diaphragm style clutch (multiple flat steel fingers) needed the shorter cover. Release (throw-out) bearings and the sleeves they press onto are also different, according to the type of clutch installed. Mix any of these components with peices from the other “set” and trouble will follow. The long cover shown here has a strange groove worn into the end, caused from rubbing the diaphragm clutch in a TR250. Checking the serial number of the transmission in the car shows it to be from a TR4, probably a junk yard swap, which explains the mis-match and the unusual wear, not to mention the strange noises coming from the clutch area!

America’s BEST Triumph Shop