Macy’s Garage

© 2026 - Macy’s Garage, Ltd.

Blog
WHAT we’re doing, and HOW we’re doing it!
June 26, 2023
Last week, the Triumph Register of America held their Annual Meet at Hueston Woods State Park near Oxford, OH, which was only a little over an hour’s drive away from Macy’s Garage. While we often have to travel a bit more to participate in this meeting of passionate Triumph aficionados, it was nice to be a little closer to home this time around. This meet was so close that we were able to bring a tour of Triumphs and their owners to the Macy’s Garage workshop for one of the activity tours during the event. Car show day was Wednesday, so we closed the shop for part of the day so that all of the Macy’s team could attend the show and see the cars. Two “new” Triumph restorations from Macy’s Garage made their debuts at this show, Baxter’s Wedgewood Blue TR4A which won a first in class award in judged concours competition (TR4- 4A), and Mark Macy’s own Winchester Blue ‘57 TR3 small mouth (supercharged) which took another first in the concours modified class. Next year will be the 50th Anniversary of TRA, and the National Meet will again be in Ohio at the Mohican State Park near Mansfield on June 17- 20. If you LOVE your Triumph, join TRA TODAY and start making your plans to attend the 50th anniversary meet next year! triumphregister.comJune 19, 2023
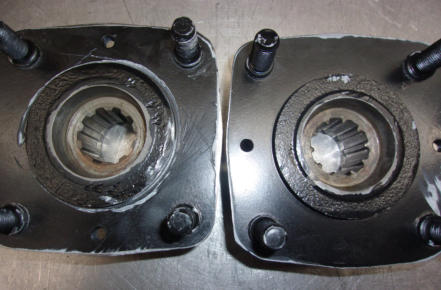
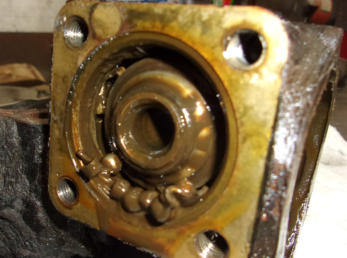
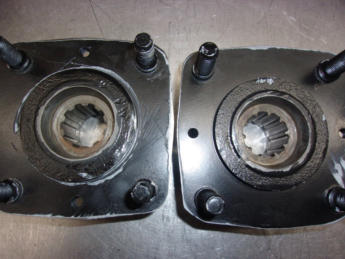
Rear axle flanges on the “Girling” brake cars are held in place with a taper, which is usually as tight as if they had been welded on! Getting the flanges off of the axles to change seals and bearings is usually a real fight, with plenty of four letter words involved. But with the earlier TR2 and TR3 with Lockheed drum brakes, it’s an entirely different matter. The axle flanges are installed via a course spline, and held in place with a washer, BF Nut, and a cotter pin. Remove the pin, nut, and washer, and the hub will slide right off of the axle. The bad news in all of this is that they can also become loose. Whether it’s from not torquing the nut tight enough or from leaving the cotter pin out doesn’t really matter. Just as with a wire wheel spline, any spline which isn’t tight can wiggle and wear. If left to do so for too long, the part(s) will be ruined. The hub on the left has a perfect spline, square cut and flat on the tops of the splines, but look closely at the hub on the right and the worn/sharp pointed tops of the splines can easily be seen. This one had been loose for a very long time, and more importantly for quite a few miles before the car was parked in a barn and forgotten. We wonder if this is the reason the car was taken off of the road, for it surely would have made a loud clunk that was hard to ignore. New replacement hubs are not available today, and good used parts are extremely difficult to find. With that in mind, if you have a Lockheed brake car, check your rear hub nuts annually!June 12, 2023
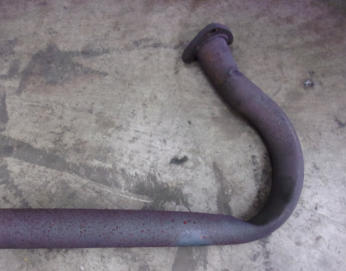
This was interesting. Apparently at some time in the distant past, this TR3A had been “punched” in the rear end. The accident damage had been “repaired”, but when we saw this pipe and went looking, we did find signs of a rear end collision. The accident pushed the exhaust system forward, collapsing the exhaust pipe in the process. We have no way of knowing whether or not this was noticed at the time, or if the post examination and repairs were limited to the obvious damage at the rear of the car. One thing we don’t have much doubt about though, is that a big exhaust system restriction like this would certainly have reduced the engine’s “pep”.June 5, 2023
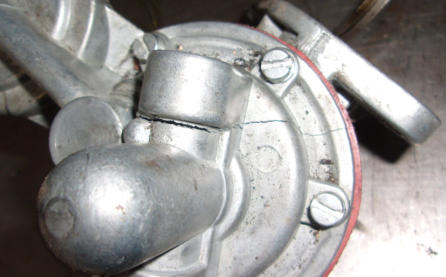
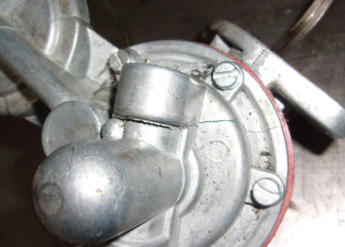
There’s not much we can say about this fuel pump, other than we’ve never seen one like this before! We removed this from a TR4 that was shipped in here because it wouldn’t run. Now this wasn’t the extent of this TR4’s trouble, but it was certainly a significant factor. From the flat circle at the left center of this photo, I can tell you that this is an aftermarket replacement fuel pump. How do we know this? Because the original pumps have a large “AC” cast into the top of this flat area. I’ll also add that we’ve been experiencing a very high rate of new replacement pump failures in the past 12-18 months, many of which fail before we can even pull the cars out of the shop. We’ve tried all of the reasonably priced replacement pumps from several different suppliers, and they all suffer from the same problems, meaning that they won’t pump fuel. For years we have preferred to replace fuel pumps rather than rebuild them, because of the economics involved. The replacement pumps did work well, and the cost of a new pump was well below the cost of a rebuild kit and the labor to rebuild it. Now that the replacement pumps suffer from quality issues, our only choice is to rebuild the old pumps here in our shop at a higher net cost to our clients. But needless to say, we won’t be rebuilding this one!May 30, 2023
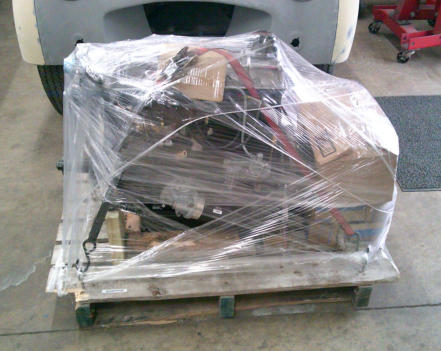
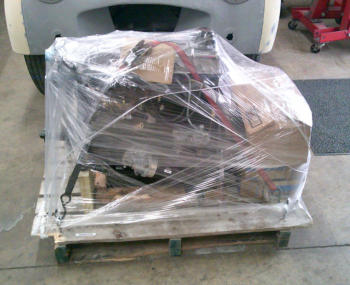
It’s well known throughout the Triumph community that we rebuild a huge amount of TR2-TR6 engines, and many of them are shipped here from all over the USA. For those of you located some great distance from Southwest Ohio, it’s pretty easy to strap an engine onto a pallet and have a freight company take care of the logistics. This is a TR3 engine which we recently overhauled for an owner in FL, all wrapped up and ready to ship home. Usually we’ll receive an engine laying on it’s side (after draining fluids), but we have to be a little more careful for the return journey home. We like to make wooden wedges from 2x6 or 2x8 boards, and bolt the front motor mount tabs to the pallet through them. Those wedges and a couple of diagonal metal straps at the rear (threaded into the block’s bellhousing bolt holes) will keep the engine from rocking side to side and falling over. We’ll also install a few small 2x4 blocks around the 4 flat sides of the oil pan, just to make certain that the engine doesn’t slide around on the pallet. After that, all that’s needed is to strap and shrink wrap the entire assembly, then call the truck. We’ll close this little story by mentioning that this engine arrived home safely 3-4 days after it left our shop. Now you know that there’s really no reason to have your engine rebuilt by anyone with less Triumph experience than is available here at Macy’s Garage. And if you don’t want to remove the engine yourself, you should know that shipping a whole car is actually easier than shipping an engine by itself. Send the whole car and we’ll handle the R&R for you as well!May 22, 2023
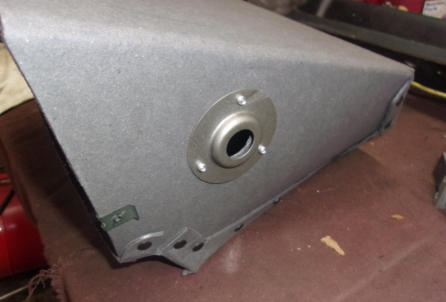
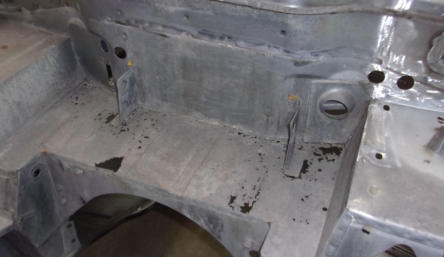
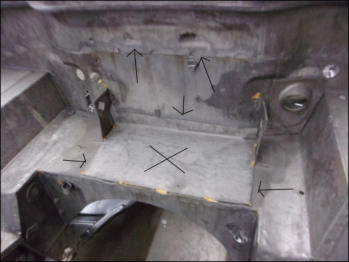
This battery shelf has received a “repair” in the past that isn’t too bad, but still leaves a lot of room for improvement. The flat piece on the bottom was at least bent up along the back edge to seal the rear corner, and brazing (gold spots) assured that it would stay securely in place, but nothing was done about sealing the reinforcement channels in the bottom. Leaving these open will allow heat and fumes from the engine bay to travel back to the rust holes, eventually making their way into the passenger compartment. Even worse are the upper holes at the approximate height of the battery. These come from spilled acid or acid vapor exiting the battery caps, and is generally caused by an over active charging system “boiling” the battery. Now you can see the importance of the tall rear wall of those battery box liners we’ve been talking about! When the firewall rusts out in this upper location, it feeds acid and engine fumes directly into the fresh air plenum, which then directs all this nasty stuff through your heater and dash vents (TR4-6). This is not something you want to have blowing in your face, or breathing through the heater when the windows are up and the heater is cranking out warmth on a cool morning!May 15, 2023
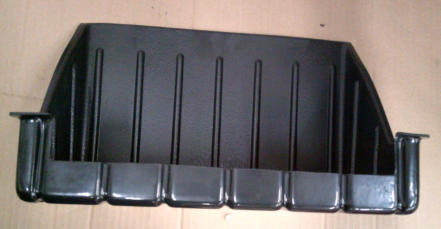
Last week we showed you the battery box liner, and this week we see why you need one. This is what the battery “shelf” in a TR4-TR6 looks like after being attacked by battery acid for many many years, and this is actually a GOOD one! We usually see them in much worse shape, and with all sorts of “quick-fix” repairs, which we’ll show you later in this series. With the bonnet up and a battery in place, the true condition of this area or the quality of previous repairs is impossible to know, unless you just happen to see the chunk of plywood that’s spanning a big hole poking out from under the battery! Now you can’t go asking to remove the battery whenever you are looking at a TR4-6 for possible purchase, but you might get a peek at it from inside of the car, ahead of the lower dash support/console and just above the gearbox cover. Just be sure to take a good flashlight along whenever you are shopping for one of these cars.May 8, 2023
Considering that just about every TR that comes to our shop has a rusted out battery box or shelf, plastic battery box liners are one of the smartest Triumph TR “upgrades” that have ever been made! Water that passes through the TR2-3B bonnet vents and past the rear bonnet edge (where it meets the scuttle) on all TR’s will provide plenty of moisture to collect below the battery, not to mention spilled water and acid mix from over filling a battery or the acid that boils out in a fine mist from over-active charging systems. The boxes for the sidescreen cars fit perfectly, but the later TR4/4A boxes have an interference issue with the heater return pipe at the rear of the head. In those cases, we must perform a little surgery to the front of the liner as shown in this week’s photo. Just be sure to leave enough of a lip along the front edge so that any accumulated water and acid mix will not run out of the box, and cause the metal under that nice plastic liner to rust away all over again!May 1, 2023
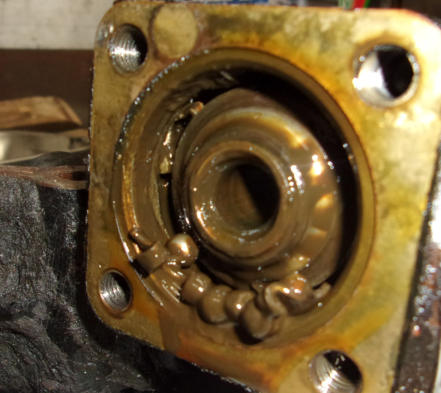
Many years ago, we put a “How To” up on our website showing the process to rebuild the TR2- TR3B steering boxes. It was meant to be instructions on how owners could do these at home, but many folks look at it and decide it’s going to be too much work, or require too many expensive special tools. The result has been that we rebuild an average of two of these each and every month, and have maintained that volume for more than 10 years now. Needless to say, we’ve probably seen more of these steering boxes than anyone else in North America, so there’s little today that surprises us any more. Over the course of the last 10+ years we have seen a few with bearings that have lost a couple of balls or occasionally disintegrated like this one, but never in a car that was being actively driven immediately before it arrived here. More probable is that a steering box like this is why the car might have been taken off the road 20-30 years ago! In this case, this steering box is from a TR2 that is presently in our shop for a complete frame-up restoration, and the car ran well enough that we drove it into the shop after it came off of the transport truck. Needless to say, it was a real bear to steer, but we didn’t get to actually see why until months later at our normal time in the whole big process.April 24, 2023
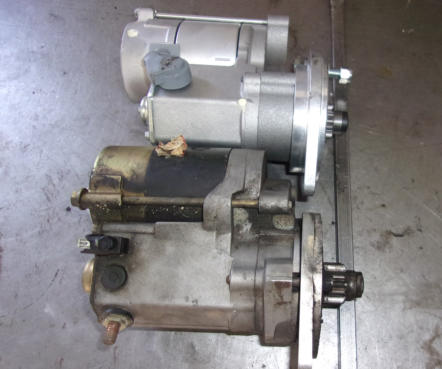
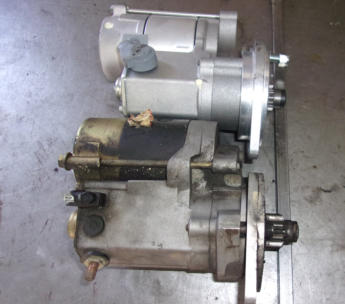
We have a TR6 here for some minor service, and one of the owner’s concerns was that the starter sounded funny, like it was dragging all of the time. Someone had previously installed a new style Hi-torque starter, and we quickly determined that it sounded like it was hanging up in the flywheel. Removing the starter easily confirmed our diagnosis, as we’ve seen enough TR6 starters to recognize that the small pinion gear was sticking out too far from the starter itself. The next step was to decide if the starter had a malfunction that prohibited the gear from fully retracting, or if the starter was the wrong part for a TR6. It only took a brief moment to decide that there was nothing wrong with the starter, and it would work perfectly fine on some other kind of car, but it was totally wrong for use on a TR6. We pulled a new TR6 Hi-torque starter from our parts department and by comparing the two you can see how the small pinion gear is supposed to retract into the starter housing and pull away completely from the flywheel ring gear teeth. We installed the new and correct TR6 starter onto the car, and that problem was checked off of the owner’s to-do list. There are no shortage of “upgrade” parts available for our cars, but you do have to be careful that you’ve (1) received the correct item, and (2) that they are working as they should immediately after installation. Even with “stock” style parts, you can’t trust that the part you removed from the car is correct and that you’re good to go if the new bit looks like the one you just took off. Our Triumphs have been around long enough by now that there have been plenty of chances for wrong parts to have been installed in the past.April 17, 2023
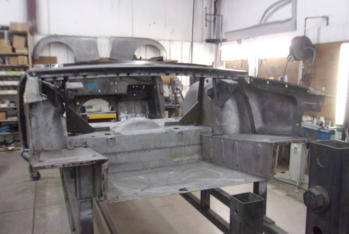
The rear valance (tail pan) on all TR6’s is one of those trouble spots that are extremely rust prone. Fortunately, all of the three panels which make up the area are available, and they fit relatively well too. The trouble with replacing them is that removal of the old rusty pieces leaves the entire rear area of the body tub loose and floppy, so getting all of the new parts to align properly takes extreme care and a precise set of jigs to help with the task. This TR6 will become even more flimsy when the spare tire pan is removed, which is the next step after this photo was taken. Access makes the job go faster, so even though the rear of the tub looses 95% of it’s rigidity, this is the ideal time to replace a needed spare tire pan. You can’t see it in this photo, but the rear deck panel (under the gas cap) has already been replaced, and we did this change well before cutting away the rigidity provided by the rear valance. When it comes time to solidly weld the rear valance panels in place, we’ll be installing the rear fenders and trunk lid and hinges, just as one more additional check to assure perfect alignment. You can’t be too careful when a car is peeled open like this, because there’s nothing worse than getting to final assembly and finding that a hood, trunk, or door won’t close!April 10, 2023
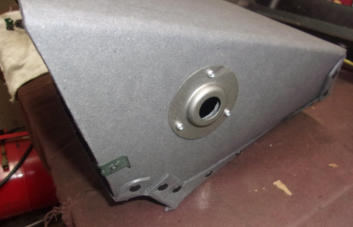
Over the course of several decades, it’s not unusual for the fiberboard glove boxes to take a beating, not to mention the ones that are used for food and nest boxes by mice. As such, when removed by restorers, they usually are immediately discarded without further thought. After all, new replacements are available, right? But what many do not realize when tossing the remains of these old dilapidated boxes, is that the metal ring to hold the light on the TR6’s is NOT included with the new replacements, nor is it available under it’s own part number. The safest course of action when you find yourself in the mad rush to disassemble a car for restoration is to keep EVERYTHING until the restoration is complete, even a chewed-up and smelly cardboard glove box. You won’t know until it’s too late that you might be tossing some seemingly insignificant clip or fitting that will become really important to your restoration many months (or years) from now.April 3, 2023
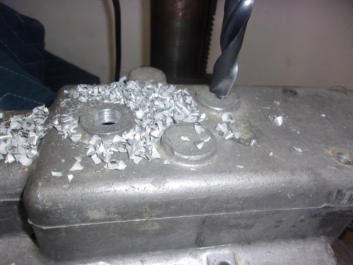
We have a source for overdrive units, both the earlier A-type and the late TR6 J-type, so we’ve been doing a lot of conversions to add this highly desirable option to the gearboxes we rebuild. Part of the conversion process requires that isolation switches be added to the gearbox top (A.K.A. shifter housing), so that the overdrive cannot be engaged unless the transmission is in the correct gear. To add these switches to later tops without plugs in existing holes, we must first locate the center of the cast boss on top of the housing. This center location is then punched and drilled with the correct tap drill size for the odd 5/8”-13 tap we use to thread the holes. We always tap the threads with the drill press, so that the hole will be threaded straight and perpendicular to the base of the housing. Precision in even this seemingly simple task is paramount, and short cuts will only produce botched results.
BLOG
2023-Q2
America’s BEST Triumph Shop


Macy’s Garage

© 2026 - Macy’s Garage, Ltd.

Blog
WHAT we’re doing, and HOW we’re doing it!
June 26, 2023
Last week, the Triumph Register of America held their Annual Meet at Hueston Woods State Park near Oxford, OH, which was only a little over an hour’s drive away from Macy’s Garage. While we often have to travel a bit more to participate in this meeting of passionate Triumph aficionados, it was nice to be a little closer to home this time around. This meet was so close that we were able to bring a tour of Triumphs and their owners to the Macy’s Garage workshop for one of the activity tours during the event. Car show day was Wednesday, so we closed the shop for part of the day so that all of the Macy’s team could attend the show and see the cars. Two “new” Triumph restorations from Macy’s Garage made their debuts at this show, Baxter’s Wedgewood Blue TR4A which won a first in class award in judged concours competition (TR4-4A), and Mark Macy’s own Winchester Blue ‘57 TR3 small mouth (supercharged) which took another first in the concours modified class. Next year will be the 50th Anniversary of TRA, and the National Meet will again be in Ohio at the Mohican State Park near Mansfield on June 17-20. If you LOVE your Triumph, join TRA TODAY and start making your plans to attend the 50th anniversary meet next year! triumphregister.comJune 19, 2023
Rear axle flanges on the “Girling” brake cars are held in place with a taper, which is usually as tight as if they had been welded on! Getting the flanges off of the axles to change seals and bearings is usually a real fight, with plenty of four letter words involved. But with the earlier TR2 and TR3 with Lockheed drum brakes, it’s an entirely different matter. The axle flanges are installed via a course spline, and held in place with a washer, BF Nut, and a cotter pin. Remove the pin, nut, and washer, and the hub will slide right off of the axle. The bad news in all of this is that they can also become loose. Whether it’s from not torquing the nut tight enough or from leaving the cotter pin out doesn’t really matter. Just as with a wire wheel spline, any spline which isn’t tight can wiggle and wear. If left to do so for too long, the part(s) will be ruined. The hub on the left has a perfect spline, square cut and flat on the tops of the splines, but look closely at the hub on the right and the worn/sharp pointed tops of the splines can easily be seen. This one had been loose for a very long time, and more importantly for quite a few miles before the car was parked in a barn and forgotten. We wonder if this is the reason the car was taken off of the road, for it surely would have made a loud clunk that was hard to ignore. New replacement hubs are not available today, and good used parts are extremely difficult to find. With that in mind, if you have a Lockheed brake car, check your rear hub nuts annually!June 12, 2023
This was interesting. Apparently at some time in the distant past, this TR3A had been “punched” in the rear end. The accident damage had been “repaired”, but when we saw this pipe and went looking, we did find signs of a rear end collision. The accident pushed the exhaust system forward, collapsing the exhaust pipe in the process. We have no way of knowing whether or not this was noticed at the time, or if the post examination and repairs were limited to the obvious damage at the rear of the car. One thing we don’t have much doubt about though, is that a big exhaust system restriction like this would certainly have reduced the engine’s “pep”.June 5, 2023
There’s not much we can say about this fuel pump, other than we’ve never seen one like this before! We removed this from a TR4 that was shipped in here because it wouldn’t run. Now this wasn’t the extent of this TR4’s trouble, but it was certainly a significant factor. From the flat circle at the left center of this photo, I can tell you that this is an aftermarket replacement fuel pump. How do we know this? Because the original pumps have a large “AC” cast into the top of this flat area. I’ll also add that we’ve been experiencing a very high rate of new replacement pump failures in the past 12-18 months, many of which fail before we can even pull the cars out of the shop. We’ve tried all of the reasonably priced replacement pumps from several different suppliers, and they all suffer from the same problems, meaning that they won’t pump fuel. For years we have preferred to replace fuel pumps rather than rebuild them, because of the economics involved. The replacement pumps did work well, and the cost of a new pump was well below the cost of a rebuild kit and the labor to rebuild it. Now that the replacement pumps suffer from quality issues, our only choice is to rebuild the old pumps here in our shop at a higher net cost to our clients. But needless to say, we won’t be rebuilding this one!May 30, 2023
It’s well known throughout the Triumph community that we rebuild a huge amount of TR2-TR6 engines, and many of them are shipped here from all over the USA. For those of you located some great distance from Southwest Ohio, it’s pretty easy to strap an engine onto a pallet and have a freight company take care of the logistics. This is a TR3 engine which we recently overhauled for an owner in FL, all wrapped up and ready to ship home. Usually we’ll receive an engine laying on it’s side (after draining fluids), but we have to be a little more careful for the return journey home. We like to make wooden wedges from 2x6 or 2x8 boards, and bolt the front motor mount tabs to the pallet through them. Those wedges and a couple of diagonal metal straps at the rear (threaded into the block’s bellhousing bolt holes) will keep the engine from rocking side to side and falling over. We’ll also install a few small 2x4 blocks around the 4 flat sides of the oil pan, just to make certain that the engine doesn’t slide around on the pallet. After that, all that’s needed is to strap and shrink wrap the entire assembly, then call the truck. We’ll close this little story by mentioning that this engine arrived home safely 3-4 days after it left our shop. Now you know that there’s really no reason to have your engine rebuilt by anyone with less Triumph experience than is available here at Macy’s Garage. And if you don’t want to remove the engine yourself, you should know that shipping a whole car is actually easier than shipping an engine by itself. Send the whole car and we’ll handle the R&R for you as well!May 22, 2023
This battery shelf has received a “repair” in the past that isn’t too bad, but still leaves a lot of room for improvement. The flat piece on the bottom was at least bent up along the back edge to seal the rear corner, and brazing (gold spots) assured that it would stay securely in place, but nothing was done about sealing the reinforcement channels in the bottom. Leaving these open will allow heat and fumes from the engine bay to travel back to the rust holes, eventually making their way into the passenger compartment. Even worse are the upper holes at the approximate height of the battery. These come from spilled acid or acid vapor exiting the battery caps, and is generally caused by an over active charging system “boiling” the battery. Now you can see the importance of the tall rear wall of those battery box liners we’ve been talking about! When the firewall rusts out in this upper location, it feeds acid and engine fumes directly into the fresh air plenum, which then directs all this nasty stuff through your heater and dash vents (TR4-6). This is not something you want to have blowing in your face, or breathing through the heater when the windows are up and the heater is cranking out warmth on a cool morning!May 15, 2023
Last week we showed you the battery box liner, and this week we see why you need one. This is what the battery “shelf” in a TR4-TR6 looks like after being attacked by battery acid for many many years, and this is actually a GOOD one! We usually see them in much worse shape, and with all sorts of “quick-fix” repairs, which we’ll show you later in this series. With the bonnet up and a battery in place, the true condition of this area or the quality of previous repairs is impossible to know, unless you just happen to see the chunk of plywood that’s spanning a big hole poking out from under the battery! Now you can’t go asking to remove the battery whenever you are looking at a TR4-6 for possible purchase, but you might get a peek at it from inside of the car, ahead of the lower dash support/console and just above the gearbox cover. Just be sure to take a good flashlight along whenever you are shopping for one of these cars.May 8, 2023
Considering that just about every TR that comes to our shop has a rusted out battery box or shelf, plastic battery box liners are one of the smartest Triumph TR “upgrades” that have ever been made! Water that passes through the TR2-3B bonnet vents and past the rear bonnet edge (where it meets the scuttle) on all TR’s will provide plenty of moisture to collect below the battery, not to mention spilled water and acid mix from over filling a battery or the acid that boils out in a fine mist from over-active charging systems. The boxes for the sidescreen cars fit perfectly, but the later TR4/4A boxes have an interference issue with the heater return pipe at the rear of the head. In those cases, we must perform a little surgery to the front of the liner as shown in this week’s photo. Just be sure to leave enough of a lip along the front edge so that any accumulated water and acid mix will not run out of the box, and cause the metal under that nice plastic liner to rust away all over again!May 1, 2023
Many years ago, we put a “How To” up on our website showing the process to rebuild the TR2-TR3B steering boxes. It was meant to be instructions on how owners could do these at home, but many folks look at it and decide it’s going to be too much work, or require too many expensive special tools. The result has been that we rebuild an average of two of these each and every month, and have maintained that volume for more than 10 years now. Needless to say, we’ve probably seen more of these steering boxes than anyone else in North America, so there’s little today that surprises us any more. Over the course of the last 10+ years we have seen a few with bearings that have lost a couple of balls or occasionally disintegrated like this one, but never in a car that was being actively driven immediately before it arrived here. More probable is that a steering box like this is why the car might have been taken off the road 20-30 years ago! In this case, this steering box is from a TR2 that is presently in our shop for a complete frame-up restoration, and the car ran well enough that we drove it into the shop after it came off of the transport truck. Needless to say, it was a real bear to steer, but we didn’t get to actually see why until months later at our normal time in the whole big process.April 24, 2023
We have a TR6 here for some minor service, and one of the owner’s concerns was that the starter sounded funny, like it was dragging all of the time. Someone had previously installed a new style Hi-torque starter, and we quickly determined that it sounded like it was hanging up in the flywheel. Removing the starter easily confirmed our diagnosis, as we’ve seen enough TR6 starters to recognize that the small pinion gear was sticking out too far from the starter itself. The next step was to decide if the starter had a malfunction that prohibited the gear from fully retracting, or if the starter was the wrong part for a TR6. It only took a brief moment to decide that there was nothing wrong with the starter, and it would work perfectly fine on some other kind of car, but it was totally wrong for use on a TR6. We pulled a new TR6 Hi-torque starter from our parts department and by comparing the two you can see how the small pinion gear is supposed to retract into the starter housing and pull away completely from the flywheel ring gear teeth. We installed the new and correct TR6 starter onto the car, and that problem was checked off of the owner’s to-do list. There are no shortage of “upgrade” parts available for our cars, but you do have to be careful that you’ve (1) received the correct item, and (2) that they are working as they should immediately after installation. Even with “stock” style parts, you can’t trust that the part you removed from the car is correct and that you’re good to go if the new bit looks like the one you just took off. Our Triumphs have been around long enough by now that there have been plenty of chances for wrong parts to have been installed in the past.April 17, 2023
The rear valance (tail pan) on all TR6’s is one of those trouble spots that are extremely rust prone. Fortunately, all of the three panels which make up the area are available, and they fit relatively well too. The trouble with replacing them is that removal of the old rusty pieces leaves the entire rear area of the body tub loose and floppy, so getting all of the new parts to align properly takes extreme care and a precise set of jigs to help with the task. This TR6 will become even more flimsy when the spare tire pan is removed, which is the next step after this photo was taken. Access makes the job go faster, so even though the rear of the tub looses 95% of it’s rigidity, this is the ideal time to replace a needed spare tire pan. You can’t see it in this photo, but the rear deck panel (under the gas cap) has already been replaced, and we did this change well before cutting away the rigidity provided by the rear valance. When it comes time to solidly weld the rear valance panels in place, we’ll be installing the rear fenders and trunk lid and hinges, just as one more additional check to assure perfect alignment. You can’t be too careful when a car is peeled open like this, because there’s nothing worse than getting to final assembly and finding that a hood, trunk, or door won’t close!April 10, 2023
Over the course of several decades, it’s not unusual for the fiberboard glove boxes to take a beating, not to mention the ones that are used for food and nest boxes by mice. As such, when removed by restorers, they usually are immediately discarded without further thought. After all, new replacements are available, right? But what many do not realize when tossing the remains of these old dilapidated boxes, is that the metal ring to hold the light on the TR6’s is NOT included with the new replacements, nor is it available under it’s own part number. The safest course of action when you find yourself in the mad rush to disassemble a car for restoration is to keep EVERYTHING until the restoration is complete, even a chewed-up and smelly cardboard glove box. You won’t know until it’s too late that you might be tossing some seemingly insignificant clip or fitting that will become really important to your restoration many months (or years) from now.April 3, 2023
We have a source for overdrive units, both the earlier A-type and the late TR6 J-type, so we’ve been doing a lot of conversions to add this highly desirable option to the gearboxes we rebuild. Part of the conversion process requires that isolation switches be added to the gearbox top (A.K.A. shifter housing), so that the overdrive cannot be engaged unless the transmission is in the correct gear. To add these switches to later tops without plugs in existing holes, we must first locate the center of the cast boss on top of the housing. This center location is then punched and drilled with the correct tap drill size for the odd 5/8”-13 tap we use to thread the holes. We always tap the threads with the drill press, so that the hole will be threaded straight and perpendicular to the base of the housing. Precision in even this seemingly simple task is paramount, and short cuts will only produce botched results.

America’s BEST Triumph Shop