Macy’s Garage

© 2026 - Macy’s Garage, Ltd.

Blog
WHAT we’re doing, and HOW we’re doing it!
September 26, 2022
As a Hard-Core Triumph enthusiast, I’m always on the lookout for Triumph “SWAG”, that being anything with a TR image or logo on it. In my search for some new TR Art one day, I came across a website called FineArtAmerica where artists can upload their work and buyers (like me) can purchase as little as ONE single item with the chosen design. The prices seemed very reasonable as well, so I ordered a few new shirt designs. I was impressed with the quality and service when my order arrived. Then I started thinking about the quarter million TR images that we have taken before, during, and after our restoration projects, and decided to convert some of these pics into artistic renderings that are available to all on everything from stickers to shirts, blankets and totes, and shower curtains to coffee mugs. I uploaded several designs, and continued to order other items for my own use. Visit fineartamerica.com , click on Artists, and do a search for Macy’s Garage to see our collection, or follow the link HERE.September 19, 2022
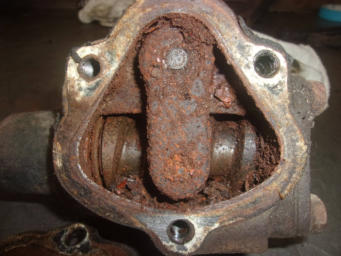
We have a large number of TR2-TR3B steering boxes sent to us for overhaul, probably an average of 2 per month over the past 12-13 years, but this has to be the absolute worst we’ve ever received. Obviously, the car this came from has been sitting dormant for a very long time. Worm and peg steering was already an antiquated design when Triumph applied it to their “new” TR2 sports car in 1953, so they will never steer as effortlessly as a modern steering system. This one had no chance of turning with anything less than a maximum effort. The steering boxes are difficult to remove from the sidescreen cars, as the front bumper and apron must be removed to get them out of the car. When the rubber seal at the bottom of the rocker shaft dries and splits (as all old rubber has a tendency to do), all of the lubricating oil would drip out from the bottom and the box would continue to be driven “dry”. In many cases, the rubber fill plug inside of the engine compartment would also dry up, crack, and fall out, leaving the upper reaches of the box exposed to water and other gritty debris, both of which would lead to the condition seen in this photo. Keep your steering box sealed and full of fluid and your TR2-TR3 will steer as Triumph intended, but if you have to remove it for an overhaul that’s also a good time to install one of our Hurricane fan blades!September 12, 2022
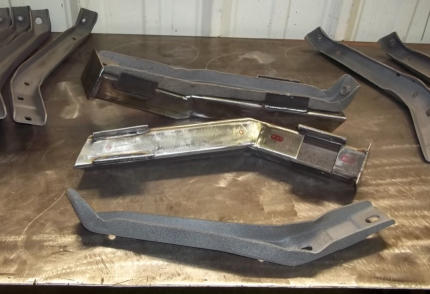
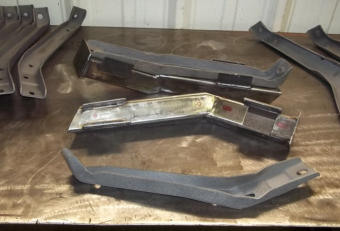
Open house weekend is now over, and it’s time to get back to work! We had a nice turn-out that didn’t overwhelm our available parking, and I believe that everyone in attendance had a good time and gained a few bits of TR wisdom from the team. Keeping with the special tools and fixtures topic from last week, here are a pair of jigs for left and right TR3A/B front bumper braces. We also have a set of these fixtures for the early TR4 braces which look similar but are quite a bit different. We use these jigs quite frequently because we’ve yet to find a TR2-TR3B that hasn’t been bumped at least once in the front end. Our theory is that back when parallel parking was the norm, folks in big American cars would back into the little TR’s because they couldn’t see them in their rear view mirrors. The resultant bumps and bangs caused all of the damage to front aprons and bumper braces that we have to straighten out during every restoration today. These fixtures help us to get the front bumper irons back very close to their original shape, and from here we can quickly tweak them to fit perfectly on any particular car.September 6, 2022
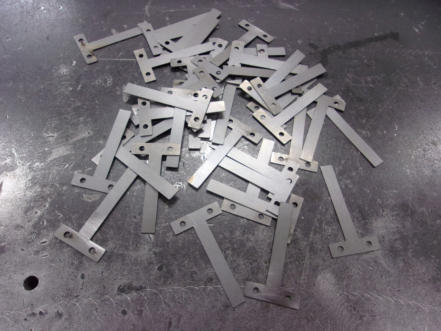
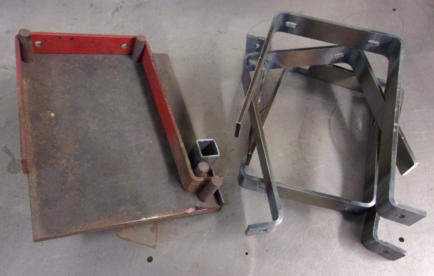
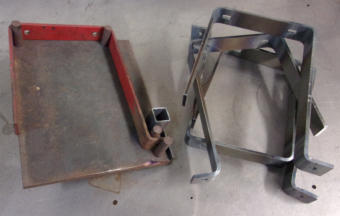
From time to time we like to point out that we can justify a healthy investment in special tools and fixtures by sticking strictly to the narrow TR2-TR6 range of cars. While it’s always the larger pieces like our Auto Twirler rotisseries and body jigs that get the most attention, we have a shop full of smaller tools which help us repair and restore the TR2-TR6 cars in the most efficient manner possible. Take this small tool shown on the left of this photo. We created this fixture over 20 years ago to form the TR3A occasional rear seat brackets for early cars up to TS60000. The red bracket shown in the jig is an original, and the pile of four brackets on the right are a new batch that were quickly formed using this special tool. In the past, we have made these one set at a time as needed, and then verified the bolt hole locations to account for slight variations from car to car before drilling the holes one at a time. But after recently receiving an inquiry about a small quantity of these brackets from a major parts supplier, we worked out locations for slotted bolt holes and had the blanks made by our local laser cutting firm. We can now offer these brackets via mail with confidence they will fit in any early TR3A. Bracket sets can be purchased from our ebay store here: Macys Triumph Garage | eBay StoresAugust 29, 2022
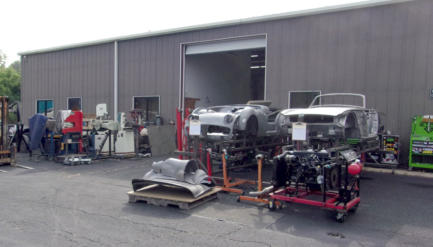
At first glance you might think that we are getting ready for an auction or a Garage Sale, but this is simply our fall cleaning procedure for the metal shop, moved ahead a few weeks to prepare for the Open House on September 10. We try to move everything outside and do this deep cleaning at least once every year, and visitors to our shop usually comment about how unexpectedly clean our shop is. Next week we’ll do the same thing with the assembly side, and save the paint shop cleaning for a day or two ahead of the event. I too have been to auto shops where it looks like an indoor junkyard, and it always makes me question the owner and crew’s attention to detail and pride in their work. We have the attention to detail and pride in workmanship attitudes down cold, and it shows not only in our Triumph restorations but in our physical facility as well. Hope you’ll be able to join us on the 10th, or anytime you’re in the Dayton OH area, and come see for yourself.August 22, 2022
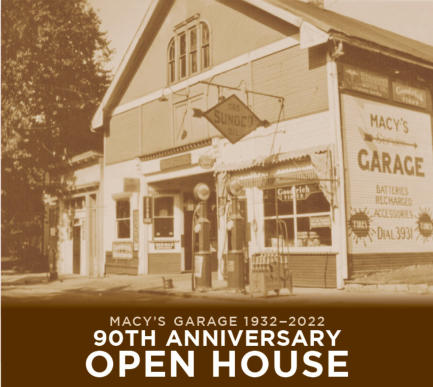
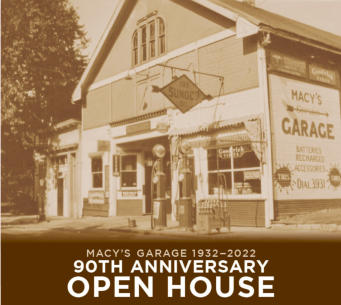
Ninety years is a very long time, and the world has certainly changed since my Grandfather Roy Macy opened his own automobile repair business in 1932. Forced by the circumstances of the great depression, he took a huge risk and borrowed $10 from my grandmother’s life insurance policy, creating his own job at a time when jobs were not easy to find. Although Macy’s Garage has not been in continuous operation as a formal entity for the entire 90 years, 2022 does mark the 90th anniversary of Roy’s gamble, which led to the present day Macy’s Garage and our national reputation for excellence in the repair and restoration of Triumph TR2-TR6 sports cars. Although antique auto restoration is a relaxing hobby for many folks, it is a serious business here as we always strive to exceed our clients expectations and protect our reputation as the Best Triumph Shop on this side of the Atlantic. As a result of this continuous laser focus, there aren’t many opportunities here to “let our hair down” and relax, but an anniversary 90 years in the making does certainly call for a party! With this in mind, we’d like to invite all of you who read this blog to please join us on Saturday, September 10 from 10-2 when we throw the doors open and let everyone in to see the inner workings. Our staff will be on hand to explain how and why they do things as they do and answer all your Triumph questions. Refreshments will be served, and there will be a FREE GIFT for the first 50 who arrive driving their Triumphs. We sincerely hope you will be able to attend on September 10 and take advantage of this opportunity to peek behind the curtain.August 15, 2022
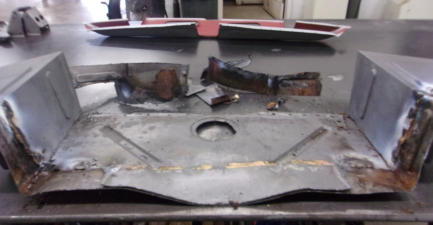
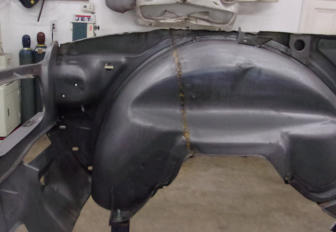
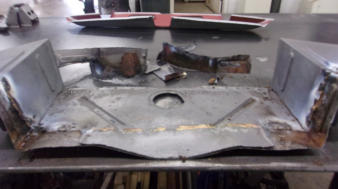
We did promise to not go through the step by step repair at the rear of this TR6, but before leaving the subject we do want to show why we dislike overlapping seams and always make repairs via butt welds. This is the “repair” trunk floor from our subject TR6, following surgical removal from the body tub. You can clearly see just how much overlap there was between this piece and the main body tub. What is noteworthy here is the amount of rust that was slowly eating away at the “new” replacement metal, between the two layers. We have always maintained that overlapping panels will give water and moisture a place to become trapped, and rust will always be the result. What puzzles us most is that the rust appears to be much worse along the vertical sides, where you would expect the water to drain out quickly. Water and rust do work in mysterious ways, but cutting patches that fit exactly and securing them with solid butt welds will go a long way toward thwarting this destructive process.August 8, 2022
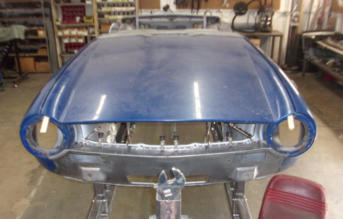
Here are the results after only a few hours of TIG welding (slowly to keep the metal cool), and then dressing the welds with a grinding disc to knock them down smooth. All of the panel line details and edges are now perfectly aligned, and after a heavy application of epoxy primer and perhaps the thinnest swipe of filler, no one will ever suspect that the front of this body tub had been crunched, cut off, and a donor piece from another car welded back on. While many guys believe that a rotisserie is only good for painting the bottom of a car, the truth is that they give you great access for all kinds of repairs just like this. By having the body tub mounted on one of our three rotisserie-body jigs, Matt was able to roll it over and weld all of this back together without removing the front fenders and hood that were previously installed to verify alignment. With the front end properly repaired, it’s time to move to an identical repair at the rear of this car. Don’t worry, we won’t bore you with the step by step repairs to the trunk. It’s simply more of the same and nothing beyond “business as usual” here at Macy’s Garage!August 1, 2022
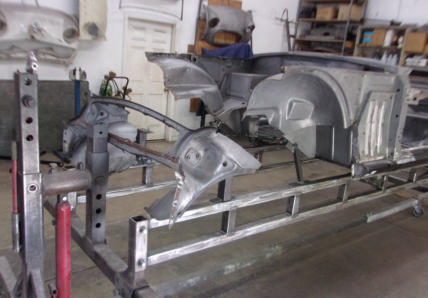
Following many measurements with a tape and a TRAM gauge, plus comparisons to several other TR6s in our shop, we were confident enough to clamp all of the pieces together and secure with a few tack welds. Then, just to be triple sure, we bolted on a really nice set of original fenders and hood for a final check. Not only is the overall length spot-on, but the front/rear slope of the fenders is perfect as well as the hood gaps along the rear and both sides. Only now will all of the seams be solidly TIG welded together to secure the graft to the main body tub. We have taken the “measure twice and cut once” to the extreme, because welding a car together wrong is more difficult to fix than simply starting over with another piece of lumber! I will also mention here that the front fenders were also grafted during the previous repair, so we will be using new reproduction fenders to complete the front end repairs. Why didn’t we mock- up with the fenders we’ll actually be using? We chose to test fit original fenders because all of the new reproductions are “off” just a bit in various places. We NEVER modify an original part so that a re-pop piece will fit, so we felt it would be best to make the tub perfect first, and then we’ll deal later with mods to the new fenders so they’ll fit correctly on any original body tub. July 25, 2022 Continuing last week’s story about the grafted TR6 body tub, this week’s photo shows that the replacement piece has been surgically removed. But before we got to this point, we took extremely careful measurements, both overall length and diagonal measurements used to determine whether the engine bay was “square” or not. While it was close, it wasn’t perfect, which explained why the hood had fit so poorly. As little as an eighth inch short on one side and an eighth too long on the other throws the entire front end off a quarter of an inch, which has huge implications for the bonnet fit along with three other panels, both fenders and the windshield cowl. We carefully sliced and ground away the old braze to release the repair section intact. The next step is to clean up the edge of this piece, and dress down the remaining braze on the tub. At that point the repair section is ready to slip back on, be aligned perfectly and verified square, and then the new clean edge of the repair piece will be used to mark the tub for trimming. This will guarantee that any little squiggles along the edge of the repair panel will match perfectly with an equal squiggle on the tub, assuring a perfectly aligned butt weld that will be completely invisible after the excess TIG weld has been dressed down.July 18, 2022
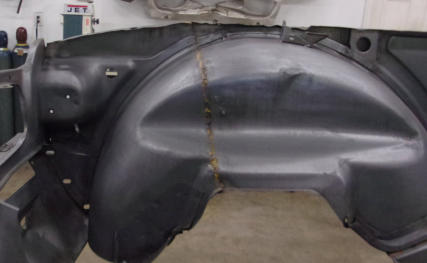
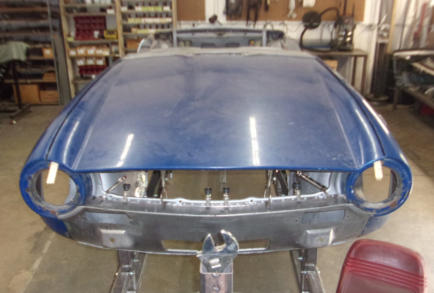
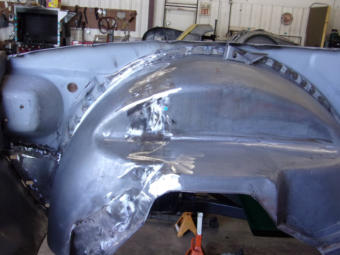
Back on May 31 (2022-Q2), we showed you the rear of a TR6 body tub that had been crunched and repaired with a new rear section crudely grafted to it. We also mentioned that the front of this TR6 had the exact same damage and rough overlapping repair. This is one side of that front repair, and while the “rough” work did get the car back into service, the alignment was off slightly and the overlapping metal on the back side provided a nice pocket to trap moisture and promote rust. Over the next few weeks we’ll show how we cut this apart, eliminated the overlap and rejoined the pieces with invisible butt welds. We’ll also demonstrate how we assured correct alignment, so that no one will ever be able to guess that this accident damage had ever been inflicted upon this poor little TR6. While this story will take several weeks to tell at one photo per week, I will tell you now that the actual repair took less than two 8-hour days to complete, thanks to our proprietary Triumph body jigs plus the skills and TR experience of our talented fabricator Matt. While many others would have called this “close enough”, our goals here are to make all work totally invisible, so that no one in the future will ever suspect a repair.July 11, 2022
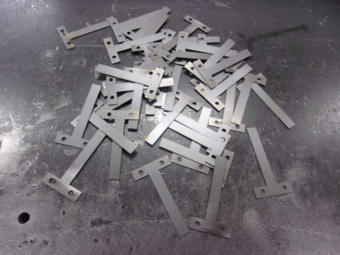
Anyone who has spent much time working on the wiring of a Triumph TR will know what these are. These are tabs which are welded onto the body at various locations, and folded over the wiring harness to hold it in place. These wire securing tabs were just metal (painted) for the TR2-TR3B, but starting with the TR4 they received a small piece of vinyl sleeve to help insulate the wiring harness. Triumph used these throughout the TR2-TR6 range, but if you search hard enough, you’ll only find them in the catalogs for the sidescreen cars TR2-3B. No mention anywhere of these being a required (or available) part for the later cars too. Many of these have snapped off from being bent multiple times, so they need to be replaced during a restoration. We use scads of these tabs, so we have our local laser cutting shop make them for us in batches of five hundred at a time. They are normally attached by welding to the body tub, and that can be accomplished by either globbing weld on the two short ends, or drilling holes and plug welding them into place to simulate the factory spot welds. The first option looks ugly when it’s done, and the second method takes extra time to drill the required holes. Our solution was to have the laser cutter make the holes for us, saving our clients time and money while we perform an appropriate looking installation.July 5, 2022
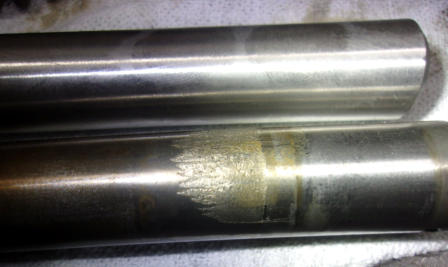
When rebuilding a transmission or a rear differential, or any other mechanical device that uses bearings, you always have to inspect the surfaces that the bearings ride on or seat against for any condition other than perfectly smooth. Take this gearbox layshaft from the bottom of a transmission, AKA a countershaft. The shaft at the bottom of the photo is the old part that was removed from the gearbox, and the upper shaft is the new replacement. The wear or should I say disintegration of the old shaft is readily apparent, and a new bearing will probably be quickly destroyed, along with the old shaft itself if it is put back into service. The additional flakes and chunks of metal that will continue to be pulled out of this damaged area won’t do too much good to any other new bearings which might be included as part of the current “rebuild” either! With many types of bearings, the inner and outer races either come with the new bearing, or are made a part of the bearing assembly, so the surfaces where the bearing rollers or balls run are always going to be new. In those cases however, you must still inspect the area where the new races are located. If an old bearing has seized and spun at some time in the past, those surfaces will be damaged and can allow the new races to spin also, chewing up the bearing seats and causing a catastrophic failure of some expensive part your car really needs!
BLOG
2022-Q3
America’s BEST Triumph Shop


Macy’s Garage

© 2026 - Macy’s Garage, Ltd.

Blog
WHAT we’re doing, and HOW we’re doing it!
September 26, 2022
As a Hard-Core Triumph enthusiast, I’m always on the lookout for Triumph “SWAG”, that being anything with a TR image or logo on it. In my search for some new TR Art one day, I came across a website called FineArtAmerica where artists can upload their work and buyers (like me) can purchase as little as ONE single item with the chosen design. The prices seemed very reasonable as well, so I ordered a few new shirt designs. I was impressed with the quality and service when my order arrived. Then I started thinking about the quarter million TR images that we have taken before, during, and after our restoration projects, and decided to convert some of these pics into artistic renderings that are available to all on everything from stickers to shirts, blankets and totes, and shower curtains to coffee mugs. I uploaded several designs, and continued to order other items for my own use. Visit fineartamerica.com , click on Artists, and do a search for Macy’s Garage, or follow the link HERE.September 19, 2022
We have a large number of TR2-TR3B steering boxes sent to us for overhaul, probably an average of 2 per month over the past 12-13 years, but this has to be the absolute worst we’ve ever received. Obviously, the car this came from has been sitting dormant for a very long time. Worm and peg steering was already an antiquated design when Triumph applied it to their “new” TR2 sports car in 1953, so they will never steer as effortlessly as a modern steering system. This one had no chance of turning with anything less than a maximum effort. The steering boxes are difficult to remove from the sidescreen cars, as the front bumper and apron must be removed to get them out of the car. When the rubber seal at the bottom of the rocker shaft dries and splits (as all old rubber has a tendency to do), all of the lubricating oil would drip out from the bottom and the box would continue to be driven “dry”. In many cases, the rubber fill plug inside of the engine compartment would also dry up, crack, and fall out, leaving the upper reaches of the box exposed to water and other gritty debris, both of which would lead to the condition seen in this photo. Keep your steering box sealed and full of fluid and your TR2-TR3 will steer as Triumph intended, but if you have to remove it for an overhaul that’s also a good time to install one of our Hurricane fan blades!September 12, 2022
Open house weekend is now over, and it’s time to get back to work! We had a nice turn-out that didn’t overwhelm our available parking, and I believe that everyone in attendance had a good time and gained a few bits of TR wisdom from the team. Keeping with the special tools and fixtures topic from last week, here are a pair of jigs for left and right TR3A/B front bumper braces. We also have a set of these fixtures for the early TR4 braces which look similar but are quite a bit different. We use these jigs quite frequently because we’ve yet to find a TR2-TR3B that hasn’t been bumped at least once in the front end. Our theory is that back when parallel parking was the norm, folks in big American cars would back into the little TR’s because they couldn’t see them in their rear view mirrors. The resultant bumps and bangs caused all of the damage to front aprons and bumper braces that we have to straighten out during every restoration today. These fixtures help us to get the front bumper irons back very close to their original shape, and from here we can quickly tweak them to fit perfectly on any particular car.September 6, 2022
From time to time we like to point out that we can justify a healthy investment in special tools and fixtures by sticking strictly to the narrow TR2-TR6 range of cars. While it’s always the larger pieces like our Auto Twirler rotisseries and body jigs that get the most attention, we have a shop full of smaller tools which help us repair and restore the TR2-TR6 cars in the most efficient manner possible. Take this small tool shown on the left of this photo. We created this fixture over 20 years ago to form the TR3A occasional rear seat brackets for early cars up to TS60000. The red bracket shown in the jig is an original, and the pile of four brackets on the right are a new batch that were quickly formed using this special tool. In the past, we have made these one set at a time as needed, and then verified the bolt hole locations to account for slight variations from car to car before drilling the holes one at a time. But after recently receiving an inquiry about a small quantity of these brackets from a major parts supplier, we worked out locations for slotted bolt holes and had the blanks made by our local laser cutting firm. We can now offer these brackets via mail with confidence they will fit in any early TR3A. Bracket sets can be purchased from our ebay store here: Macys Triumph Garage | eBay StoresAugust 29, 2022
At first glance you might think that we are getting ready for an auction or a Garage Sale, but this is simply our fall cleaning procedure for the metal shop, moved ahead a few weeks to prepare for the Open House on September 10. We try to move everything outside and do this deep cleaning at least once every year, and visitors to our shop usually comment about how unexpectedly clean our shop is. Next week we’ll do the same thing with the assembly side, and save the paint shop cleaning for a day or two ahead of the event. I too have been to auto shops where it looks like an indoor junkyard, and it always makes me question the owner and crew’s attention to detail and pride in their work. We have the attention to detail and pride in workmanship attitudes down cold, and it shows not only in our Triumph restorations but in our physical facility as well. Hope you’ll be able to join us on the 10th, or anytime you’re in the Dayton OH area, and come see for yourself.August 22, 2022
Ninety years is a very long time, and the world has certainly changed since my Grandfather Roy Macy opened his own automobile repair business in 1932. Forced by the circumstances of the great depression, he took a huge risk and borrowed $10 from my grandmother’s life insurance policy, creating his own job at a time when jobs were not easy to find. Although Macy’s Garage has not been in continuous operation as a formal entity for the entire 90 years, 2022 does mark the 90th anniversary of Roy’s gamble, which led to the present day Macy’s Garage and our national reputation for excellence in the repair and restoration of Triumph TR2-TR6 sports cars. Although antique auto restoration is a relaxing hobby for many folks, it is a serious business here as we always strive to exceed our clients expectations and protect our reputation as the Best Triumph Shop on this side of the Atlantic. As a result of this continuous laser focus, there aren’t many opportunities here to “let our hair down” and relax, but an anniversary 90 years in the making does certainly call for a party! With this in mind, we’d like to invite all of you who read this blog to please join us on Saturday, September 10 from 10-2 when we throw the doors open and let everyone in to see the inner workings. Our staff will be on hand to explain how and why they do things as they do and answer all your Triumph questions. Refreshments will be served, and there will be a FREE GIFT for the first 50 who arrive driving their Triumphs. We sincerely hope you will be able to attend on September 10 and take advantage of this opportunity to peek behind the curtain.August 15, 2022
We did promise to not go through the step by step repair at the rear of this TR6, but before leaving the subject we do want to show why we dislike overlapping seams and always make repairs via butt welds. This is the “repair” trunk floor from our subject TR6, following surgical removal from the body tub. You can clearly see just how much overlap there was between this piece and the main body tub. What is noteworthy here is the amount of rust that was slowly eating away at the “new” replacement metal, between the two layers. We have always maintained that overlapping panels will give water and moisture a place to become trapped, and rust will always be the result. What puzzles us most is that the rust appears to be much worse along the vertical sides, where you would expect the water to drain out quickly. Water and rust do work in mysterious ways, but cutting patches that fit exactly and securing them with solid butt welds will go a long way toward thwarting this destructive process.August 8, 2022
Here are the results after only a few hours of TIG welding (slowly to keep the metal cool), and then dressing the welds with a grinding disc to knock them down smooth. All of the panel line details and edges are now perfectly aligned, and after a heavy application of epoxy primer and perhaps the thinnest swipe of filler, no one will ever suspect that the front of this body tub had been crunched, cut off, and a donor piece from another car welded back on. While many guys believe that a rotisserie is only good for painting the bottom of a car, the truth is that they give you great access for all kinds of repairs just like this. By having the body tub mounted on one of our three rotisserie-body jigs, Matt was able to roll it over and weld all of this back together without removing the front fenders and hood that were previously installed to verify alignment. With the front end properly repaired, it’s time to move to an identical repair at the rear of this car. Don’t worry, we won’t bore you with the step by step repairs to the trunk. It’s simply more of the same and nothing beyond “business as usual” here at Macy’s Garage!August 1, 2022
Following many measurements with a tape and a TRAM gauge, plus comparisons to several other TR6s in our shop, we were confident enough to clamp all of the pieces together and secure with a few tack welds. Then, just to be triple sure, we bolted on a really nice set of original fenders and hood for a final check. Not only is the overall length spot-on, but the front/rear slope of the fenders is perfect as well as the hood gaps along the rear and both sides. Only now will all of the seams be solidly TIG welded together to secure the graft to the main body tub. We have taken the “measure twice and cut once” to the extreme, because welding a car together wrong is more difficult to fix than simply starting over with another piece of lumber! I will also mention here that the front fenders were also grafted during the previous repair, so we will be using new reproduction fenders to complete the front end repairs. Why didn’t we mock-up with the fenders we’ll actually be using? We chose to test fit original fenders because all of the new reproductions are “off” just a bit in various places. We NEVER modify an original part so that a re-pop piece will fit, so we felt it would be best to make the tub perfect first, and then we’ll deal later with mods to the new fenders so they’ll fit correctly on any original body tub.July 25, 2022
Continuing last week’s story about the grafted TR6 body tub, this week’s photo shows that the replacement piece has been surgically removed. But before we got to this point, we took extremely careful measurements, both overall length and diagonal measurements used to determine whether the engine bay was “square” or not. While it was close, it wasn’t perfect, which explained why the hood had fit so poorly. As little as an eighth inch short on one side and an eighth too long on the other throws the entire front end off a quarter of an inch, which has huge implications for the bonnet fit along with three other panels, both fenders and the windshield cowl. We carefully sliced and ground away the old braze to release the repair section intact. The next step is to clean up the edge of this piece, and dress down the remaining braze on the tub. At that point the repair section is ready to slip back on, be aligned perfectly and verified square, and then the new clean edge of the repair piece will be used to mark the tub for trimming. This will guarantee that any little squiggles along the edge of the repair panel will match perfectly with an equal squiggle on the tub, assuring a perfectly aligned butt weld that will be completely invisible after the excess TIG weld has been dressed down.July 18, 2022
Back on May 31 (2022-Q2), we showed you the rear of a TR6 body tub that had been crunched and repaired with a new rear section crudely grafted to it. We also mentioned that the front of this TR6 had the exact same damage and rough overlapping repair. This is one side of that front repair, and while the “rough” work did get the car back into service, the alignment was off slightly and the overlapping metal on the back side provided a nice pocket to trap moisture and promote rust. Over the next few weeks we’ll show how we cut this apart, eliminated the overlap and rejoined the pieces with invisible butt welds. We’ll also demonstrate how we assured correct alignment, so that no one will ever be able to guess that this accident damage had ever been inflicted upon this poor little TR6. While this story will take several weeks to tell at one photo per week, I will tell you now that the actual repair took less than two 8- hour days to complete, thanks to our proprietary Triumph body jigs plus the skills and TR experience of our talented fabricator Matt. While many others would have called this “close enough”, our goals here are to make all work totally invisible, so that no one in the future will ever suspect a repair.July 11, 2022
Anyone who has spent much time working on the wiring of a Triumph TR will know what these are. These are tabs which are welded onto the body at various locations, and folded over the wiring harness to hold it in place. These wire securing tabs were just metal (painted) for the TR2- TR3B, but starting with the TR4 they received a small piece of vinyl sleeve to help insulate the wiring harness. Triumph used these throughout the TR2-TR6 range, but if you search hard enough, you’ll only find them in the catalogs for the sidescreen cars TR2-3B. No mention anywhere of these being a required (or available) part for the later cars too. Many of these have snapped off from being bent multiple times, so they need to be replaced during a restoration. We use scads of these tabs, so we have our local laser cutting shop make them for us in batches of five hundred at a time. They are normally attached by welding to the body tub, and that can be accomplished by either globbing weld on the two short ends, or drilling holes and plug welding them into place to simulate the factory spot welds. The first option looks ugly when it’s done, and the second method takes extra time to drill the required holes. Our solution was to have the laser cutter make the holes for us, saving our clients time and money while we perform an appropriate looking installation.July 5, 2022
When rebuilding a transmission or a rear differential, or any other mechanical device that uses bearings, you always have to inspect the surfaces that the bearings ride on or seat against for any condition other than perfectly smooth. Take this gearbox layshaft from the bottom of a transmission, AKA a countershaft. The shaft at the bottom of the photo is the old part that was removed from the gearbox, and the upper shaft is the new replacement. The wear or should I say disintegration of the old shaft is readily apparent, and a new bearing will probably be quickly destroyed, along with the old shaft itself if it is put back into service. The additional flakes and chunks of metal that will continue to be pulled out of this damaged area won’t do too much good to any other new bearings which might be included as part of the current “rebuild” either! With many types of bearings, the inner and outer races either come with the new bearing, or are made a part of the bearing assembly, so the surfaces where the bearing rollers or balls run are always going to be new. In those cases however, you must still inspect the area where the new races are located. If an old bearing has seized and spun at some time in the past, those surfaces will be damaged and can allow the new races to spin also, chewing up the bearing seats and causing a catastrophic failure of some expensive part your car really needs!

America’s BEST Triumph Shop