Macy’s Garage

© 2026 - Macy’s Garage, Ltd.

Blog
WHAT we’re doing, and HOW we’re doing it!
March 28, 2022
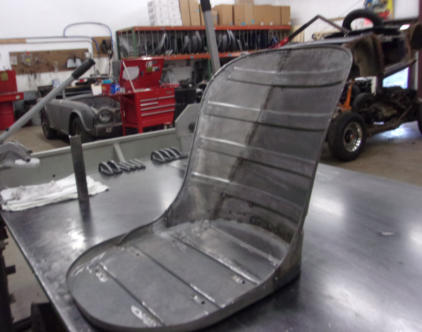
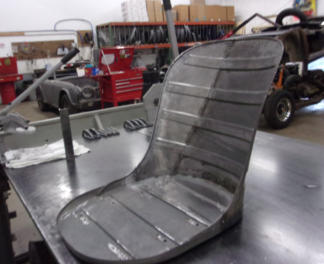
It’s almost unthinkable to expect an auto trim shop to have metal fabrication ability, at least until you restore enough vintage Triumph TR’s! Most of the sidescreen cars (TR2-TR3B) and early TR4’s with the sheet metal pan seats will require some metal work to repair rust and cracks in the bottoms. Occasionally the damage will extend along the lower edge of the seat backs, but never before have we found a seat back that required this much work. Most who encounter something like this will start searching for a replacement seat base that’s in better condition, but with the passage of time the “better” parts are now as rare as ghost poop! This TR2 seat pan is the same style that was shown here on February 28, with the wide top seat back and the sloped edges along the bottom. With less than 10,000 TR2’s built and scattered all around the globe, not to mention the passage of 66 years since the last cars were built, how many “better” seats do you think you’ll find sitting unused somewhere that you can purchase? How this seat back got so rusty up high on a vertical surface is still a mystery, but the best ideas are that the padding got wet repeatedly and held moisture against the metal, or the seat was removed from the car and stored for many years on it’s side in a very wet location. However it might have occurred, our metal shop was able to replace the damaged section, complete with wire bead around the edge and curved ribs through the back as originally designed for strength.March 21, 2022
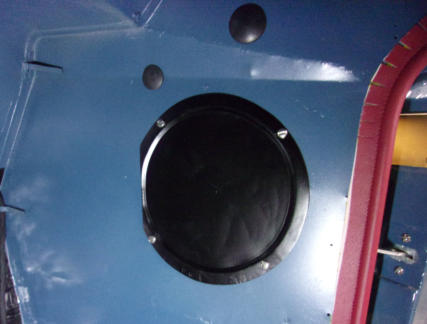
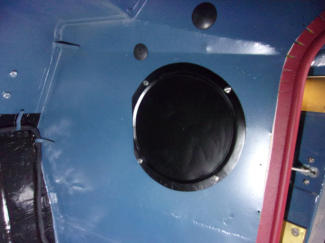
We all know that you shouldn’t believe everything you see on the internet, but did you know that the same advice pertains to books as well? This outer footwell panel (bulkhead end) on the right side of a TR3 is called out a couple of times in the popular “How To Restore Triumph TR2 TR3 & TR3A” for having a speaker hole, which the author states is a reason to replace the whole end panel. What he and many who read his book won’t know, is that these speaker holes were standard on most TR2-TR3A’s, up somewhere in the late TS50000 range. TS1LO did not have this hole for a speaker, nor does TS333L which is here now for a complete frame-up restoration. The earliest car we’ve had here with this exact same speaker hole is TS2101L, so from that number up through about 55000, you can see that there were quite a few cars with OEM speaker holes which are supposed to be here. Triumph only covered these holes with carpet, which was probably OK for keeping the water and dirt out until the bulkhead sealer plate seals went bad, but we always make this cool little block-off plate as added protection and to support the carpet. If you are wondering about this paint color, it is Winchester Blue, available only on the 1957 small mouth TR3, and quickly replaced by Powder Blue in 1958 for the TR3A.March 14, 2022
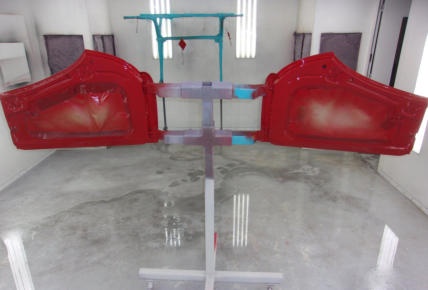
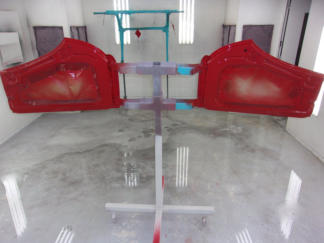
From time to time we like to remind Triumph owners that our singular focus on the TR2-TR6 models has allowed us to invest in tools and equipment that makes our shop extremely efficient. What that means for our clients is that we can accomplish repair and maintenance tasks on these models to a higher level of quality, and in fewer billable hours (less cost) than would be possible anywhere else. You can bet that the Corvette shop 2 miles from your house isn’t going to have any TR specific tools that will speed up their work on your Triumph!. And as a side note, if they were any good with Corvettes, they wouldn’t have time (or space) to take on your TR project in the first place! The Corvette world should keep them just as busy with Corvette work as the Triumph community keeps us with TR’s. This week’s photo is just one such example of a fixture which cuts the required time AND allows us to produce a finished product of a much higher quality. Triumph doors have to be painted both inside and out, so we created a special stand which allows us to paint all surfaces at the same time. This saves the time that would be needed to tape up and paint the inside and outside of the doors at different times, and it also holds the doors in the same vertical orientation for paint as they will be installed onto the cars.March 7, 2022
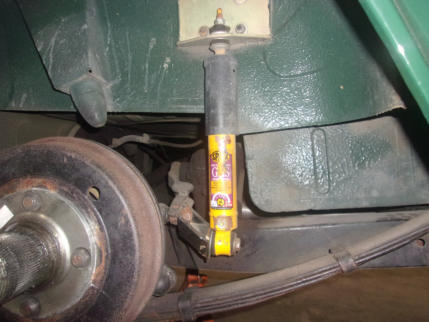
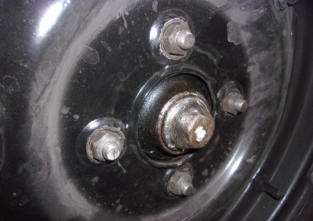
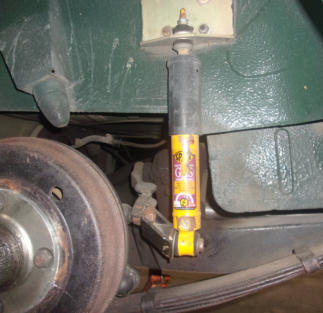
Here’s one we’ve never seen before, and another chance to scratch our heads and ask “What were they thinking?”. Someone fell into the “you better upgrade to tube shocks” trap, but left the lever arm shocks intact and operational. No wonder this solid axle TR4A rode like a log wagon! Now we have seen plenty of tube shock conversions, but there’s really no reason to do so unless you regularly take your car to track days and need adjustable shocks to gain a half second or so on your lap times. We haven’t seen any converted cars yet that ride any better with “upgraded” shocks on the back, and they certainly won’t help you get down to the local cars and coffee any quicker on a Saturday morning. Many times, however, we have found cracked chassis members or cracked wheel tub sheet metal where the tube shocks and their mounting plates have been attached. Naturally, the guys who have put all the effort in converting their cars will describe the conversion as the best thing since sliced bread, but perhaps their old lever shocks were so bad that anything would have been seen as an improvement. We have found that most owners are perfectly happy with a quality rebuilt lever shock, and quality rebuilds will be the last shocks they will ever have to install on their TR’s. It’s not that we are “purists” who resist changing the cars, as we have no reservations about making changes and upgrades where there are benefits to be gained in the areas of safety, comfort, and reliability. It’s just that rear tube shock conversions don’t fit that criteria, and certainly not while leaving an operational set of lever arm shocks in place as well!February 28, 2022
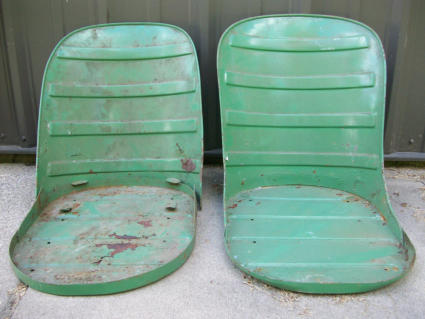
This week we have another of those subtle differences that will cause trouble for most hobbiest and paid TR restorers alike. Both of these seats came out of the same car, but if you look closely you can see that there’s a slight difference in the shape of the back panels. The “narrow top” seat on the left is the correct style for a TR3A/B, while the “wide top” seatback on the right is the TR2/3 small mouth style. (And if the back looks like the narrow top TR3A/B seat, but has a deep pan like depression in most of the bottom, it’s an early TR4 seat.) As an added detail, I will mention that the small mouth seat on the right is also a TR2 seat, as the lip around the bottom edge is sloped (beveled). A correct TR3 small mouth seat would have the wide top, but a square lower edge as seen on the TR3A/B seat on the left. Now if you or your restorer were to order a seat cover kit for your car in a mixed seat situation like this, only one side is going to fit. You don’t have to think too hard to imagine a day many years ago when some average TR owner was walking through a junkyard and spotted a wreck with better seats than were in his own car. If the budget allowed, both seats were probably changed, in which case the seat kit you order today isn’t going to fit correctly on either side!February 21, 2022
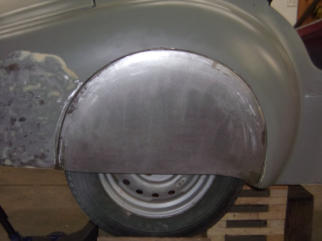
Fender skirts (AKA “Spats”) were a very popular accessory in the 1950’s and 60’s, so much so that Standard-Triumph installed them on the Jabbeke TR2 for aerodynamic reasons, and also on the first two production cars TS1LO and TS2. It’s unknown how many of the early cars might have been fitted with them on the production line, but they are shown in the TR2 & TR3 Spare Parts Catalogue in the rear of the book under “Accessories”. They won’t fit with wire wheels, but you also don’t see many today on steel wheel cars either. If you like the look, or want to have your sidescreen TR stand out in a row of TR2-TR3B’s, a set of these will certainly draw a crowd to your car at the next British Car show you attend. Now you can just forget about finding a pair of useable or repairable Spats on eBay or at any swap meet on the planet, but we’ve figured out how to create these from flat metal, and have done so for several cars now. We need unpainted fenders and preferably an entire car to make them and be sure of a proper fit, so if your car is here for a restoration we’ll be able to check these rare birds off of your “wish list”.February 14, 2022
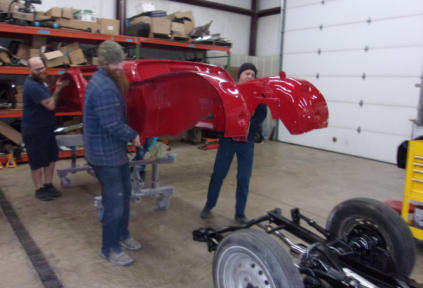
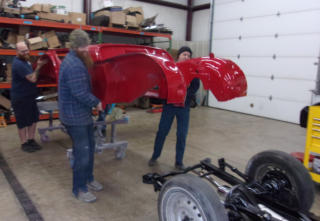
Happy Valentine’s Day! The one thing that we LOVE above anything else is the day when a restoration project starts to resemble a Triumph sports car again. Only after the rusty metal has been replaced, and the banged/beaten body panels straightened, will the body parts receive their shiny new paint. We always wait to restore the chassis until the body tub is in the paint booth, so that it is fresh and clean when the time arrives to unite them for the final time. You can’t see the entire chassis here, but it is very complete. All of the suspension has been rebuilt, and new brake and fuel lines have been routed through the frame. After the plumbing is complete, we install engine/gearbox combination and secure with new mounts. We learned a very long time ago that it’s difficult to snake the longest lines through the frame with an engine or transmission in the way! You can see in this photo that the exhaust system is already in place, because just as with suspension parts or fluid lines, it’s much faster to install these components while we have the best possible access. With our singular focus on the TR2-TR6 models, the efficiencies we’ve gained results in a higher quality car at a lower total cost for our clients.February 7, 2022
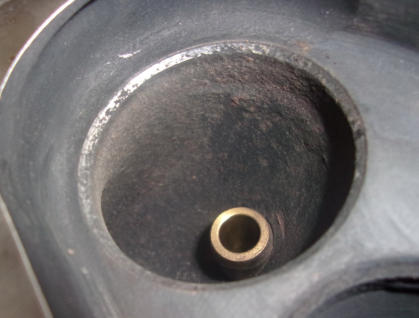
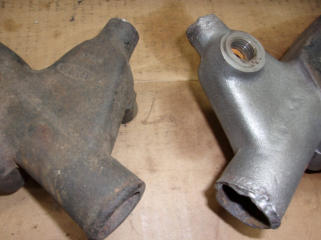
Here’s a situation that you’ve probably never thought about, that is until you encounter it for the first time. Hard and heavy metal castings such as these 4-cylinder water pump housings can and do rust away, just the same as the much thinner body sheet metal on your TR. When this happens on the inside of a casting, it’s difficult to judge just how much of the metal has disappeared through erosion, but when it happens at the hose attachment points like on the housing shown on the right, it should jump right up at you and scream to be repaired. After all, having a hose slip off in heavy summer traffic is one sure way to ruin your day! We find housings like this several times every year, and fortunately we have a good supply of decent spares as shown on the left to quickly replace any suspect housings. While new aluminum replacements are shown in the catalogs for something close to $250, we feel that our clients will be better off sticking with the tried and true original cast iron housings, and saving the high cost of aluminum for some other surprise that will likely surface at another time during most every restoration.January 31, 2022
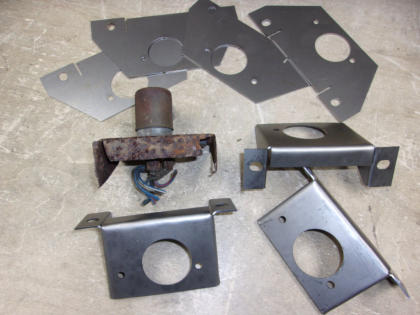
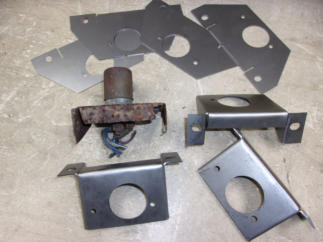
Most TR2/3 dimmer switch brackets have been destroyed by rust over the past 60+ years, so we started reproducing them many years ago. This is the “early” version, used on all TR2-early TR3A’s, up to approximately TS60000 when the dimmer switch changed. If your bracket has a big rust hole in it and is missing mount tabs like this one, chances are pretty good that you’ll also be repairing or replacing the bulkhead side panel for the very same reason! This is the fourth or fifth time we’ve made a batch of 50 brackets since we started reproducing them, and we start by having the blanks cut out for us by our local laser cutting firm (who’s owner has a pretty nice TR4!). Once we have the blanks in hand, it’s pretty easy for our metal fabrication shop to make all of the bends and fold them into useable brackets. If you were to attempt to bend these in a traditional sheet metal break, there would no doubt be some places where tabs that were previously bent would be in the way of the spot where you need to clamp for the next bend. Fortunately, we have a Baliegh magnetic break, which allows us to easily clamp intricate shapes like this and fold precisely where the bends need to be located, without interference from previous bends.January 24, 2022
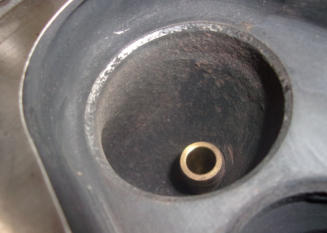
The intake and exhaust valves inside of your engine seal only by simple metal to metal contact, so the sealing surfaces of both the valve and the valve seat in the head must be perfect. They also must align perfectly, so that contact between the two is maintained 100 percent of the way around. You have no doubt heard of bent or burned valves causing engines to run rough or poorly (if at all), and it is the irregular contact caused by one of those two conditions which causes all of the trouble. These valves must seal and hold compression of approximately 150 PSI on the initial compression stroke, and who knows how much additional pressure is exerted when the fuel and air mixture explodes in the cylinder. Without a doubt, it is a substantial amount. You can see in this photo some of the irregular surface pits in this exhaust valve seat, and understand why the engine barely ran and would only pump up to 120# of static compression. Note that there are two types of compression checks, a static check where you hold a compression gauge in the spark plug hole and measure the initial push when the starter cranks and the piston rises. Then there’s a leak-down test, where you test how well the cylinder holds the compression after that initial push. Needless to say, this one leaked down rapidly!January 17, 2022
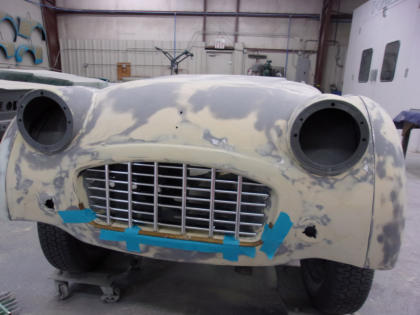
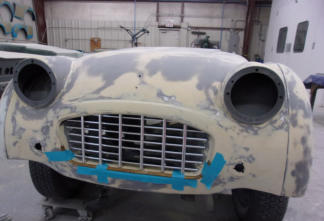
When working with ancient parts and new reproduction bits, it’s never too early to begin test fitting. Who knows how many times this front apron has been bumped and beaten over the preceeding 65 years, so chances are very good that even an original grille isn’t going to fit as properly as it should in this opening. Now most of you (and many “professional” shops) will hope for the best and wait until the car is painted to fit or even order the new shiny parts, but that’s when the wheels will start to come off of the apple cart! Over the years, we’ve seen more than our share of stalled projects, many of them painted and “just needs to be re-assembled”. What should be the easiest and most pleasant part of the restoration is left sitting idle, as no one wants to reverse gears and re-do bodywork a second time so that the car will go back together. While some may think that we assemble and dissassemble too many times during a restoration, we fully believe in being prudent and avoiding rework at some point further down the process. So far (knock on wood), we’ve never had to go back and re-do bodywork and paint because a later installed part wouldn’t fit. Remember, “haste makes waste”.January 10, 2022
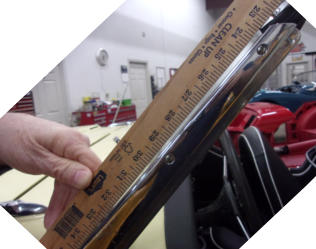
We had to do some fancy cropping and rotation on this weeks’ photo to find the correct angle to show the problem, but it should be easy to pick-up on now. Among the lengthy list that arrived with this TR3A, was a complaint that the owner was having difficulty fitting a new convertible top. We’ve seen enough of these cars by now to quickly notice when something isn’t right, and at first glance it was obvious to us that the windshield frame was bent back and lower at the top left corner. Using a simple yardstick held flat along the edge and starting from the lower portion of the stanchion (but above where it starts to curve forward), we could easily see the stanchion falling back away from a straight line. When checking the right side stanchion, the yardstick stayed in contact with the post all the way to the top, confirming that the left stanchion was bent. While it might not look like much at the windshield, only falling back a quarter of an inch, by the time you extend the angle out to the rear of the car, the top was skewed off to the right side by an inch and a half. How do these stanchions get bent this way? By drivers pulling themselves up and out of the car using the windshield as a handle. So if you find yourself or your passengers grabbing the top of the windscreen when getting in or out of a sidescreen TR, STOP DOING THAT!January 3, 2022
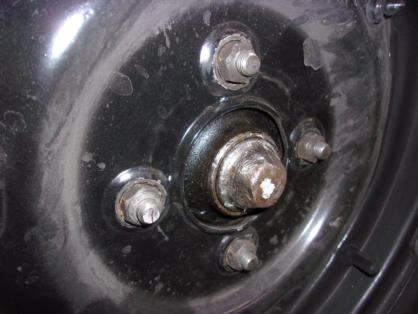
Two different types of lug nuts were used on the Triumph TR’s, the small/thin nut shown here is the style that is used to attach the splined hub for cars equipped with wire wheels. In order to clear the rear of the wire wheels, the nuts were purposely made small and thin, with a tapered edge on each side. The flat thick base of the splined hubs distributed the forces around the entire bolt circle, allowing such small nuts to do the job safely. For steel wheel cars, the forces are concentrated around the four small studs, so larger and thicker nuts were specified. Try to use a large nut on a wire wheel car, and the nuts will keep the wheels from seating correctly and running true. Install small wire wheel nuts onto steel wheels as shown here, and the nuts will slowly pull through the wheel and fail. This wheel is already ruined, as the areas around the nuts have worn very thin. Thankfully we caught this (and the other 3 as well) before complete failure caused an accident that would have been harmful to both the car and occupants.
BLOG
2022-Q1
America’s BEST Triumph Shop


Macy’s Garage

© 2026 - Macy’s Garage, Ltd.

Blog
WHAT we’re doing, and HOW we’re doing it!
March 28, 2022
It’s almost unthinkable to expect an auto trim shop to have metal fabrication ability, at least until you restore enough vintage Triumph TR’s! Most of the sidescreen cars (TR2- TR3B) and early TR4’s with the sheet metal pan seats will require some metal work to repair rust and cracks in the bottoms. Occasionally the damage will extend along the lower edge of the seat backs, but never before have we found a seat back that required this much work. Most who encounter something like this will start searching for a replacement seat base that’s in better condition, but with the passage of time the “better” parts are now as rare as ghost poop! This TR2 seat pan is the same style that was shown here on February 28, with the wide top seat back and the sloped edges along the bottom. With less than 10,000 TR2’s built and scattered all around the globe, not to mention the passage of 66 years since the last cars were built, how many “better” seats do you think you’ll find sitting unused somewhere that you can purchase? How this seat back got so rusty up high on a vertical surface is still a mystery, but the best ideas are that the padding got wet repeatedly and held moisture against the metal, or the seat was removed from the car and stored for many years on it’s side in a very wet location. However it might have occurred, our metal shop was able to replace the damaged section, complete with wire bead around the edge and curved ribs through the back as originally designed for strength.March 21, 2022
We all know that you shouldn’t believe everything you see on the internet, but did you know that the same advice pertains to books as well? This outer footwell panel (bulkhead end) on the right side of a TR3 is called out a couple of times in the popular “How To Restore Triumph TR2 TR3 & TR3A” for having a speaker hole, which the author states is a reason to replace the whole end panel. What he and many who read his book won’t know, is that these speaker holes were standard on most TR2-TR3A’s, up somewhere in the late TS50000 range. TS1LO did not have this hole for a speaker, nor does TS333L which is here now for a complete frame-up restoration. The earliest car we’ve had here with this exact same speaker hole is TS2101L, so from that number up through about 55000, you can see that there were quite a few cars with OEM speaker holes which are supposed to be here. Triumph only covered these holes with carpet, which was probably OK for keeping the water and dirt out until the bulkhead sealer plate seals went bad, but we always make this cool little block-off plate as added protection and to support the carpet. If you are wondering about this paint color, it is Winchester Blue, available only on the 1957 small mouth TR3, and quickly replaced by Powder Blue in 1958 for the TR3A.March 14, 2022
From time to time we like to remind Triumph owners that our singular focus on the TR2-TR6 models has allowed us to invest in tools and equipment that makes our shop extremely efficient. What that means for our clients is that we can accomplish repair and maintenance tasks on these models to a higher level of quality, and in fewer billable hours (less cost) than would be possible anywhere else. You can bet that the Corvette shop 2 miles from your house isn’t going to have any TR specific tools that will speed up their work on your Triumph!. And as a side note, if they were any good with Corvettes, they wouldn’t have time (or space) to take on your TR project in the first place! The Corvette world should keep them just as busy with Corvette work as the Triumph community keeps us with TR’s. This week’s photo is just one such example of a fixture which cuts the required time AND allows us to produce a finished product of a much higher quality. Triumph doors have to be painted both inside and out, so we created a special stand which allows us to paint all surfaces at the same time. This saves the time that would be needed to tape up and paint the inside and outside of the doors at different times, and it also holds the doors in the same vertical orientation for paint as they will be installed onto the cars.March 7, 2022
Here’s one we’ve never seen before, and another chance to scratch our heads and ask “What were they thinking?”. Someone fell into the “you better upgrade to tube shocks” trap, but left the lever arm shocks intact and operational. No wonder this solid axle TR4A rode like a log wagon! Now we have seen plenty of tube shock conversions, but there’s really no reason to do so unless you regularly take your car to track days and need adjustable shocks to gain a half second or so on your lap times. We haven’t seen any converted cars yet that ride any better with “upgraded” shocks on the back, and they certainly won’t help you get down to the local cars and coffee any quicker on a Saturday morning. Many times, however, we have found cracked chassis members or cracked wheel tub sheet metal where the tube shocks and their mounting plates have been attached. Naturally, the guys who have put all the effort in converting their cars will describe the conversion as the best thing since sliced bread, but perhaps their old lever shocks were so bad that anything would have been seen as an improvement. We have found that most owners are perfectly happy with a quality rebuilt lever shock, and quality rebuilds will be the last shocks they will ever have to install on their TR’s. It’s not that we are “purists” who resist changing the cars, as we have no reservations about making changes and upgrades where there are benefits to be gained in the areas of safety, comfort, and reliability. It’s just that rear tube shock conversions don’t fit that criteria, and certainly not while leaving an operational set of lever arm shocks in place as well!February 28, 2022
This week we have another of those subtle differences that will cause trouble for most hobbiest and paid TR restorers alike. Both of these seats came out of the same car, but if you look closely you can see that there’s a slight difference in the shape of the back panels. The “narrow top” seat on the left is the correct style for a TR3A/B, while the “wide top” seatback on the right is the TR2/3 small mouth style. (And if the back looks like the narrow top TR3A/B seat, but has a deep pan like depression in most of the bottom, it’s an early TR4 seat.) As an added detail, I will mention that the small mouth seat on the right is also a TR2 seat, as the lip around the bottom edge is sloped (beveled). A correct TR3 small mouth seat would have the wide top, but a square lower edge as seen on the TR3A/B seat on the left. Now if you or your restorer were to order a seat cover kit for your car in a mixed seat situation like this, only one side is going to fit. You don’t have to think too hard to imagine a day many years ago when some average TR owner was walking through a junkyard and spotted a wreck with better seats than were in his own car. If the budget allowed, both seats were probably changed, in which case the seat kit you order today isn’t going to fit correctly on either side!February 21, 2022
Fender skirts (AKA “Spats”) were a very popular accessory in the 1950’s and 60’s, so much so that Standard-Triumph installed them on the Jabbeke TR2 for aerodynamic reasons, and also on the first two production cars TS1LO and TS2. It’s unknown how many of the early cars might have been fitted with them on the production line, but they are shown in the TR2 & TR3 Spare Parts Catalogue in the rear of the book under “Accessories”. They won’t fit with wire wheels, but you also don’t see many today on steel wheel cars either. If you like the look, or want to have your sidescreen TR stand out in a row of TR2-TR3B’s, a set of these will certainly draw a crowd to your car at the next British Car show you attend. Now you can just forget about finding a pair of useable or repairable Spats on eBay or at any swap meet on the planet, but we’ve figured out how to create these from flat metal, and have done so for several cars now. We need unpainted fenders and preferably an entire car to make them and be sure of a proper fit, so if your car is here for a restoration we’ll be able to check these rare birds off of your “wish list”.February 14, 2022
Happy Valentine’s Day! The one thing that we LOVE above anything else is the day when a restoration project starts to resemble a Triumph sports car again. Only after the rusty metal has been replaced, and the banged/beaten body panels straightened, will the body parts receive their shiny new paint. We always wait to restore the chassis until the body tub is in the paint booth, so that it is fresh and clean when the time arrives to unite them for the final time. You can’t see the entire chassis here, but it is very complete. All of the suspension has been rebuilt, and new brake and fuel lines have been routed through the frame. After the plumbing is complete, we install engine/gearbox combination and secure with new mounts. We learned a very long time ago that it’s difficult to snake the longest lines through the frame with an engine or transmission in the way! You can see in this photo that the exhaust system is already in place, because just as with suspension parts or fluid lines, it’s much faster to install these components while we have the best possible access. With our singular focus on the TR2-TR6 models, the efficiencies we’ve gained always results in a higher quality car at a lower total cost for our clients.February 7, 2022
Here’s a situation that you’ve probably never thought about, that is until you encounter it for the first time. Hard and heavy metal castings such as these 4-cylinder water pump housings can and do rust away, just the same as the much thinner body sheet metal on your TR. When this happens on the inside of a casting, it’s difficult to judge just how much of the metal has disappeared through erosion, but when it happens at the hose attachment points like on the housing shown on the right, it should jump right up at you and scream to be repaired. After all, having a hose slip off in heavy summer traffic is one sure way to ruin your day! We find housings like this several times every year, and fortunately we have a good supply of decent spares as shown on the left to quickly replace any suspect housings. While new aluminum replacements are shown in the catalogs for something close to $250, we feel that our clients will be better off sticking with the tried and true original cast iron housings, and saving the high cost of aluminum for some other surprise that will likely surface at another time during most every restoration.January 31, 2022
Most TR2/3 dimmer switch brackets have been destroyed by rust over the past 60+ years, so we started reproducing them many years ago. This is the “early” version, used on all TR2-early TR3A’s, up to approximately TS60000 when the dimmer switch changed. If your bracket has a big rust hole in it and is missing mount tabs like this one, chances are pretty good that you’ll also be repairing or replacing the bulkhead side panel for the very same reason! This is the fourth or fifth time we’ve made a batch of 50 brackets since we started reproducing them, and we start by having the blanks cut out for us by our local laser cutting firm (who’s owner has a pretty nice TR4!). Once we have the blanks in hand, it’s pretty easy for our metal fabrication shop to make all of the bends and fold them into useable brackets. If you were to attempt to bend these in a traditional sheet metal break, there would no doubt be some places where tabs that were previously bent would be in the way of the spot where you need to clamp for the next bend. Fortunately, we have a Baliegh magnetic break, which allows us to easily clamp intricate shapes like this and fold precisely where the bends need to be located, without interference from previous bends.January 24, 2022
The intake and exhaust valves inside of your engine seal only by simple metal to metal contact, so the sealing surfaces of both the valve and the valve seat in the head must be perfect. They also must align perfectly, so that contact between the two is maintained 100 percent of the way around. You have no doubt heard of bent or burned valves causing engines to run rough or poorly (if at all), and it is the irregular contact caused by one of those two conditions which causes all of the trouble. These valves must seal and hold compression of approximately 150 PSI on the initial compression stroke, and who knows how much additional pressure is exerted when the fuel and air mixture explodes in the cylinder. Without a doubt, it is a substantial amount. You can see in this photo some of the irregular surface pits in this exhaust valve seat, and understand why the engine barely ran and would only pump up to 120# of static compression. Note that there are two types of compression checks, a static check where you hold a compression gauge in the spark plug hole and measure the initial push when the starter cranks and the piston rises. Then there’s a leak-down test, where you test how well the cylinder holds the compression after that initial push. Needless to say, this one leaked down rapidly!January 17, 2022
When working with ancient parts and new reproduction bits, it’s never too early to begin test fitting. Who knows how many times this front apron has been bumped and beaten over the preceeding 65 years, so chances are very good that even an original grille isn’t going to fit as properly as it should in this opening. Now most of you (and many “professional” shops) will hope for the best and wait until the car is painted to fit or even order the new shiny parts, but that’s when the wheels will start to come off of the apple cart! Over the years, we’ve seen more than our share of stalled projects, many of them painted and “just needs to be re-assembled”. What should be the easiest and most pleasant part of the restoration is left sitting idle, as no one wants to reverse gears and re-do bodywork a second time so that the car will go back together. While some may think that we assemble and dissassemble too many times during a restoration, we fully believe in being prudent and avoiding rework at some point further down the process. So far (knock on wood), we’ve never had to go back and re-do bodywork and paint because a later installed part wouldn’t fit. Remember, “haste makes waste”.January 10, 2022
We had to do some fancy cropping and rotation on this weeks’ photo to find the correct angle to show the problem, but it should be easy to pick-up on now. Among the lengthy list that arrived with this TR3A, was a complaint that the owner was having difficulty fitting a new convertible top. We’ve seen enough of these cars by now to quickly notice when something isn’t right, and at first glance it was obvious to us that the windshield frame was bent back and lower at the top left corner. Using a simple yardstick held flat along the edge and starting from the lower portion of the stanchion (but above where it starts to curve forward), we could easily see the stanchion falling back away from a straight line. When checking the right side stanchion, the yardstick stayed in contact with the post all the way to the top, confirming that the left stanchion was bent. While it might not look like much at the windshield, only falling back a quarter of an inch, by the time you extend the angle out to the rear of the car, the top was skewed off to the right side by an inch and a half. How do these stanchions get bent this way? By drivers pulling themselves up and out of the car using the windshield as a handle. So if you find yourself or your passengers grabbing the top of the windscreen when getting in or out of a sidescreen TR, STOP DOING THAT!January 3, 2022
Two different types of lug nuts were used on the Triumph TR’s, the small/thin nut shown here is the style that is used to attach the splined hub for cars equipped with wire wheels. In order to clear the rear of the wire wheels, the nuts were purposely made small and thin, with a tapered edge on each side. The flat thick base of the splined hubs distributed the forces around the entire bolt circle, allowing such small nuts to do the job safely. For steel wheel cars, the forces are concentrated around the four small studs, so larger and thicker nuts were specified. Try to use a large nut on a wire wheel car, and the nuts will keep the wheels from seating correctly and running true. Install small wire wheel nuts onto steel wheels as shown here, and the nuts will slowly pull through the wheel and fail. This wheel is already ruined, as the areas around the nuts have worn very thin. Thankfully we caught this (and the other 3 as well) before complete failure caused an accident that would have been harmful to both the car and occupants.

America’s BEST Triumph Shop