Macy’s Garage

© 2026 - Macy’s Garage, Ltd.

Blog
WHAT we’re doing, and HOW we’re doing it!
September 25, 2023
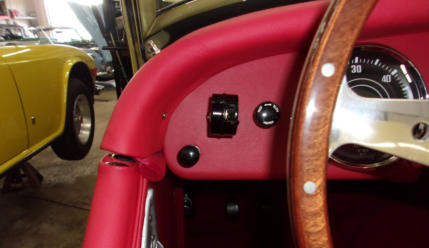
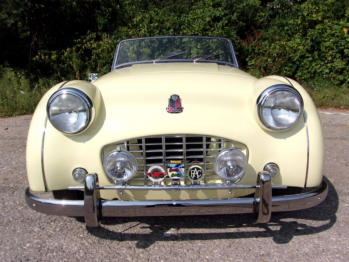
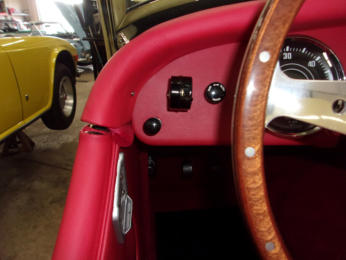
Our photo this week shows the back end of the driving light installation from last week. While most will simply let a toggle switch hang down below the dash and be happy if the lights come on when they flip it, we feel like we need to continue the neatness factor throughout the entire project. We selected a spot low on the instrument panel, below and outside of the overdrive switch, and then mounted a genuine Triumph (Lucas) push-pull switch and a knob that matches all the others in the center panel. Easy to reach, and nothing that looks modern or out of place. While we’re here at this particular angle, be sure to notice how well the cockpit cappings align at the front corner of the door and the end of the dash rail capping. We always put in the effort to make sure that all of these parts will line up, well before we begin to cover them with the leather or vinyl coverings. It’s attention to the tiniest details like this that make the difference between good cars and outstanding cars, and we always strive to provide our clients with the latter. And yes, this IS a yellow car with red interior! We’ll provide better photos of this interesting color combination to start the 2023 Q4 Blog page next week.September 18, 2023
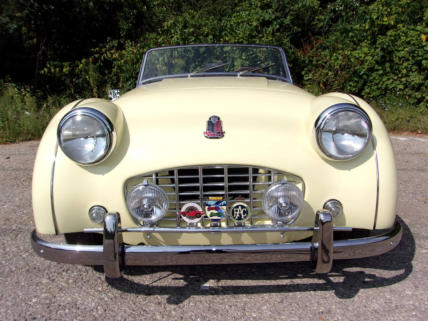
Personalizing your car was a more popular activity back in the day than it is today, but we still occasionally add accessories at the owner’s request. Thankfully items such as this badge bar, badges, and driving or fog lights are being reproduced and are easy to obtain. But you might be surprised at how much effort is required to install and make everything functional! After carefully aligning the front bumper with the body (a difficult task on a smallmouth car), you can move on to the badge bar. The badge bar had to have brackets shimmed and tweaked to bring it into alignment with the bumper. The badges themselves were of different thickness at the bases, which changed how tightly they clamped onto the bar. Shimming was again required on some of the badge brackets so that they would grip the bar tightly. Mounting the lights did not pose too much of a problem, other than adjustments to make the lights level and pointing straight ahead. But then came the wiring of the lights, and it was not as simple as running a hot wire from the battery to a switch, and then on to the lights. Big lights draw a lot of current, so step one was to route some 12ga wires neatly into the engine bay. We then had to mount and power a relay, so that high amperage wasn’t brought inside the car and through a small dash mounted switch. And of course the switch had to be located on the dash, then wired to control the relay. And that folks is how a “simple” badge bar installation burns up the better part of a day!September 11, 2023
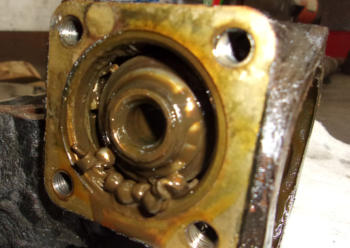
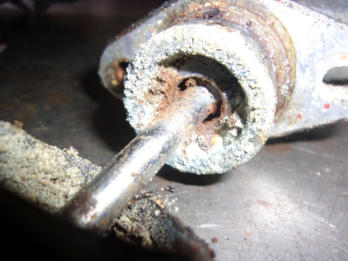
This is a sight we get to see quite often, a hydraulic cylinder that is corroded and seized. This is the back side of a TR6 clutch master cylinder, but the same thing happens to them all, clutch and brake master cylinders, clutch slave cylinders, and aluminum wheel cylinders. Whenever a car is neglected and allowed to sit, even for as little as a year or two, it’s ALWAYS the fluid systems that go bad first. That would be brake and clutch hydraulics, fuel systems, and engine cooling systems. Even engine, transmission, and differential oils can cause problems by absorbing moisture out of the air or draining off of the components they were supposed to protect, allowing rust to start and grow. Rubber components that contain all of these fluids also go bad when allowed to sit idle. The crusty cylinders like this one get all of the attention, but you should also plan on replacing all of the rubber components at the same time; parts like clutch and brake hoses, radiator and heater hoses, and even rubber oil seals from the engine back to the differential and rear axles. It’s easier and less frustrating to replace everything while the systems are open and dry than to go back in and deal with your new fresh fluids, all of which will surely run out when you need to open it again and replace a component that was bypassed the first time. I don’t know about you, but I’d rather be driving my TR’s than to be working on an area that had received attention not that long ago. September 5, 2023 TR2-TR3B steering boxes are not a modern design, going back almost as far as the horse and buggy days. The reputation and driving experience is SO bad that many will go the Rack & Pinion steering conversion route. But geometry changes incurred when converting to a rack that wasn’t designed as part of the entire front suspension can be quite scary to drive at speed. You will probably be better off by ignoring all of the internet experts and trying a little maintenance on the original box as a first step toward steering improvement. We rebuild an average of two of the early steering boxes each and every month, and have done so at this same rate for the past 14-15 years. Needless to say, we’ve seen quite a few of these, and the effects of ignoring the steering box until it’s impossible to keep the car on the road. See the photo at the right. A sidescreen Triumph steering box has two small ball and cage bearings inside, and they aren’t much more than bicycle bearings. They don’t rotate at high speed, so they really don’t need to be “heavy duty”. They do however need to be intact, and it’s little wonder that this TR3 was “hard to steer” when the bearing cage broke apart and released all of the balls. Yes, an R&P conversion would have improved the low speed steering, but would it have been necessary?August 28, 2023
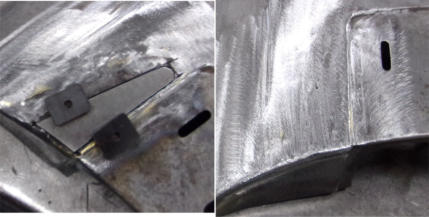
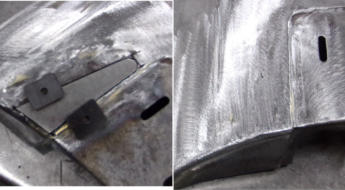
This week we’ll wrap up in the metal shop with this combined “During and After” image of the rear TR6 fender from last week. On the left you can see that the bad metal was completely cut away and a patch which just fit the hole was created and held in place with magnets. On the right side you can see what the area in question looks like after being welded solidly in place and the welds ground away. The welds are of the Butt-Weld category, and the new patch does not overlap any original metal whatsoever. It’s worth noting that what was probably a few very small holes had expanded to a repair area the exact size and shape of the patch brazed on so many years ago. We’ll also mention that there are plenty of special clamps on the market which hold patches and panels apart slightly, leaving a small gap which is helpful when MIG welding a patch into position. We leave ZERO gap because we are TIG welding the patch into place. TIG welding is more difficult but allows greater heat control to reduce warpage. It also means that less filler rod will be needed, reducing the time and the heat necessary to grind the welds clean and create an “invisible and forever” repair.August 21, 2023
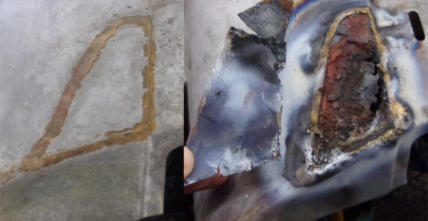
This week we have combined two photos into one to illustrate a point. Browse through our blog posts for the past several years, and you will find where we have cautioned many times against patching OVER rust, as this creates pockets to hold moisture. This warning was posted here as recently as 2 weeks ago (8/07/23), and then we had this prime example show up in our metal shop. On the left side of this photo you can see a very nice looking patch that was placed over a damaged area, above the tail light of a TR6 rear fender. It was solidly brazed in place, then covered with bondo and paint to create an invisible repair. Should last forever, right? After having the fender stripped to reveal the patch, we melted away the brazing and peeled the patch back to see what was really going on underneath the surface. Moisture was still getting through from the original rust holes and collecting in the pocket between the fender and the patch. All that the original patch did was to keep the bondo from falling through a much smaller hole, and insulated the paint from promptly bubbling and cracking. But it didn’t solve the issue forever like cutting out the weak metal and precisely fitting a single layer patch would’ve.August 14, 2023
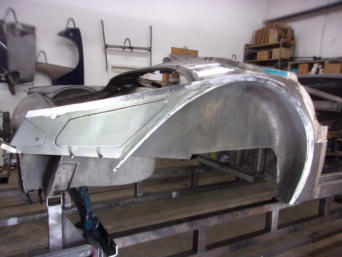
This will be the third and final photo of the project started on July 31. This was actually completed in just a few hours, but with only one Blog entry per week, it takes14 days to show the major steps! Although the repair to the RR corner of this TR3A body tub is not 100% complete with the tail light pocket and trunk lid seal channel yet to be fabricated and installed, it’s far enough along for you to see that this will be another invisible repair by our talented metal shop. Notice too all of the shiny new metal all the way around the outer edge of the wheel tub. This is a typical rust area because Triumph painted the cars AFTER they were assembled, and the joint between fender and body tub never received any paint. Water thrown off of the rear tires would go up into the crack between the two, and it was made a little wider because of the wing bead tabs that were wedged between the tub and fender. With nothing but bare steel in this seam, the rust action started here pretty quick. Repair sections for this area are difficult to make without large and expensive metal shaping equipment, because of double layers and compound curves all the way around. Experience helps too, and our metal guys can just about fix this area in their sleep after having done such a large number of them!August 7, 2023
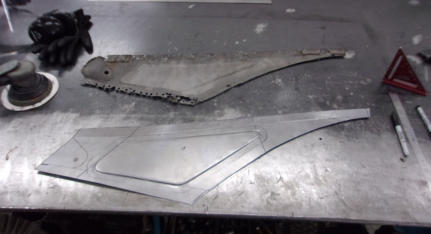
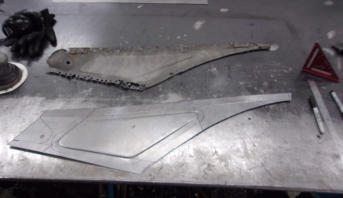
Continuing on with last week’s project, after bracing up the body tub and removing the damaged panel, you next have to create a new panel to replace it. On the TR2-3B cars, there are three different versions of this panel, but only one is readily available from a catalog. Those that can be purchased are expensive, and then you have to work on them for hours to make it fit. At that point, we think it’s less costly for our clients if we just make one that fits correctly the first time. We’ve often seen these “repaired” with small patch pieces held on by pop rivets or small brazed tacks, but that doesn’t restore the strength of the area. It also makes pockets for moisture to collect, accelerating future rust and greater damage. Occasionally someone with minimal sheet metal skills or equipment will replace this panel with a perfectly flat panel that fits the hole. However, without the raised panel in the middle it still lacks some needed strength, and it will also be prone to vibration and the associated noise that creates. Triumph didn’t spend money on details like this in their stamping dies just to make it pretty, so we always include the strength features in all of the replacement panels we create here.July 31, 2023
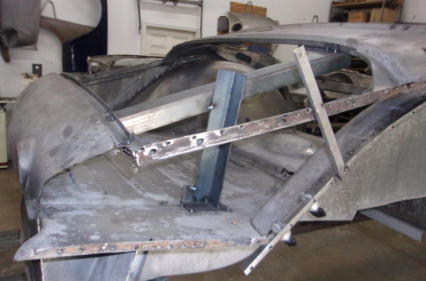
After 60-70 years of use and exposure to the elements, there is no area of a TR2 or TR3 body that is immune to the “Tin worm”. Frequent visitors to this site well know that we have three rotisseries that are equipped with Triumph body jigs that we have made, and they do an excellent job of keeping the body tubs in shape when floors and sills have evaporated. They even guarantee perfect results on cars that have rusted in half or been cut into two or more large sections. But what do you do to maintain some sort of alignment when extensive rust is located higher up in the body, and removing the damaged parts would allow the body to open up like a cardboard box with a couple of corners sliced open? In those cases, we just have to tack weld braces in places where our experience thinks they should be located. There won’t be a great amount of force on these temporary braces, nothing like driving the car over a rough railroad track at 60 MPH, so small tack welds that can be easily ground off later are all that will be required. Once the new sections of the body tub have been fabricated and welded securely into place, the body will regain all of it’s original rigidity and the temporary braces can come out before we move on to the next section needing repair.July 24, 2023
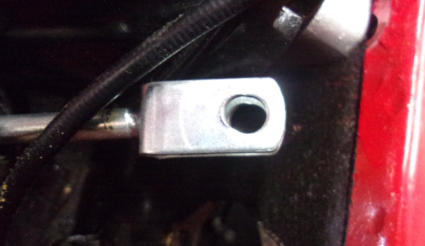
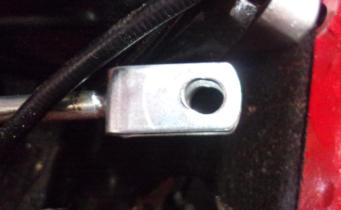
Today’s photo shows the clevis end of a TR6 clutch master cylinder push rod. Note that the hole where the clevis pin attaches it to the top of the clutch pedal is not round, as it has worn from repeated clutch operation. The top of the clutch pedal will wear even more over the lifetime of the car, and we’ve seen clevis pins which were almost worn in two. If you stop and think about it, drivers go up and down through the gears many times between stops, so the clutch pedal linkage gets at least 8 times as much use as each application of the brakes. Now all of this wear adds together, and the result is an inch or more of pedal travel before the rod ever starts to move the master cylinder piston (and send fluid to the slave cylinder). There is a limited amount of travel before the pedal stops at the firewall, and if half of it is wasted taking up the slop in the linkage, you won’t have any chance of fully releasing the clutch. This car came to us from FL due to a “clutch issue”, where it had previously been to two local import car shops for the same problem before coming here to be quickly resolved by the Macy’s Garage Team.July 17, 2023
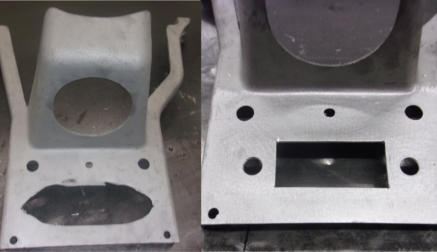
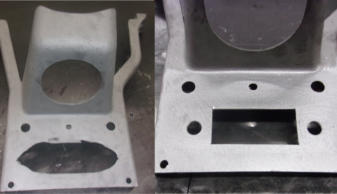
The line between upholstery trim and metal work is a razor thin one, and often blurred. Take this combined before and after picture of a TR6 lower dash support or “console”. We have stripped the black vinyl padding from the aluminum framework in preparation to recover it, but first we’ll need to repair the chopped up radio hole. Most of these supports have been butchered in the past, back when owners just HAD to have a better stereo system. We have saved just about every one of these that we’ve encountered by cutting away the butchered section to obtain straight and square edges, then filling the hole by TIG welding a thick (.125”) aluminum plate into the hole to close it back up. The final step is to cut perfect original-sized radio holes in the new plate, using a pattern taken from the one and only unmolested support bracket that we’ve seen in the past 20+ years. After this metalworking chore is complete, we’re finally able to return to the upholstery work we originally set out to do!July 10, 2023
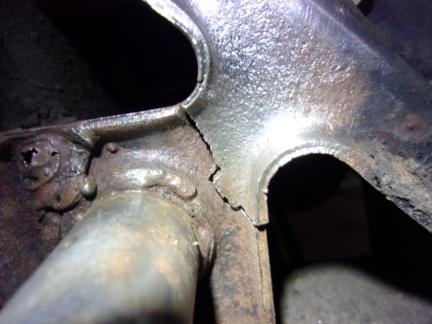
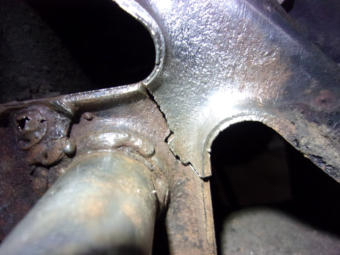
Simple repairs on 50-70 year old sports cars aren’t always that simple, and here’s a prime example of suddenly finding yourself at the bottom of a rabbit hole. What was supposed to be a simple bushing replacement on the front end of a TR3A got a little more complicated just by cleaning off caked on dirt and grease, then taking a good look around. What you see here is the lower fulcrum pin and the locating/reinforcement plate, all of which hold the lower wishbones and coil spring pans onto the frame. It wouldn’t be pretty if this were to let go completely, and probably not too good for the handling and tire wear even if it didn’t. The lesson here is to never take anything for granted, and use any simple maintenance chore as an opportunity to look around and inspect all that you can. Time and stress has a way of fatiguing steel, and cracks or breaks can happen in the strangest places. It’s far better to discover them while the car is in the garage and up on jack-stands, than while performing a post-mortem after the accident!July 3, 2023
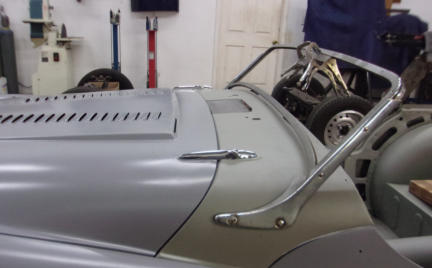
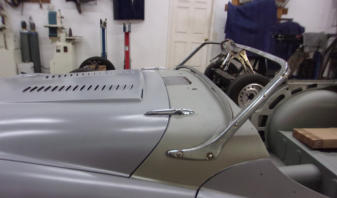
Many in the Triumph community believe that we are strict devotees to originality, and folks who would like to modify their TR’s are afraid to call us and ask for changes. Nothing could be farther from the truth! While there are some modifications circulating through the chat rooms that would be a waste of your money, if proposed modifications make sense we’re more than happy to comply. After all, it’s your car and you should be free to restore or modify it in a manner that will enhance your enjoyment! Take this TR3A for example. We’ve shown the louvered bonnet before, but the chopped windshield is a new twist that we have not previously brought to light. “Strange” requests like this are no problem for the talented crew we have here, as most of them either have or still are dabbling in the world of Hot Rods, Race Cars, and Customs. It makes a task like this almost routine, for we knew right away that the top of the windshield frame would need to be stretched wider as it dropped 3” toward the bottom. Fortunately we have extra frames on hand, and we knew how to cut the two so that we’d end up with a single seam. The two brass pieces were securely welded together, so now it’s off to the chrome shop to make it shiny again, just the same as if it had never been chopped.
BLOG
2023-Q3
America’s BEST Triumph Shop


Macy’s Garage

© 2026 - Macy’s Garage, Ltd.

Blog
WHAT we’re doing, and HOW we’re doing it!
September 25, 2023
Our photo this week shows the back end of the driving light installation from last week. While most will simply let a toggle switch hang down below the dash and be happy if the lights come on when they flip it, we feel like we need to continue the neatness factor throughout the entire project. We selected a spot low on the instrument panel, below and outside of the overdrive switch, and then mounted a genuine Triumph (Lucas) push-pull switch and a knob that matches all the others in the center panel. Easy to reach, and nothing that looks modern or out of place. While we’re here at this particular angle, be sure to notice how well the cockpit cappings align at the front corner of the door and the end of the dash rail capping. We always put in the effort to make sure that all of these parts will line up, well before we begin to cover them with the leather or vinyl coverings. It’s attention to the tiniest details like this that make the difference between good cars and outstanding cars, and we always strive to provide our clients with the latter. And yes, this IS a yellow car with red interior! We’ll provide better photos of this interesting color combination to start the 2023 Q4 Blog page next week.September 18, 2023
Personalizing your car was a more popular activity back in the day than it is today, but we still occasionally add accessories at the owner’s request. Thankfully items such as this badge bar, badges, and driving or fog lights are being reproduced and are easy to obtain. But you might be surprised at how much effort is required to install and make everything functional! After carefully aligning the front bumper with the body (a difficult task on a smallmouth car), you can move on to the badge bar. The badge bar had to have brackets shimmed and tweaked to bring it into alignment with the bumper. The badges themselves were of different thickness at the bases, which changed how tightly they clamped onto the bar. Shimming was again required on some of the badge brackets so that they would grip the bar tightly. Mounting the lights did not pose too much of a problem, other than adjustments to make the lights level and pointing straight ahead. But then came the wiring of the lights, and it was not as simple as running a hot wire from the battery to a switch, and then on to the lights. Big lights draw a lot of current, so step one was to route some 12ga wires neatly into the engine bay. We then had to mount and power a relay, so that high amperage wasn’t brought inside the car and through a small dash mounted switch. And of course the switch had to be located on the dash, then wired to control the relay. And that folks is how a “simple” badge bar installation burns up the better part of a day!September 11, 2023
This is a sight we get to see quite often, a hydraulic cylinder that is corroded and seized. This is the back side of a TR6 clutch master cylinder, but the same thing happens to them all, clutch and brake master cylinders, clutch slave cylinders, and aluminum wheel cylinders. Whenever a car is neglected and allowed to sit, even for as little as a year or two, it’s ALWAYS the fluid systems that go bad first. That would be brake and clutch hydraulics, fuel systems, and engine cooling systems. Even engine, transmission, and differential oils can cause problems by absorbing moisture out of the air or draining off of the components they were supposed to protect, allowing rust to start and grow. Rubber components that contain all of these fluids also go bad when allowed to sit idle. The crusty cylinders like this one get all of the attention, but you should also plan on replacing all of the rubber components at the same time; parts like clutch and brake hoses, radiator and heater hoses, and even rubber oil seals from the engine back to the differential and rear axles. It’s easier and less frustrating to replace everything while the systems are open and dry, than to go back in and deal with your new fresh fluids, all of which will surely run out when you need to open it again and replace a component that was bypassed the first time. I don’t know about you, but I’d rather be driving my TR’s than to be working on an area that had received attention not that long ago.September 5, 2023
TR2-TR3B steering boxes are not a modern design, going back almost as far as the horse and buggy days. The reputation and driving experience is SO bad that many will go the Rack & Pinion steering conversion route. But geometry changes incurred when converting to a rack that wasn’t designed as part of the entire front suspension can be quite scary to drive at speed. You will probably be better off by ignoring all of the internet experts and trying a little maintenance on the original box as a first step toward steering improvement. We rebuild an average of two of the early steering boxes each and every month, and have done so at this same rate for the past 14-15 years. Needless to say, we’ve seen quite a few of these, and the effects of ignoring the steering box until it’s impossible to keep the car on the road. See the photo at the right. A sidescreen Triumph steering box has two small ball and cage bearings inside, and they aren’t much more than bicycle bearings. They don’t rotate at high speed, so they really don’t need to be “heavy duty”. They do however need to be intact, and it’s little wonder that this TR3 was “hard to steer” when the bearing cage broke apart and released all of the balls. Yes, an R&P conversion would have improved the low speed steering, but would it have been necessary?August 28, 2023
This week we’ll wrap up in the metal shop with this combined “During and After” image of the rear TR6 fender from last week. On the left you can see that the bad metal was completely cut away and a patch which just fit the hole was created and held in place with magnets. On the right side you can see what the area in question looks like after being welded solidly in place and the welds ground away. The welds are of the Butt-Weld category, and the new patch does not overlap any original metal whatsoever. It’s worth noting that what was probably a few very small holes had expanded to a repair area the exact size and shape of the patch brazed on so many years ago. We’ll also mention that there are plenty of special clamps on the market which hold patches and panels apart slightly, leaving a small gap which is helpful when MIG welding a patch into position. We leave ZERO gap because we are TIG welding the patch into place. TIG welding is more difficult but allows greater heat control to reduce warpage. It also means that less filler rod will be needed, reducing the time and the heat necessary to grind the welds clean and create an “invisible and forever” repair.August 21, 2023
This week we have combined two photos to illustrate a point. Browse through our blog posts for the past several years, and you will find where we have cautioned many times against patching OVER rust, as this creates pockets to hold moisture. This warning was posted here as recently as 2 weeks ago (8/07/23), and then we had this prime example show up in our metal shop. On the left side of this photo you can see a very nice looking patch that was placed over a damaged area, above the tail light of a TR6 rear fender. It was solidly brazed in place, then covered with bondo and paint to create an invisible repair. Should last forever, right? After having the fender stripped to reveal the patch, we melted away the brazing and peeled the patch back to see what was really going on underneath the surface. Moisture was still getting through from the original rust holes and collecting in the pocket between the fender and the patch. All that the original patch did was to keep the bondo from falling through a much smaller hole, and insulated the paint from promptly bubbling & cracking. But it didn’t solve the issue forever like cutting out the weak metal and precisely fitting a single layer patch would have.August 14, 2023
This will be the third and final photo of the project started on July 31. This was actually completed in just a few hours, but with only one Blog entry per week, it takes 14 days to show the major steps! Although the repair to the RR corner of this TR3A body tub is not 100% complete with the tail light pocket and trunk lid seal channel yet to be fabricated and installed, it’s far enough along for you to see that this will be another invisible repair by our talented metal shop. Notice too all of the shiny new metal all the way around the outer edge of the wheel tub. This is a typical rust area because Triumph painted the cars AFTER they were assembled, and the joint between fender and body tub never received any paint. Water thrown off of the rear tires would go up into the crack between the two, and it was made a little wider because of the wing bead tabs that were wedged between the tub and fender. With nothing but bare steel in this seam, the rust action started here pretty quick. Repair sections for this area are difficult to make without large and expensive metal shaping equipment, because of double layers and compound curves all the way around. Experience helps too, and our metal guys can just about fix this area in their sleep after having done such a large number of them!August 7, 2023
Continuing on with last week’s project, after bracing up the body tub and removing the damaged panel, you next have to create a new panel to replace it. On the TR2-3B cars, there are three different versions of this panel, but only one is readily available from a catalog. Those that can be purchased are expensive, and then you have to work on them for hours to make it fit. At that point, we think it’s less costly for our clients if we just make one that fits correctly the first time. We’ve often seen these “repaired” with small patch pieces held on by pop rivets or small brazed tacks, but that doesn’t restore the strength of the area. It also makes pockets for moisture to collect, accelerating future rust and greater damage. Occasionally someone with minimal sheet metal skills or equipment will replace this panel with a perfectly flat panel that fits the hole. However, without the raised panel in the middle it still lacks some needed strength, and it will also be prone to vibration and the associated noise that creates. Triumph didn’t spend money on details like this in their stamping dies just to make it pretty, so we always include the strength features in all of the replacement panels we create here.July 31, 2023
After 60-70 years of use and exposure to the elements, there is no area of a TR2 or TR3 body that is immune to the “Tin worm”. Frequent visitors to this site well know that we have three rotisseries that are equipped with Triumph body jigs that we have made, and they do an excellent job of keeping the body tubs in shape when floors and sills have evaporated. They even guarantee perfect results on cars that have rusted in half or been cut into two or more large sections. But what do you do to maintain some sort of alignment when extensive rust is located higher up in the body, and removing the damaged parts would allow the body to open up like a cardboard box with a couple of corners sliced open? In those cases, we just have to tack weld braces in places where our experience thinks they should be located. There won’t be a great amount of force on these temporary braces, nothing like driving the car over a rough railroad track at 60 MPH, so small tack welds that can be easily ground off later are all that will be required. Once the new sections of the body tub have been fabricated and welded securely into place, the body will regain all of it’s original rigidity and the temporary braces can come out before we move on to the next section needing repair.. .July 24, 2023
Today’s photo shows the clevis end of a TR6 clutch master cylinder push rod. Note that the hole where the clevis pin attaches it to the top of the clutch pedal is not round, as it has worn from repeated clutch operation. The top of the clutch pedal will wear even more over the lifetime of the car, and we’ve seen clevis pins which were almost worn in two. If you stop and think about it, drivers go up and down through the gears many times between stops, so the clutch pedal linkage gets at least 8 times as much use as each application of the brakes. Now all of this wear adds together, and the result is an inch or more of pedal travel before the rod ever starts to move the master cylinder piston (and send fluid to the slave cylinder). There is a limited amount of travel before the pedal stops at the firewall, and if half of it is wasted taking up the slop in the linkage, you won’t have any chance of fully releasing the clutch. This car came to us from FL due to a “clutch issue”, where it had previously been to two local import car shops for the same problem before coming here to be quickly resolved by the Macy’s Garage Team.July 17, 2023
The line between upholstery trim and metal work is a razor thin one, and often blurred. Take this combined before and after picture of a TR6 lower dash support or “console”. We have stripped the black vinyl padding from the aluminum framework in preparation to recover it, but first we’ll need to repair the chopped up radio hole. Most of these supports have been butchered in the past, back when owners just HAD to have a better stereo system. We have saved just about every one of these that we’ve encountered by cutting away the butchered section to obtain straight and square edges, then filling the hole by TIG welding a thick (.125”) aluminum plate into the hole to close it back up. The final step is to cut perfect original-sized radio holes in the new plate, using a pattern taken from the one and only unmolested support bracket that we’ve seen in the past 20+ years. After this metalworking chore is complete, we’re finally able to return to the upholstery work we originally set out to do!July 10, 2023
Simple repairs on 50-70 year old sports cars aren’t always that simple, and here’s a prime example of suddenly finding yourself at the bottom of a rabbit hole. What was supposed to be a simple bushing replacement on the front end of a TR3A got a little more complicated just by cleaning off caked on dirt and grease, then taking a good look around. What you see here is the lower fulcrum pin and the locating/reinforcement plate, all of which hold the lower wishbones and coil spring pans onto the frame. It wouldn’t be pretty if this were to let go completely, and probably not too good for the handling and tire wear even if it didn’t. The lesson here is to never take anything for granted, and use any simple maintenance chore as an opportunity to look around and inspect all that you can. Time and stress has a way of fatiguing steel, and cracks or breaks can happen in the strangest places. It’s far better to discover them while the car is in the garage and up on jack-stands, than while performing a post-mortem after the accident!July 3, 2023
Many in the Triumph community believe that we are strict devotees to originality, and folks who would like to modify their TR’s are afraid to call us and ask for changes. Nothing could be farther from the truth! While there are some modifications circulating through the chat rooms that would be a waste of your money, if proposed modifications make sense we’re more than happy to comply. After all, it’s your car and you should be free to restore or modify it in a manner that will enhance your enjoyment! Take this TR3A for example. We’ve shown the louvered bonnet before, but the chopped windshield is a new twist that we have not previously brought to light. “Strange” requests like this are no problem for the talented crew we have here, as most of them either have or still are dabbling in the world of Hot Rods, Race Cars, and Customs. It makes a task like this almost routine, for we knew right away that the top of the windshield frame would need to be stretched wider as it dropped 3” toward the bottom. Fortunately we have extra frames on hand, and we knew how to cut the two so that we’d end up with a single seam. The two brass pieces were securely welded together, so now it’s off to the chrome shop to make it shiny again, just the same as if it had never been chopped.

America’s BEST Triumph Shop