Macy’s Garage

© 2026 - Macy’s Garage, Ltd.

Blog
WHAT we’re doing, and HOW we’re doing it!
December 27, 2022
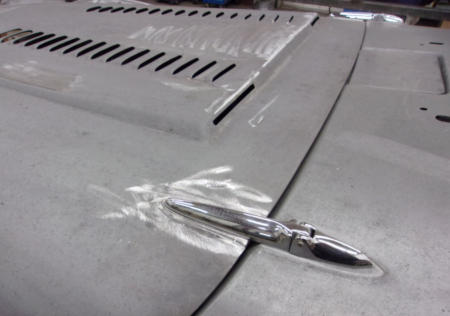
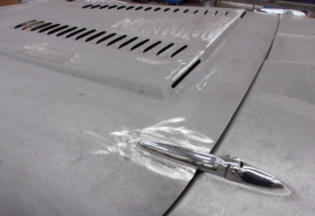
This week we have the completed bonnet hinge mod, with raised plinths being added to the hinge mounting location. You can also see why we opted to install an “early” hood on a “late” car, due to the two rows of cooling louvers that had been requested by the owner. These louvers were once popular and somewhat common on hot rods in the 1950’s and 60’s, but never so much with the sports car crowd. Louvers were “punched” one at a time into hoods and other various body panels with a special set of dies and a press, and great care had to be taken to ensure that the rows were straight and each louver was perfectly spaced and aligned with all of the others. The process is quite involved, and there aren’t too many guys still around who know how to do it correctly. Fortunately, we just happened to have a single TR3 bonnet in our warehouse that had received the louver treatment decades ago, and it was a much simpler and faster (less costly) to turn this early hood into a late one that fit the car. No one will ever suspect the cross pollination between late car and early bonnet! Buffing the paint around all of these sharp edges will be no picnic, but we’ll load on extra clear and try to be really really careful when we get to that stage.December 19, 2022
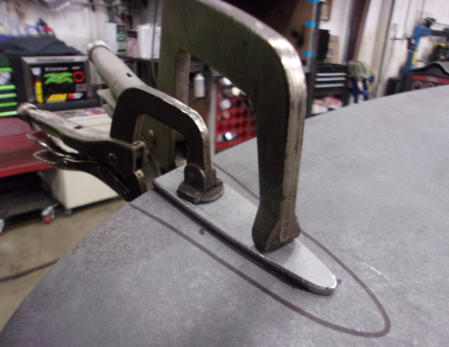
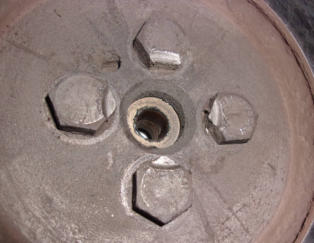
Those who dive into the details of the sidescreen TR’s should know that the body dies were worn out by approximately TS60000, and the cars after that number were a bit different. I’ll also mention here that we’ve seen a few verified cars before TS60000 that had the later body panels, so the TS60000 is not really a hard line in the sand. With that bit of trivia out of the way, we’ll look at one of the most distinguishing differences between pre and post TS60000 cars, that being the “raised plinths” in four mounting locations under the boot and bonnet hinges. We have had quite a few cars come to our shop with mixed panels on them, probably from the days when it was easy to buy replacement hoods and trunks from a salvage yard, and the difference wasn’t noticed until the owner got home and went to install it on their car. That would have been an accidental mix- up, but what if you needed to do it intentionally? Installing an early panel on a late car with raised plinths on the scuttle and rear deck is as easy as fabricating a solid plinth, and welding it onto the flat panel. Next week we’ll show this hood with the completed “late style conversion”, and explain why we made this change instead of simply pulling an early hood from our used parts warehouse.December 12, 2022
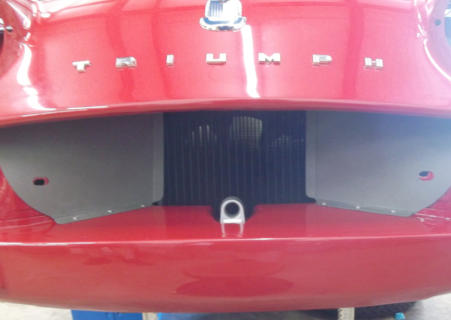
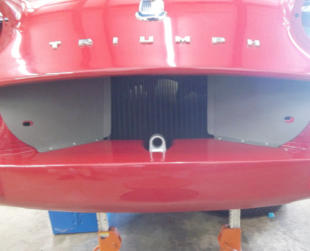
We recently had an inquiry about fitting the air duct (deflector) in front of a TR3A/B radiator, and with a picture being worth 1000 words we went looking through our photo archive for a good example. Upon finding this photo showing the deflector installed, all questions were answered. The three screws along the bottom “flap” of each side are #8 x ½ slotted pan head sheet metal screws. Some cars had only 4 of these attachment screws originally installed, and others (probably later) used six. Look for the existing holes in your front apron to determine the correct quantity and locations for your car. Originally these ducts (and the handcrank guide) were installed before the car was painted, so the duct, screws, and guide would all be painted body color. We do this for cars being restored to the Concours level, but leave them in natural finishes for Drivers and Show quality cars. The black cardboard that deflectors are made from is “waterproof”, being impregnated with something similar to roofing tar paper so that paint isn’t required as part of the weatherproofing. Whether painted or not painted, the duct must be installed on all widemouth cars to stop air from flowing around the sides of the radiator and bypassing the radiator core. The existence and condition of this deflector is one of the first things we check when an owner complains of an overheating problem with their TR3A or TR3B.December 5, 2022
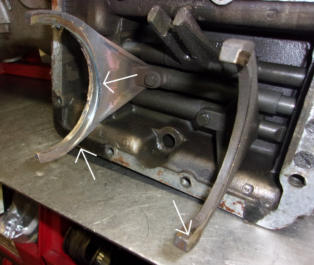
This week’s photo shows the working side of a TR2-TR3A gearbox top, inside the transmission. The two large brass semi-circular forks are moved back and forth from the motion of the shift lever on top and work through the round rods seen inside the top of the cover to select different gears. The white arrows show where the brass has been worn away by friction with the steel gearbox synchronizers. We see this quite often, but the real problem is that replacement forks have been unavailable for many, many years now. The solution is good used parts, but if this is a common problem where do we find them? The truth is that although this problem is common, it is avoidable through proper driving technique so the percentage of ruined forks is probably less than 25%. The folks who use the shift lever as a hand rest, and keep their hands on the shift knob for longer than it takes to change gears are the ones doing the damage to these forks. Now I don’t advocate letting go as you accelerate through the gears from a stop, but you should not cruise down the street with a hand resting on the knob either. Using the shift lever as a hand rest puts some amount of extra pressure on the forks, forcing them into the rotating synchronizers and accelerating wear of the softer brass forks. Pay attention the next time you drive your TR and if you notice your hand resting on the knob for longer than it needs to be, LET GO!November 28, 2022
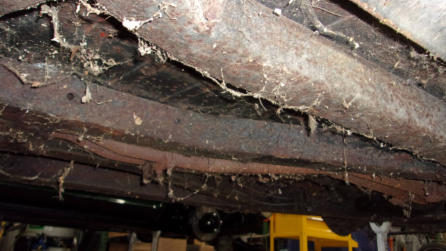
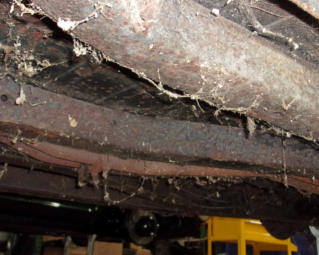
Countless folks have tucked their precious cars away in an old barn, thinking that they are protecting the car from the elements and saving it for the day when they can begin a restoration. While an old barn will indeed keep the precipitation and high winds off of an old car, greater harm will be done to the bottom if that barn has a dirt floor! Same too if the car is parked outside on dirt, gravel, or grass if the moisture from the earth is able to rise and be caught by the underside of the car they’re trying to save, especially if it’s under tarps, plastic, or a non-breathing cover. This is the bottom of one such TR6, a car that was “lovingly” stored away from the weather in an old barn with a dirt floor. There is a coarse coating of rough flaky rust over everything on the bottom, and had it been given another decade in these conditions the floors and frame would most likely be shot. Fortunately, the car was pulled out of this harmful environment before it was too late. We will be able to replace all of the functional parts below and return the car to service. It’s already been exposed long enough that getting all of the lower components disassembled has been quite a struggle, even with a healthy dose of penetrating fluid. We just have to convince cars like this that we’re going to win the fight.November 21, 2022
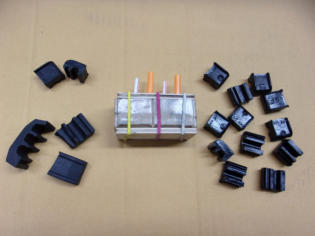
This ended up being quite a challenging project! Upper left in the photo are two rubber bushings which hold the fuel and vacuum advance lines at the front of a 4-cyl TR engine, just below the thermostat. About 6 months ago, we ordered more stock and were sent the giant 4 groove bushing (3 large and 1 small) shown lower left. When we complained to our source, they crudely chopped off two of the large grooves and continued to send these oversized bushings, also shown lower left. Almost too large to fit into the steel retainer, the new substitute bushings are sized for 5/16” lines, so the correct 1/4” lines will just rattle around. Like so many other dilemmas we’ve faced over the years, we set out to make our own proper parts. The first couple attempts at creating a mold were disastrous, as something in the rubber originals prohibited the silicone mold material from curing. On the advice of casting experts, we tried a urethane rubber mold material and were then successful in creating the rubber mold shown in the center. With a good mold, we could then cast the first dozen bushings shown on the right. That should last us through 2023, and we’ll probably have to pour another batch about this time next year. The only problem now will be storing the mold somewhere that we can find it again next year!November 14, 2022
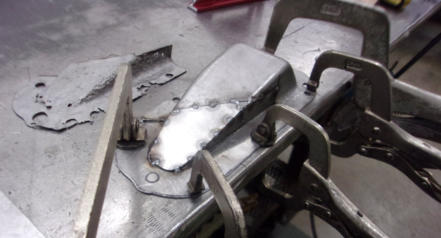
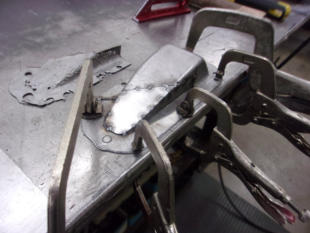
Give any (metal) car 50 years, and you’re likely to find rust in some very strange places. For example, take a look at this sheet metal pocket. The rusted original section is at the top, and the whole pocket at the bottom is shown during the repair process with new replacement metal already tack welded into place. In case you don’t recognize this pocket, it is the windshield wiper motor pocket, where the wiper drive cable passes through the firewall on a TR6. What you are seeing is actually the back side of this pocket, which is fitted through the firewall and is located inside of the car, buried inside of the fresh air plenum behind the dash! These pockets are spot welded to the firewall, so to make the rust repair it had to be removed. That involved finding and drilling all of the original spot welds, cutting away the rust damaged section and fabricating a new replacement piece to perfectly fit where the bad stuff had been. The next step will be to completely TIG weld the repair panel into place and grind the welds smooth for an invisible repair. Only then can we weld the pocket back into the firewall and grind the plug welds nearly smooth to simulate the original spot welds. Not only is this process a good example of finding rust in strange places, but it also shows why a quality car restoration takes so long and costs so much!November 7, 2022
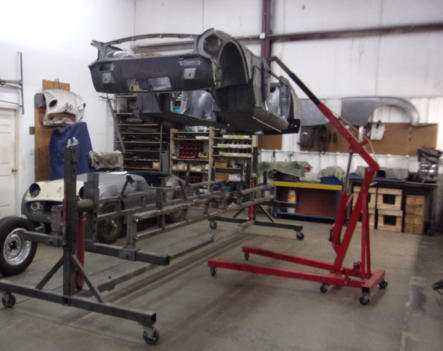
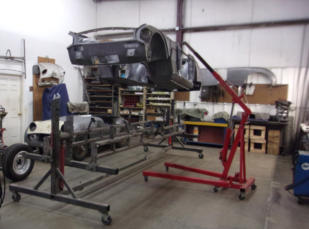
Yes, what you see here is a little engine crane lifting a complete TR6 body tub. Along with previous blog posts showing some of the special TR tools we have created, we fabricated this extension arm for our portable engine crane many years ago, and it continues to serve us well. A complete body tub does not weigh that much, but with the full length body jig it was awkward to have 4 guys try to lift the tub and step over the rotisserie/jig to set it in position to be bolted down. The lifting arm and engine crane now make this a one man operation. I’ll mention that we also have an “H” frame bolted inside of the tub to stabilize the door openings, and that also provides a central pick-up point for this lifting arm. We bolt this H frame in place before the body is first removed from the chassis, and it is then used as the pick-up point when the bodies go into stripping tanks at Pro-Strip Indy. We have several H frames configured for TR2-3B and TR4-6 bodies, and we leave them in place until all of the rusty metal floors and sills have been repaired and the tub has regained all of it’s original strength. Lifting the tub down off of the rotisserie is the final time we use this apparatus, and from then on all body tubs are carefully lifted on and off of the chassis by several members of our team.October 31, 2022
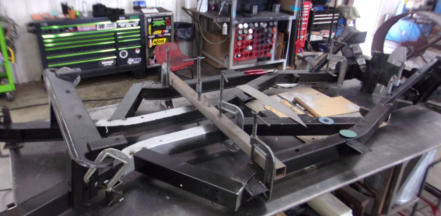
It’s a well known fact that the TR4A-TR6 cars have a rusty frame problem, so just like installing windshields as mentioned last week, we get a lot of practice repairing frames. Some time ago we bought a very heavy and very expensive slab of steel, and created our own jig for bolting, clamping, and measuring frames during the rust repair process. These frames were originally made by welding numerous smaller pieces together, so removing the old and TIG welding in new does the frame no harm. We simply secure the frame to an immovable flat surface so we can easily cut out weak and rusted sections and replace them with solid new metal of the same thickness and strength. The TR6 frame shown here is nearing completion. The silver painted areas of the central rails are all new, having been rusted away almost completely under the central “T-shirt” plates. The black angled boxes which run between the silver areas and the outer rails are new trailing arm mounts, which are generally the first place that this style frame will rust. All we have to do now is re-install the T-shirts, and this frame repair will be undetectable and just as straight and strong as it was when new.October 24, 2022
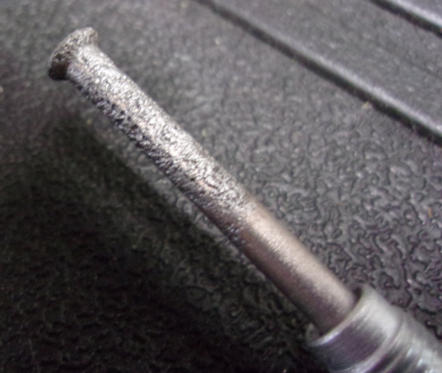
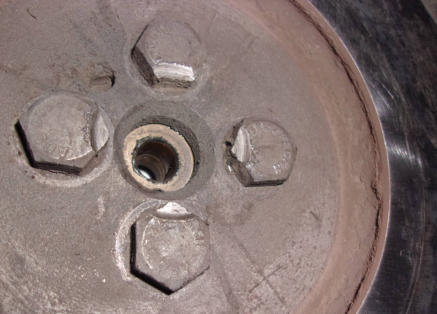
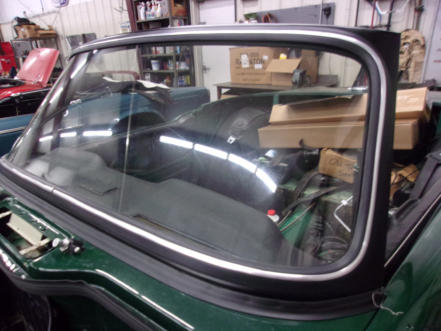
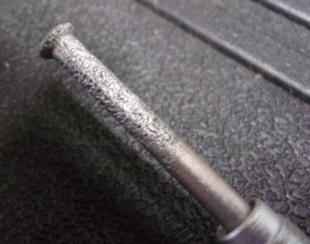
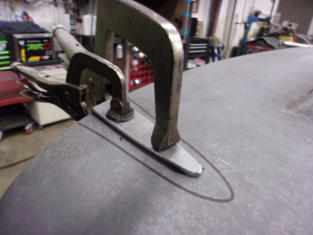
Did you know that the TR4 and TR4A windshield glass is exactly the same as the glass for a TR6? Did you also know that this glass fits a Spitfire, and possibly even a GT6? Triumph was always short of funds for tooling, thus interchangeable parts whenever possible. All the way back to the first TR2, the design was dictated in part by the minimal amount of funding available for body tooling. It is also possible to install a TR6 windshield frame on the earlier cars and the Spits, although there were several small running changes to accommodate various folding top and sunvisor attachments. With all of this similarity, you can probably guess that we have to install quite a few windshields into the frames every year. For awhile, we were calling a mobile auto glass installer, but they were all somewhat unreliable and expensive for such a quick and simple job. I had learned how to pull this type windshield glass into a body way back in my youth, working on my 1940 Pontiac street rod and an assortment of 55-57 Chevys, so it wasn’t a far leap to show the guys how to pull a TR4-6 windshield into the frame. You don’t want to try this with a frame that’s not securely attached to the car, as I can’t imagine trying to do this while chasing the frame around on a bench or a panel stand. Now we install all of our own glass, on our own schedule, and save our clients a substantial sublet-labor charge at the same time. It’s a Win-Win for everyone (except the Glass Man!). October 17, 2022 Here’s something we haven’t seen before. The clutch disc on this TR250 was worn so thin that the center of the disc was rubbing on the flywheel bolts! Our first thought when the clutch dropped out was that the disc had been installed backwards, with the thick side of the center facing forward instead of back inside the pressure plate. Closer inspection however revealed the shiny rub spots on the disc center, confirming that it had indeed been installed correctly. This just shows how tight some of the clearances are in these cars. It also reminds me of another more frequent clearance issue involving flywheel bolts, this time in the case of the 4-cylinder TR’s. If the bolts are even a minor amount longer than 7/8” from under the head to the tip, there is a good chance that the ends of the bolts will hit the rear crankshaft “seal” bolt heads, and lock the engine so tight that the starter won’t spin it. How would you get long bolts in your flywheel? These bolts will stretch over time, often enough that you can actually see them pinch down in diameter along the length of the bolt. Leaving the 2 flat locking plates off when you install the bolts will also cause the excess length to exit the crankshaft flange forward and touch the seal bolts. Bottom line is that if you’ve had the flywheel off for any reason, it’s a good idea to spin the engine over by hand before you install the gearbox and put the interior back in the car. You wouldn’t want to have to pull it all apart again just because of a few thousandths interference! October 10, 2022 Brakes are just about the most important system on a car. You won’t put your health and safety in jeopardy if a car won’t run, but if it runs and can’t stop it’s a whole different story. Factory brake lines are steel, and steel will rust over time. Sometimes you can see rusty lines before they start to leak, but most times you can’t. Take this brake line for example, where all of the rust was hidden behind the attachment nut. Changing a rear wheel cylinder gave us a reason to disassemble the connection and see the potential for trouble. Had we not done so, this rust weakened line would not have been discovered until it started to leak. If the failure was sudden, so too might have been the impact! Many times a brake line will rust from the inside out, and you’ll never find it until the line reaches the point of failure. This strange phenomena happens because normal brake fluid is hygroscopic, which means that it absorbs water vapor from the air. It’s not a problem for normal cars which are driven daily or frequently, as the heat generated from stopping warms the system and boils off the moisture. In collector cars that are parked for lengthy periods of time, the water will pool inside the lines and the rusting process begins. This process takes a very long time, but if your Triumph still has any original steel brake lines on it you should go through the hydraulics and replace all of them soon.October 3, 2022
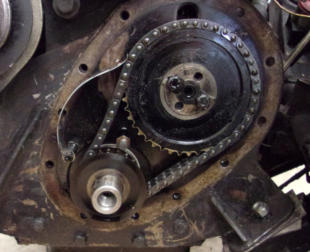
We currently have a TR3A in the shop which has belonged to the same owner for a great many decades. We were told that it’s been sitting for 10+ years, and they want to return it to driving status. We were able to get it running again, and it’s obvious that it has a mean “race car” camshaft which indicates that someone has been inside this engine at some time in the distant past. It’s certainly not in the same condition as it left the Triumph factory! As with all Triumphs (and old British cars in general), this one has leaked oil seemingly forever. The multi-year sit probably hasn’t done the rubber seals any good either, so while the front apron was off for a radiator repair and a Hurricane fan, they asked if we could replace the timing cover seal to slow down the drips. Imagine our surprise when the cover was removed and this incorrectly installed timing chain tensioner was staring us in the face! There are only two ways a tensioner can be installed, and only one of those two ways is correct. Installing it this way isn’t it! The tensioner needs to be flipped over so that the large gentle curve in the middle is pressing on the “slack” area between the two gears. This mistake is just one more example of why you can’t take photos, and then put an old car back together the same way that it was before you took it apart. When cars get to be 50-60 years old, it’s hard telling what prior snafu’s you’re likely to find and repeat if you aren’t careful!
BLOG
2022-Q4
America’s BEST Triumph Shop


Macy’s Garage

© 2026 - Macy’s Garage, Ltd.

Blog WHAT we’re doing, and HOW we’re doing it!
December 27, 2022
This week we have the completed bonnet hinge mod, with raised plinths being added to the hinge mounting location. You can also see why we opted to install an “early” hood on a “late” car, due to the two rows of cooling louvers that had been requested by the owner. These louvers were once popular and somewhat common on hot rods in the 1950’s and 60’s, but never so much with the sports car crowd. Louvers were “punched” one at a time into hoods and other various body panels with a special set of dies and a press, and great care had to be taken to ensure that the rows were straight and each louver was perfectly spaced and aligned with all of the others. The process is quite involved, and there aren’t too many guys still around who know how to do it correctly. Fortunately, we just happened to have a single TR3 bonnet in our warehouse that had received the louver treatment decades ago, and it was a much simpler and faster (less costly) to turn this early hood into a late one that fit the car. No one will ever suspect the cross pollination between late car and early bonnet! Buffing the paint around all of these sharp edges will be no picnic, but we’ll load on extra clear and try to be really really careful when we get to that stage.December 19, 2022
Those who dive into the details of the sidescreen TR’s should know that the body dies were worn out by approximately TS60000, and the cars after that number were a bit different. I’ll also mention here that we’ve seen a few verified cars before TS60000 that had the later body panels, so the TS60000 is not really a hard line in the sand. With that bit of trivia out of the way, we’ll look at one of the most distinguishing differences between pre and post TS60000 cars, that being the “raised plinths” in four mounting locations under the boot and bonnet hinges. We have had quite a few cars come to our shop with mixed panels on them, probably from the days when it was easy to buy replacement hoods and trunks from a salvage yard, and the difference wasn’t noticed until the owner got home and went to install it on their car. That would have been an accidental mix-up, but what if you needed to do it intentionally? Installing an early panel on a late car with raised plinths on the scuttle and rear deck is as easy as fabricating a solid plinth, and welding it onto the flat panel. Next week we’ll show this hood with the completed “late style conversion”, and explain why we made this change instead of simply pulling an early hood from our used parts warehouse.December 12, 2022
We recently had an inquiry about fitting the air duct (deflector) in front of a TR3A/B radiator, and with a picture being worth 1000 words we went looking through our photo archive for a good example. Upon finding this photo showing the deflector installed, all questions were answered. The three screws along the bottom “flap” of each side are #8 x ½ slotted pan head sheet metal screws. Some cars had only 4 of these attachment screws originally installed, and others (probably later) used six. Look for the existing holes in your front apron to determine the correct quantity and locations for your car. Originally these ducts (and the handcrank guide) were installed before the car was painted, so the duct, screws, and guide would all be painted body color. We do this for cars being restored to the Concours level, but leave them in natural finishes for Drivers and Show quality cars. The black cardboard that deflectors are made from is “waterproof”, being impregnated with something similar to roofing tar paper so that paint isn’t required as part of the weatherproofing. Whether painted or not painted, the duct must be installed on all widemouth cars to stop air from flowing around the sides of the radiator and bypassing the radiator core. The existence and condition of this deflector is one of the first things we check when an owner complains of an overheating problem with their TR3A or TR3B.December 5, 2022
This week’s photo shows the working side of a TR2-TR3A gearbox top, inside the transmission. The two large brass semi-circular forks are moved back and forth from the motion of the shift lever on top and work through the round rods seen inside the top of the cover to select different gears. The white arrows show where the brass has been worn away by friction with the steel gearbox synchronizers. We see this quite often, but the real problem is that replacement forks have been unavailable for many, many years now. The solution is good used parts, but if this is a common problem where do we find them? The truth is that although this problem is common, it is avoidable through proper driving technique so the percentage of ruined forks is probably less than 25%. The folks who use the shift lever as a hand rest, and keep their hands on the shift knob for longer than it takes to change gears are the ones doing the damage to these forks. Now I don’t advocate letting go as you accelerate through the gears from a stop, but you should not cruise down the street with a hand resting on the knob either. Using the shift lever as a hand rest puts some amount of extra pressure on the forks, forcing them into the rotating synchronizers and accelerating wear of the softer brass forks. Pay attention the next time you drive your TR and if you notice your hand resting on the knob for longer than it needs to be, LET GO!November 28, 2022
Countless folks have tucked their precious cars away in an old barn, thinking that they are protecting the car from the elements and saving it for the day when they can begin a restoration. While an old barn will indeed keep the precipitation and high winds off of an old car, greater harm will be done to the bottom if that barn has a dirt floor! Same too if the car is parked outside on dirt, gravel, or grass if the moisture from the earth is able to rise and be caught by the underside of the car they’re trying to save, especially if it’s under tarps, plastic, or a non-breathing cover. This is the bottom of one such TR6, a car that was “lovingly” stored away from the weather in an old barn with a dirt floor. There is a coarse coating of rough flaky rust over everything on the bottom, and had it been given another decade in these conditions the floors and frame would most likely be shot. Fortunately, the car was pulled out of this harmful environment before it was too late. We will be able to replace all of the functional parts below and return the car to service. It’s already been exposed long enough that getting all of the lower components disassembled has been quite a struggle, even with a healthy dose of penetrating fluid. We just have to convince cars like this that we’re going to win the fight.November 21, 2022
This ended up being quite a challenging project! Upper left in the photo are two rubber bushings which hold the fuel and vacuum advance lines at the front of a 4-cyl TR engine, just below the thermostat. About 6 months ago, we ordered more stock and were sent the giant 4 groove bushing (3 large and 1 small) shown lower left. When we complained to our source, they crudely chopped off two of the large grooves and continued to send these oversized bushings, also shown lower left. Almost too large to fit into the steel retainer, the new substitute bushings are sized for 5/16” lines, so the correct 1/4” lines will just rattle around. Like so many other dilemmas we’ve faced over the years, we set out to make our own proper parts. The first couple attempts at creating a mold were disastrous, as something in the rubber originals prohibited the silicone mold material from curing. On the advice of casting experts, we tried a urethane rubber mold material and were then successful in creating the rubber mold shown in the center. With a good mold, we could then cast the first dozen bushings shown on the right. That should last us through 2023, and we’ll probably have to pour another batch about this time next year. The only problem now will be storing the mold somewhere that we can find it again next year!November 14, 2022
Give any (metal) car 50 years, and you’re likely to find rust in some very strange places. For example, take a look at this sheet metal pocket. The rusted original section is at the top, and the whole pocket at the bottom is shown during the repair process with new replacement metal already tack welded into place. In case you don’t recognize this pocket, it is the windshield wiper motor pocket, where the wiper drive cable passes through the firewall on a TR6. What you are seeing is actually the back side of this pocket, which is fitted through the firewall and is located inside of the car, buried inside of the fresh air plenum behind the dash! These pockets are spot welded to the firewall, so to make the rust repair it had to be removed. That involved finding and drilling all of the original spot welds, cutting away the rust damaged section and fabricating a new replacement piece to perfectly fit where the bad stuff had been. The next step will be to completely TIG weld the repair panel into place and grind the welds smooth for an invisible repair. Only then can we weld the pocket back into the firewall and grind the plug welds nearly smooth to simulate the original spot welds. Not only is this process a good example of finding rust in strange places, but it also shows why a quality car restoration takes so long and costs so much!November 7, 2022
Yes, what you see here is a little engine crane lifting a complete TR6 body tub. Along with previous blog posts showing some of the special TR tools we have created, we fabricated this extension arm for our portable engine crane many years ago, and it continues to serve us well. A complete body tub does not weigh that much, but with the full length body jig it was awkward to have 4 guys try to lift the tub and step over the rotisserie/jig to set it in position to be bolted down. The lifting arm and engine crane now make this a one man operation. I’ll mention that we also have an “H” frame bolted inside of the tub to stabilize the door openings, and that also provides a central pick-up point for this lifting arm. We bolt this H frame in place before the body is first removed from the chassis, and it is then used as the pick-up point when the bodies go into stripping tanks at Pro-Strip Indy. We have several H frames configured for TR2-3B and TR4-6 bodies, and we leave them in place until all of the rusty metal floors and sills have been repaired and the tub has regained all of it’s original strength. Lifting the tub down off of the rotisserie is the final time we use this apparatus, and from then on all body tubs are carefully lifted on and off of the chassis by several members of our team.October 31, 2022
It’s a well known fact that the TR4A-TR6 cars have a rusty frame problem, so just like installing windshields as mentioned last week, we get a lot of practice repairing frames. Some time ago we bought a very heavy and very expensive slab of steel, and created our own jig for bolting, clamping, and measuring frames during the rust repair process. These frames were originally made by welding numerous smaller pieces together, so removing the old and TIG welding in new does the frame no harm. We simply secure the frame to an immovable flat surface so we can easily cut out weak and rusted sections and replace them with solid new metal of the same thickness and strength. The TR6 frame shown here is nearing completion. The silver painted areas of the central rails are all new, having been rusted away almost completely under the central “T- shirt” plates. The black angled boxes which run between the silver areas and the outer rails are new trailing arm mounts, which are generally the first place that this style frame will rust. All we have to do now is re-install the T- shirts, and this frame repair will be undetectable and just as straight and strong as it was when new.October 24, 2022
Did you know that the TR4 and TR4A windshield glass is exactly the same as the glass for a TR6? Did you also know that this glass fits a Spitfire, and possibly even a GT6? Triumph was always short of funds for tooling, thus interchangeable parts whenever possible. All the way back to the first TR2, the design was dictated in part by the minimal amount of funding available for body tooling. It is also possible to install a TR6 windshield frame on the earlier cars and the Spits, although there were several small running changes to accommodate various folding top and sunvisor attachments. With all of this similarity, you can probably guess that we have to install quite a few windshields into the frames every year. For awhile, we were calling a mobile auto glass installer, but they were all somewhat unreliable and expensive for such a quick and simple job. I had learned how to pull this type windshield glass into a body way back in my youth, working on my 1940 Pontiac street rod and an assortment of 55-57 Chevys, so it wasn’t a far leap to show the guys how to pull a TR4-6 windshield into the frame. You don’t want to try this with a frame that’s not securely attached to the car, as I can’t imagine trying to do this while chasing the frame around on a bench or a panel stand. Now we install all of our own glass, on our own schedule, and save our clients a substantial sublet-labor charge at the same time. It’s a Win-Win for everyone (except the Glass Man!).October 17, 2022
Here’s something we haven’t seen before. The clutch disc on this TR250 was worn so thin that the center of the disc was rubbing on the flywheel bolts! Our first thought when the clutch dropped out was that the disc had been installed backwards, with the thick side of the center facing forward instead of back inside the pressure plate. Closer inspection however revealed the shiny rub spots on the disc center, confirming that it had indeed been installed correctly. This just shows how tight some of the clearances are in these cars. It also reminds me of another more frequent clearance issue involving flywheel bolts, this time in the case of the 4-cylinder TR’s. If the bolts are even a minor amount longer than 7/8” from under the head to the tip, there is a good chance that the ends of the bolts will hit the rear crankshaft “seal” bolt heads, and lock the engine so tight that the starter won’t spin it. How would you get long bolts in your flywheel? These bolts will stretch over time, often enough that you can actually see them pinch down in diameter along the length of the bolt. Leaving the 2 flat locking plates off when you install the bolts will also cause the excess length to exit the crankshaft flange forward and touch the seal bolts. Bottom line is that if you’ve had the flywheel off for any reason, it’s a good idea to spin the engine over by hand before you install the gearbox and put the interior back in the car. You wouldn’t want to have to pull it all apart again just because of a few thousandths interference!October 10, 2022
Brakes are just about the most important system on a car. You won’t put your health and safety in jeopardy if a car won’t run, but if it runs and can’t stop it’s a whole different story. Factory brake lines are steel, and steel will rust over time. Sometimes you can see rusty lines before they start to leak, but most times you can’t. Take this brake line for example, where all of the rust was hidden behind the attachment nut. Changing a rear wheel cylinder gave us a reason to disassemble the connection and see the potential for trouble. Had we not done so, this rust weakened line would not have been discovered until it started to leak. If the failure was sudden, so too might have been the impact! Many times a brake line will rust from the inside out, and you’ll never find it until the line reaches the point of failure. This strange phenomena happens because normal brake fluid is hygroscopic, which means that it absorbs water vapor from the air. It’s not a problem for normal cars which are driven daily or frequently, as the heat generated from stopping warms the system and boils off the moisture. In collector cars that are parked for lengthy periods of time, the water will pool inside the lines and the rusting process begins. This process takes a very long time, but if your Triumph still has any original steel brake lines on it you should go through the hydraulics and replace all of them soon.October 3, 2022
We currently have a TR3A in the shop which has belonged to the same owner for a great many decades. We were told that it’s been sitting for 10+ years, and they want to return it to driving status. We were able to get it running again, and it’s obvious that it has a mean “race car” camshaft which indicates that someone has been inside this engine at some time in the distant past. It’s certainly not in the same condition as it left the Triumph factory! As with all Triumphs (and old British cars in general), this one has leaked oil seemingly forever. The multi-year sit probably hasn’t done the rubber seals any good either, so while the front apron was off for a radiator repair and a Hurricane fan, they asked if we could replace the timing cover seal to slow down the drips. Imagine our surprise when the cover was removed and this incorrectly installed timing chain tensioner was staring us in the face! There are only two ways a tensioner can be installed, and only one of those two ways is correct. Installing it this way isn’t it! The tensioner needs to be flipped over so that the large gentle curve in the middle is pressing on the “slack” area between the two gears. This mistake is just one more example of why you can’t take photos, and then put an old car back together the same way that it was before you took it apart. When cars get to be 50-60 years old, it’s hard telling what prior snafu’s you’re likely to find and repeat if you aren’t careful!

America’s BEST Triumph Shop