© 2026 - Macy’s Garage, Ltd.
Macy’s Garage

Cage Nuts
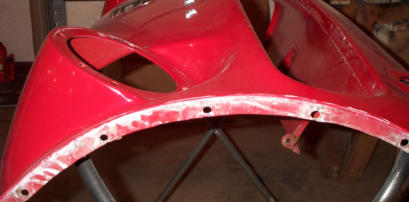
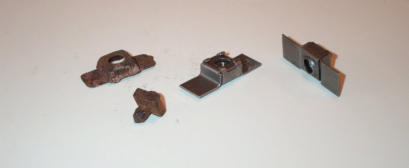
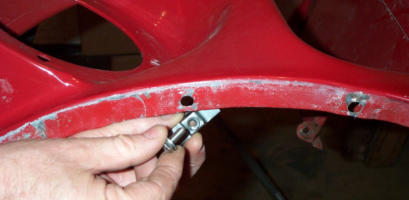
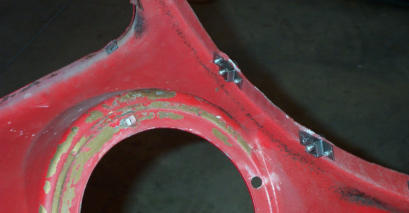
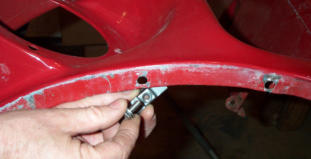
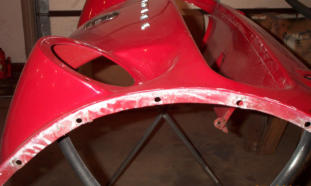
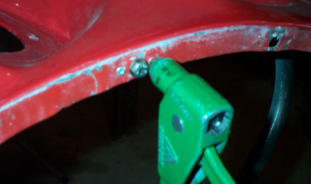
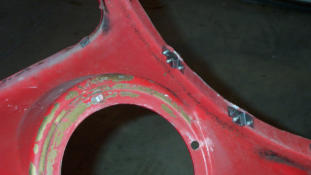
Many years ago, a local client was having his TR3A painted by a local body shop, and they contacted me about my stainless steel hardware kits to attach the rear wings. I recommended they check the condition of all the cage nuts before painting, and they informed me that they’d just use regular nuts where needed. I wasn’t able to persuade them otherwise, and knew that at some point someone would have to remove the interior to get a rear wing off and their names would be used in vain. Little did I know that I would soon be the one swearing at them when the car came into my shop 6 months later to have the steering box removed and overhauled. I had to remove the headlamp buckets to reach all of the hidden hex nuts that they’d installed to attach the front apron, and I wasn’t too happy about it. With beautiful fresh paint on the apron I couldn't weld new nut cages in place, but I did have an ace up my sleeve with regard to correcting the problem without burning any paint. I’d found some ‘heavy-duty’ caged nuts in the proper size several years ago, and I had a way to attach them without welding. Looking at the photo on the right, you can see the Triumph style square nut and separate cage on the left, and the new ‘heavy-duty’ caged nuts at center and right. The originals work O.K., but as most of you know when a nut and bolt decide to rust together, the weak sides of the cage will deflect and allow the nut to spin in place, making removal a major operation. Same is true when it comes time to weld a new nut and cage in place. There are places on a TR2/3 where the factory never intended for man to ever have access again, and attempts to get separate cages and nuts into the proper position before welding are all but impossible. With the new H-D style nuts, the nut is fully enclosed in the cage, and cannot ever spin in place or drop out as you try to position it. It also means that the entire cage nut assembly can be held in place with a single bolt, and attached with ‘pop’ rivets if for some reason you don’t want to weld them to the car. That’s how I chose to attach new cages to the front apron of the TR3A in question. NOTE: We DO weld these same cage nuts in place when performing a complete restoration here in our shop. Here you can see the apron is missing the original cage nuts, and the new H-D cage nut with a bolt and washer that will be used to hold it in place. If I were going to weld the cage in place I would have pre-drilled the apron on either side of the bolt hole and plug welded the cage in place with a welder. Because we have unrestricted access to this location I also could have skipped the drilling operation and used my spot welder, but that’s not going to be possible for every cage nut location on our cars. Tighten the bolt to hold the H-D cage nut firmly in place. If you’ve pre-drilled holes for plug welding, or are using a spot welder, it’s time to attach. If you are attaching with ‘pop’ rivets to avoid welding (and paint damage), drill a small hole for a pop rivet on each side of the bolt head, and be sure to go completely through the body panel and nut cage. Pop rivet the cage to the body panel on either side of the bolt, remove the bolt and washer, and move on to the next one. It really is as easy as that! Here is the view from the backside of the apron. You can see the cages are firmly riveted to the apron, and the bolts are in place as they will be when the apron is back on the car. (You can also see that the ‘collision specialist’ body shop did not ‘waste’ any time painting the backside of the apron either.) The next time this panel has to come off, and trust me - it will, the job will be a whole lot easier with proper cage nuts in place. These marvelous H-D cage nuts are available in our ebay store HERE or by selecting the “PARTS” button at the top of this page. Click “Categories” at the upper left corner of the Store welcome page, then choose “Triumph Hardware” to find the H-D Cage Nuts. Happy Triumph Motoring!
CAGE NUTS
America’s BEST Triumph Shop


© 2026 - Macy’s Garage, Ltd.
Macy’s Garage


America’s BEST Triumph Shop

Cage Nuts
Many years ago, a local client was having his TR3A painted by a local body shop, and they contacted me about my stainless steel hardware kits to attach the rear wings. I recommended they check the condition of all the cage nuts before painting, and they informed me that they’d just use regular nuts where needed. I wasn’t able to persuade them otherwise, and knew that at some point someone would have to remove the interior to get a rear wing off and their names would be used in vain. Little did I know that I would soon be the one swearing at them when the car came into my shop 6 months later to have the steering box removed and overhauled. I had to remove the headlamp buckets to reach all of the hidden hex nuts that they’d installed to attach the front apron, and I wasn’t too happy about it. With beautiful fresh paint on the apron I couldn't weld new nut cages in place, but I did have an ace up my sleeve with regard to correcting the problem without burning any paint. I’d found some ‘heavy-duty’ caged nuts in the proper size several years ago, and I had a way to attach them without welding. Looking at the photo above, you can see the Triumph style square nut and separate cage on the left, and the new ‘heavy-duty’ caged nuts at center and right. The originals work O.K., but as most of you know when a nut and bolt decide to rust together, the weak sides of the cage will deflect and allow the nut to spin in place, making removal a major operation. Same is true when it comes time to weld a new nut and cage in place. There are places on a TR2/3 where the factory never intended for man to ever have access again, and attempts to get separate cages and nuts into the proper position before welding are all but impossible. With the new H-D style nuts, the nut is fully enclosed in the cage, and cannot ever spin in place or drop out as you try to position it. It also means that the entire cage nut assembly can be held in place with a single bolt, and attached with ‘pop’ rivets if for some reason you don’t want to weld them to the car. That’s how I chose to attach new cages to the front apron of the TR3A in question. NOTE: We DO weld these same cage nuts in place when performing a complete restoration here in our shop. Here you can see the apron is missing the original cage nuts, and the new H-D cage nut with a bolt and washer that will be used to hold it in place. If I were going to weld the cage in place I would have pre-drilled the apron on either side of the bolt hole and plug welded the cage in place with a welder. Because we have unrestricted access to this location I also could have skipped the drilling operation and used my spot welder, but that’s not going to be possible for every cage nut location on our cars. Tighten the bolt to hold the H-D cage nut firmly in place. If you’ve pre-drilled holes for plug welding, or are using a spot welder, it’s time to attach. If you are attaching with ‘pop’ rivets to avoid welding (and paint damage), drill a small hole for a pop rivet on each side of the bolt head, and be sure to go completely through the body panel and nut cage. Pop rivet the cage to the body panel on either side of the bolt, remove the bolt and washer, and move on to the next one. It really is as easy as that! Here is the view from the backside of the apron. You can see the cages are firmly riveted to the apron, and the bolts are in place as they will be when the apron is back on the car. (You can also see that the ‘collision specialist’ body shop did not ‘waste’ any time painting the backside of the apron either.) The next time this panel has to come off, and trust me - it will, the job will be a whole lot easier with proper cage nuts in place. These marvelous H-D cage nuts are available in our ebay store HERE or by selecting the “Parts” button from the “Site Navigation” menu above. Click “Categories” at the upper left corner of the Store welcome page, then choose “Triumph Hardware” to find the H-D Cage Nuts. Happy Triumph Motoring!