© 2026 - Macy’s Garage, Ltd.
Macy’s Garage

America’s BEST Triumph Shop
SEAT KITS
Seat Kits
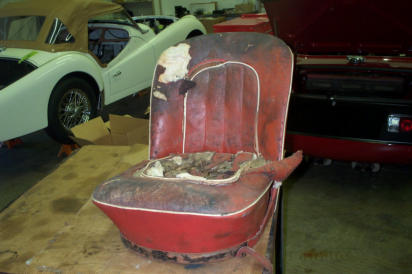
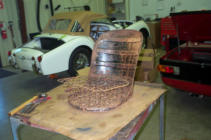
The first thing that you have to realize about auto trim is that it is a “soft” product. Unlike “hard” components made of metal, wood, plastic, etc., sharp/crisp edges and perfectly shaped corners are impossible to attain from soft and flexible upholstery materials. Also keep in mind that some small wrinkles will be inevitable. Almost all of the shape of a car seat (and cappings, door panels, etc.) comes from the component structure underneath and the padding in between. Therefore, for the best possible shape and appearance of your newly recovered seats, you should ALWAYS replace the padding. Don’t think for one second that the 45-65 year old cotton, foam rubber, or curled horsehair left under your nice new seat kit will look right, feel right, or even smell right!. If you are tempted to use an 'all foam' seat base to avoid the cost of a proper seat bottom, you will not be happy with the results (and as an Interior Judge, I can spot this from 10 feet away!). To fully understand this, go back and re-read the first sentence of this paragraph above! Do you know anyone who would build a new house on top of a decades old foundation? The thing to remember from all of this is that a comfortable seat will go a long way toward making drives in your car a pleasurable experience. The seats are not a place to cut corners and use old springs and padding, because your posterior will remind you of your decision with every mile! One problem that we see occasionally is a seat component that was incorrectly sewn. Here again, the “soft” factor enters the picture. Seat trim is sewn by hand, and variances will enter into every seam. If a piece is cut wrong or pulled too tight as it is being stitched, the result is a piece that doesn’t fit as it should. Sometimes we can open a bad seam (single edge razor blade and CAREFULLY cut the thread), reposition the pieces, and re-stitch with an industrial sewing machine to remove a wrinkle that doesn’t belong, or trim down an oversize part. If the seam in question is “buried” or trapped by other seams, then the best option is to return the cover to the manufacturer and request another piece, or live with it! Please don't get the impression that seat kits are a bad choice. From an economic viewpoint, kits are absolutely the best way to go, but proper installation is critical and not something that anyone can accomplish with ease. We routinely install seat kits kit in our client's cars, because the cost of a pre-sewn kit is less than the price of a leather hide alone! Add in the vinyl and labor cost if we had to sew the entire works, and the price to our clients would more than triple! If you are building a car to drive and enjoy, I’d recommend a kit (if available) and proper installation every time. If you are building a serious concours car and want the perfect color and fit (see our interior color and piping pages), then an “off the shelf” kit might not be the best choice, and you’ll need to shop around. Triumph TR2-Early TR4 seats are a throwback to ancient times. The proper method to install these seat covers involves techniques unknown to most modern day auto trimmers. I once had a trim shop on the west coast contact me about a pair of TR3A seats that a customer had brought them. They had been in the upholstery business for 30 years, but still couldn’t understand why the new Moss kit was missing the pockets for the “listing wires”. I told them “it’s because a Triumph seat doesn’t use listing wires.” In the end, they boxed everything up and shipped it to me for installation. After welding the giant cracks they’d overlooked in the bases, fabricating and installing new tack strips, and modifying the universal seat padding kit for this particular style of seat, I installed the covers and sent them back to a happy client. Another thing that you should be aware of, is that there are many subtle differences between the TR2/3 seats and springs, and the TR3A/B & early TR4 seats and springs. This means that if the seats were switched at some time in your car’s history, (which happened a lot), then the kit you purchased for your car might not fit. There are also many differences in the late TR4-TR6 seat frames, and all will bolt onto the same tracks, so beware that your car has the correct frames before ordering a seat upholstery kit! Years ago when there were many TR’s in salvage yards, it was very common for a Triumph owner with a bad seat to grab something better that would work in their car, perfect match or not. Your interior is what you see (and feel) the most when driving your car. Make the right choices and get the best possible interior in your car. You'll enjoy the car more and be happier with every mile behind the wheel!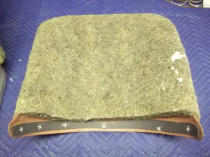

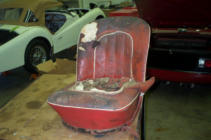
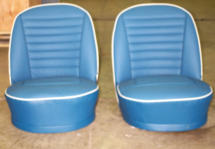
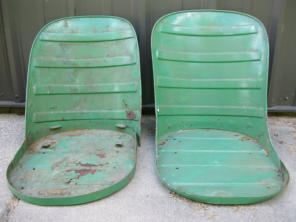
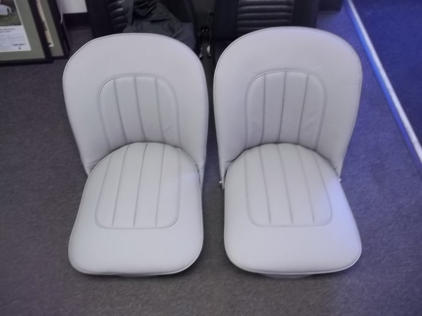
RIGHT:
TR2-3 smallmouth.
LEFT:
TR3A/B widemouth.
Note shape difference
back and base front.
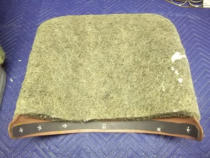
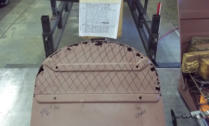
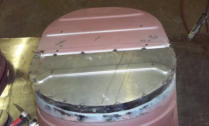
Early TR4 seat base
Back same as 3A/B.
Note recess in bottom.
Special springs fit into
bottom recess.


© 2026 - Macy’s Garage, Ltd.
Macy’s Garage


America’s BEST Triumph Shop

Seat Kits
NOTE: Several graphic images have been removed for viewing this lengthy page on mobile devices. Please visit this page on a large screen computer to see additional photos. The first thing that you have to realize about auto trim is that it is a “soft” product. Unlike “hard” components made of metal, wood, plastic, etc., sharp/crisp edges and perfectly shaped corners are impossible to attain from soft and flexible upholstery materials. Also keep in mind that some small wrinkles will be inevitable. Almost all of the shape of a car seat (and cappings, door panels, etc.) comes from the component structure underneath and the padding in between. Therefore, for the best possible shape and appearance of your newly recovered seats, you should ALWAYS replace the padding. Don’t think for one second that the 45-65 year old cotton, foam rubber, or curled horsehair left under your nice new seat kit will look right, feel right, or even smell right!. If you are tempted to use an 'all foam' seat base to avoid the cost of a proper seat bottom, you will not be happy with the results (and as an Interior Judge, I can spot this from 10 feet away!). To fully understand this, go back and re-read the first sentence of this paragraph above! Do you know anyone who would build a new house on top of a decades old foundation? The thing to remember from all of this is that a comfortable seat will go a long way toward making drives in your car a pleasurable experience. The seats are not a place to cut corners and use old springs and padding, because your posterior will remind you of your decision with every mile! One problem that we see occasionally is a seat component that was incorrectly sewn. Here again, the “soft” factor enters the picture. Seat trim is sewn by hand, and variances will enter into every seam. If a piece is cut wrong or pulled too tight as it is being stitched, the result is a piece that doesn’t fit as it should. Sometimes we can open a bad seam (single edge razor blade and CAREFULLY cut the thread), reposition the pieces, and re-stitch with an industrial sewing machine to remove a wrinkle that doesn’t belong, or trim down an oversize part. If the seam in question is “buried” or trapped by other seams, then the best option is to return the cover to the manufacturer and request another piece, or live with it! Please don't get the impression that seat kits are a bad choice. From an economic viewpoint, kits are absolutely the best way to go, but proper installation is critical and not something that anyone can accomplish with ease. We routinely install seat kits kit in our client's cars, because the cost of a pre-sewn kit is less than the price of a leather hide alone! Add in the vinyl and labor cost if we had to sew the entire works, and the price to our clients would more than triple! If you are building a car to drive and enjoy, I’d recommend a kit (if available) and proper installation every time. If you are building a serious concours car and want the perfect color and fit (see our interior color and piping pages), then an “off the shelf” kit might not be the best choice, and you’ll need to shop around. Triumph TR2-Early TR4 seats are a throwback to ancient times. The proper method to install these seat covers involves techniques unknown to most modern day auto trimmers. I once had a trim shop on the west coast contact me about a pair of TR3A seats that a customer had brought them. They had been in the upholstery business for 30 years, but still couldn’t understand why the new Moss kit was missing the pockets for the “listing wires”. I told them “it’s because a Triumph seat doesn’t use listing wires.” In the end, they boxed everything up and shipped it to me for installation. After welding the giant cracks they’d overlooked in the bases, fabricating and installing new tack strips, and modifying the universal seat padding kit for this particular style of seat, I installed the covers and sent them back to a happy client. Another thing that you should be aware of, is that there are many subtle differences between the TR2/3 seats and springs, and the TR3A/B & early TR4 seats and springs. This means that if the seats were switched at some time in your car’s history, (which happened a lot), then the kit you purchased for your car might not fit. There are also many differences in the late TR4-TR6 seat frames, and all will bolt onto the same tracks, so beware that your car has the correct frames before ordering a seat upholstery kit! Years ago when there were many TR’s in salvage yards, it was very common for a Triumph owner with a bad seat to grab something better that would work in their car, perfect match or not. Your interior is what you see (and feel) the most when driving your car. Make the right choices and get the best possible interior in your car. You'll enjoy the car more and be happier with every mile behind the wheel!