Macy’s Garage

© 2026 - Macy’s Garage, Ltd.

Blog
WHAT we’re doing, and HOW we’re doing it!
December 29, 2025
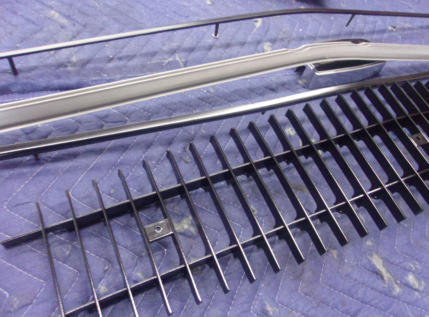
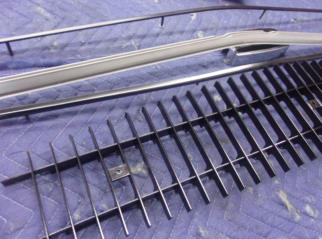
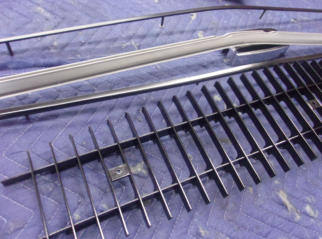
As stated on this website many times before, just because a part is shown in the catalogs and on supplier websites today does not mean you will be able to buy one when you’re ready for it. Case in point the new reproduction TR6 grilles. We used to be able to purchase nice new reproductions at a reasonable price for all of our restorations, but suddenly in the last few months they have been discontinued. Our only choice now is to disassemble and restore the original grilles, all at higher expense (primarily for labor) than would have been spent to buy a new replacement. Rivets must be drilled out to disassemble the grille, and some parts have to be sent out for media blasting and powder coating. The stainless steel trim strips for the top and bottom (‘73-‘76) will need to be polished (or replaced as long as we can still get them), and then all of the components need to be reassembled (riveted) and fitted onto the car. This process takes much longer than simply opening a box and ‘offering-up’ the new assembly to a nearly completed restoration, thus the much higher cost! NOTE: There will be no new Blog posts during the month of January 2026, while we work to split our massive website into two smaller sites which can be better handled by our web publishing software.December 22, 2025
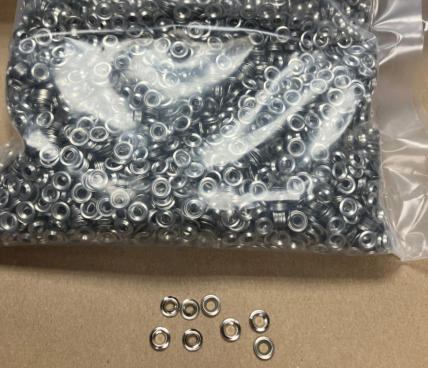
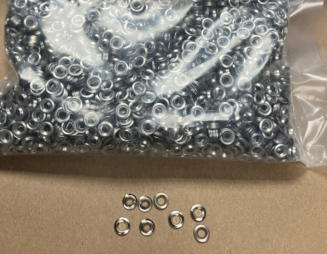
Those familiar with the TR2-TR3B range will know about these #4 flush type Cup Washers. They are used throughtout the interior, and 80-100 are needed for a whole car. The Triumph part number is SP132B/CP, and Moss USA calls them 324-390 with a price of $0.62 EACH. Multiply that X100, and you get a glimpse of why restorations are so expensive! For years now, we had an alternate source through our upholstery suppliers, but it’s such a scarcely used part those sources eventually dried up. We have no idea if/when Moss’s source will ever run out, but at that price they aren’t an option for us. So, our only remaining choice was to search the globe and have them made specially for us. After our poke at Chinese brake parts last week, you can now see that wasn’t a blanket comdenation as there are places on our Triumphs where “Made in China” parts are A-OK. We had to pay for tooling and purchase 20,000 of these tiny trim washers, but we now have enough to cover 200 cars at a more reasonable price of only $0.35 each. We will be selling packs of 100 in our eBay store discounted to $0.30 each ($30 per pack), and they are also included in all of our TR2-3B SS interior hardware kits. Our washers are stainless steel (to match the SS screws we use) as opposed to the nickel-plated originals Triumph called “chrome”, and they look/function PERFECTLY!December 15, 2025
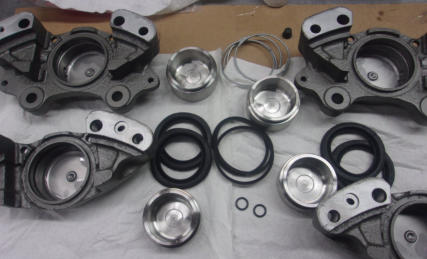
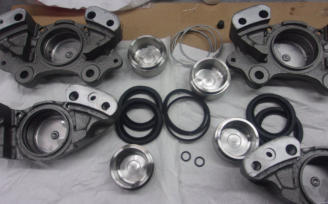
In our opinion, brakes are just about the most important system on a car, right up there with steering and suspension. It doesn’t matter how well it runs or how fast it goes if it won’t go where you point it, and if you can’t stop it once it starts moving. We could spend a good hour or more relaying all of the situations we’ve seen or heard about over the years where cars were destroyed because some over-eager car enthusiast thought he should get the car to run as his first priority. But instead we’ll discuss how we handle brake components, focusing on the importance of the parts and the entire system. Yes, you can buy new replacement brake calipers, but we would prefer to rebuild the originals here in-house than to trust our lives to Chinese calipers. We know that these cars will sit for long periods of time which invites hygroscopic action, resulting in rusty pistons and ruined seals. For this reason we always use new stainless steel pistons, which aren’t available in the new Chinese calipers. We also use DOT4 silicone fluid exclusively for the very same reason. And as you can see here, the old internet fobia about “splitting” the calipers is a bunch of hooey as well!December 8, 2025
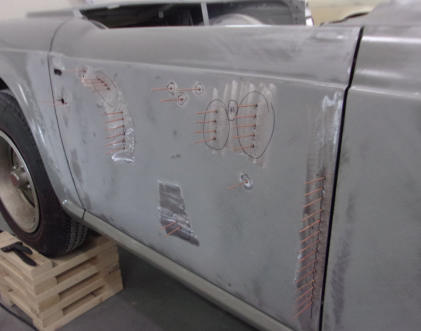
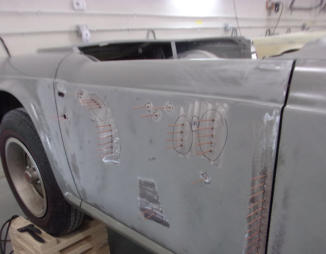
The little “pins” (studs) sticking out from this TR6 door are not an attempt to create a porcupine ‘art-car’. They are used to refine a previously damaged body panel, and move small areas to a different position so that less filler will be required. Now the filler is only needed if the spot in question is “low”, and in that case a small puller is attached to the stud and the low is pulled up while lightly tapping around it with a body hammer. But what if the area sticks up and is “high”? In that case, the high area must be shrunk down, although most body hacks will pound it down and fill the resulting low (dent) with filler, also called the “cave it and pave it” method. A little fact known only to serious metal men is that thin sheet metal will shrink as it cools after being heated. The hard part is limiting the heat to a very small area. Here, the studs add heat to a tiny spot with pinpoint accuracy and apply that heat briefly when welding the stud. The surrounding high metal will then shrink as it cools, pulling the high spot down close to ‘level’, or slightly below. What if it shrinks too much? It’s easy to raise again by either pulling the pin up as for any normal low, or hammer lightly “on dolly” to squeeze the metal slightly, expanding the low back up to the perfect height. There’s a lot of judgement and experience required for this, and the talented staff in our metal and paint shops are well stocked with both.December 1, 2025
This rusty tail light pocket is from the rear inside corner of a TR6 rear fender. It is never seen unless the car is disassembled, but it is important to repair rust here just as much as on an outside panel that is being prepped for new paint. If not repaired properly to seal this area from dirt and water infiltration, the contaminants allowed into the tail lamp pocket will start (or continue) to rust away (again) and hasten the date of the next repair. Water that gets in through a rusty area like this will also cause electrical trouble with the tail lamp, for which poor old Joseph Lucas will certainly be blamed! Unfortunately, most home restorers and lower tier “restoration” shops will ignore everything like this which will not be seen, but we prefer the “do it right the first time so it never needs to be done again” approach. We know the cars will be pampered from here forward and not driven daily on salty roads (as they were when new), and it’s also the reason that we would never contemplate buying an already “restored” car that wasn’t done here in our shop. There’s no sense paying up for half a job that looks OK today but will likely need to be re-done again much sooner than you’d like.November 24, 2025
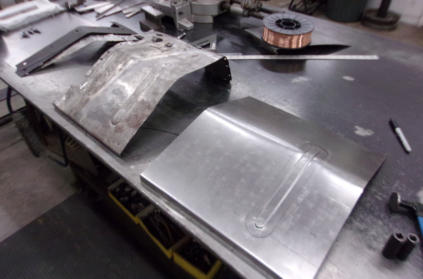
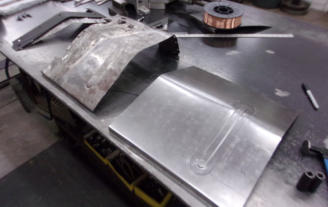
Have you ever noticed the ribs or channels, or any other ‘designs’ that are stamped into large flat structural panels in car bodies? Some examples of panels with these on our Triumphs are the floor pans, firewall, and inner trunk panels (just to name a few). The small ridges and indentations are there to add strength and support, not to add asthetics to the design. They are also useful in eliminating vibrations (harmonics) throughout the car, as any flat sheet metal panel will quickly become strong and quiet with the addition of just a few of these small design elements. Whenever you have a rusty piece of body metal which needs to be replaced, it is important to put the strengthening elements back into any replacement panel you need to fabricate. The problem in doing this is that it requires expensive and specialized equipment to create these elements, and few home restorers or collision body shops will have it. Something as simple as this strengthening rib on a firewall panel is the type of details which make the difference between average and exceptional restorations.November 17, 2025
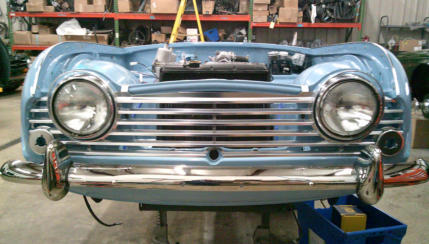
After the lengthy process of restoring dirty, grimy, and rusty car parts, the real fun finally begins when the shiny parts all start to come together again. Hopefully, the fit of all components was checked BEFORE any paint was applied, because finding out now that two pieces don’t fit together correctly creates a frustrating situation. This is especially true at the front of the car, where minor collisions from bigger cars parked ahead of our little TR’s have most likely backed into the “invisible” little Triumph at sometime long ago. More problems can be expected when using reproduction parts or extensively repaired original pieces. In those cases, don’t expect anything to fit correctly, and multiple test fittings must take place so that all required adjustments can be performed well ahead of paint and final assembly. Never assume that a new bumper is going to come out of the box and slide onto the car perfectly on the first try. If the truth were known, it probably wasn’t that easy at the Triumph factory either, and most of the assembly line workers probably had a big hammer at the ready!November 10, 2025
This week we have another one of those “gotcha’s”, where you order a “kit” to upgrade something on your Triumph, and you don’t know to order all the extras that are needed for a first rate job. Here we’re looking at a late TR6 seat frame, and all of the associated parts that are usually required to end up with a good looking and comfortable seat. Most of you will know to order new seat foam, but the stretchy/squishy parts to support the foam are often overlooked until you remove the old covers and foam to see just how bad the foundation is. Rubber doesn’t age well, and the lower rubber diaphragms and backrest straps will generally loose their elasticity over the life of an upholstery cover and foam cushion. Just like building a new house on an old foundation, your new seat covers will last longer and feel much more comfortable if you replace all of these hidden structure items while the seats are apart and you have E-Z access. Even if they look good now, don’t expect old rubber stretchy parts to last as long as your new new seat covers and foam will.November 3, 2025
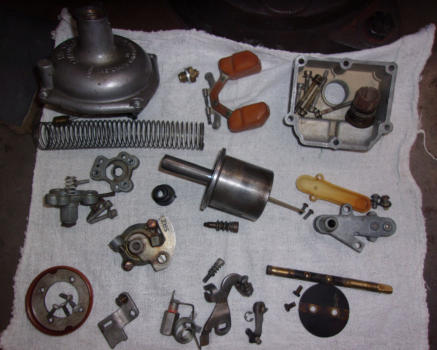
If you walk into any new car dealership today and ask all of the techs who’ve rebuilt a carburetor to hold up their hand, the number of “takers” will probably be in the minority. Carburetors started to disappear from American cars in the mid 1970’s, when the only way to meet increasing emissions standards was to control the combustion process electronically by computer. That makes mainstream fuel injection now 50 years old, and carburetors are now relegated to the catagory of “antiques”. Because we work only with Triumphs that are also parked in the “antique” catagory, everyone here learns to speak fluent carburetor pretty fast. All of our carburetors are rebuilt here in-house, and we stock a healthy supply of new and used parts so that we can move through the process quickly. There’s nothing worse than disassembling a complex component with many tiny parts, and then have it sit around like an exploded diagram while waiting on needed parts to arrive. Chances are VERY good that something small will go AWOL while waiting on the first batch of bits to arrive!October 20, 2025
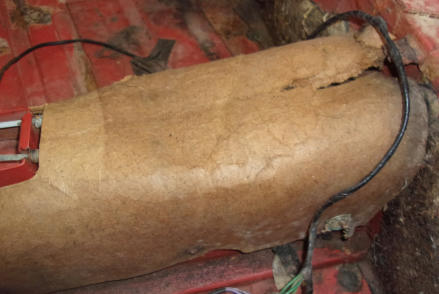
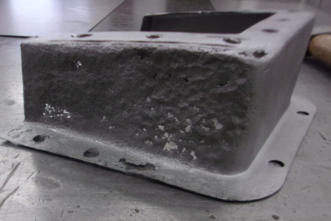
This mangy piece of cardboard is the driveshaft tunnel cover used on all TR4A, TR250, and TR6 cars. It became necessary to cover the handbrake cables on these cars when the handbrake lever moved from the floor to the top of the driveshaft tunnel with the introduction of the IRS frame for the TR4A. As you can see from the crushed top and decaying old cardboard, it gets a lot of abuse that the Triumph designers probably didn’t anticipate. (They probably didn’t expect the cars to last for more than a few years, or be driven by old guys who needed to push-off from here to get out of the car either!) This is a good item to replace when installing new carpet, and the new plastic covers are more durable than the cardboard replacements. The problem is in knowing that you need this when ordering your carpet set! They are “hidden” in the parts catalogs and not shown near the carpet. The Moss TR4 catalog shows it on the 4A handbrake page, but does not list a part number for the plastic cover (856-046). The TR250/6 catalog does show the plastic cover p/n, but it’s “hidden” as a text only notation (no illustration), and ONLY on the TR6 Body Panels page (not 250). Now you know so plan ahead if ever ordering carpet!October 13, 2025
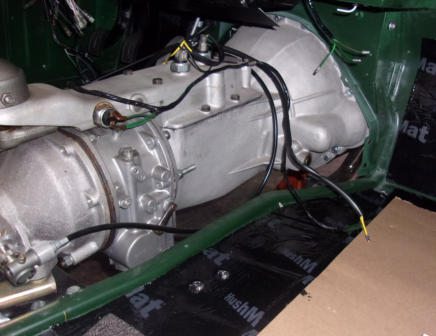
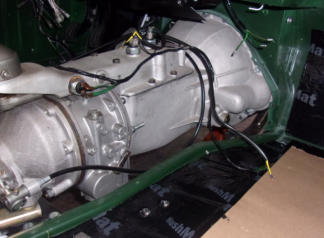
Adding an overdrive to a TR which didn’t originally have it is a “relatively” simple task, but there are several related parts which will be necessary if you want it to work! While the front gearbox case is the same (o.d -vs- non-o.d.) and the unit will easily bolt onto the rear of the engine, the rear mounts are only that simple as long as you install an A-type overdrive into a pre-1973 TR6 and a J-type in a 73-76 version. The gearbox mainshaft is the biggest difference internally, so that leaves us with all of the peripheral pieces. Dash or steering column switches and an unseen voltage relay to operate an engagement solenoid, and wiring sub-harnesses to connect them all together. Isolation switches have to be added to the top so the overdrive can only be engaged in certain forward gears, and then there’s the longer speedometer cable and a 90 degree cable adaptor (TR4A-TR6 only) that’s needed to keep your speedometer working. Thankfully, your original driveshaft will still work with an overdrive upgrade! While none of this is rocket science, it won’t be as simple as buying an overdrive gearbox from eBay with plans to ‘throw-it-in’ on a Saturday afternoon. Want to simplify the process even more? Give us a call and let the folks here (who know the ins-and-outs like the back of their hands) do it all for you!October 6, 2025
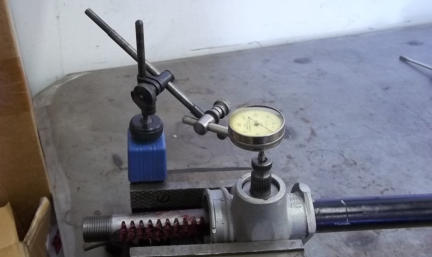
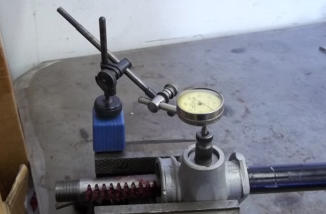
We are well known among the sidescreen community for rebuilding TR2-TR3B steering boxes, averaging 2 per month over the last 15-16 years, but did you also know that we rebuild all of our own TR4-TR6 steering racks as well? Special bushing reamers are required to rebuild the early steering boxes, and we had to make a couple of our own special tools to be able to work on the steering racks. (Another good excuse to have our own machine shop!) Careful measurements and adjustment of shim packs are required to rebuild the early boxes, and the same task is also repeated with the steering racks. Here you see the setup for measuring pinion end float, and then this float is adjusted by adding or removing shims from the stack. The more things change, the more they stay the same! While we don’t recommend rack and pinion steering conversions for the sidescreen cars (due to incorrect geometry changes), we are equally well versed on the racks for the Triumphs that were designed to use them.
BLOG
2025-Q4
America’s BEST Triumph Shop


Macy’s Garage

© 2026 - Macy’s Garage, Ltd.

Blog
WHAT we’re doing, and HOW we’re doing it!
December 29, 2025
As stated on this website many times before, just because a part is shown in the catalogs and on supplier websites today does not mean you will be able to buy one when you’re ready for it. Case in point the new reproduction TR6 grilles. We used to be able to purchase nice new reproductions at a reasonable price for all of our restorations, but suddenly in the last few months they have been discontinued. Our only choice now is to disassemble and restore the original grilles, all at higher expense (primarily for labor) than would have been spent to buy a new replacement. Rivets must be drilled out to disassemble the grille, and some parts have to be sent out for media blasting and powder coating. The stainless steel trim strips for the top and bottom (‘73-‘76) will need to be polished (or replaced as long as we can still get them), and then all of the components need to be reassembled (riveted) and fitted onto the car. This process takes much longer than simply opening a box and ‘offering-up’ the new assembly to a nearly completed restoration, thus the much higher cost! NOTE: There will be no new Blog posts during the month of January 2026, while we work to split our massive website into two smaller sites which can be better handled by our web publishing software.December 22, 2025
Those familiar with the TR2-TR3B range will know about these #4 flush type Cup Washers. They are used throughtout the interior, and 80-100 are needed for a whole car. The Triumph part number is SP132B/CP, and Moss USA calls them 324-390 with a price of $0.62 EACH. Multiply that X100, and you get a glimpse of why restorations are so expensive! For years now, we had an alternate source through our upholstery suppliers, but it’s such a scarcely used part those sources eventually dried up. We have no idea if/when Moss’s source will ever run out, but at that price they aren’t an option for us. So, our only remaining choice was to search the globe and have them made specially for us. After our poke at Chinese brake parts last week, you can now see that wasn’t a blanket comdenation as there are places on our Triumphs where “Made in China” parts are A-OK. We had to pay for tooling and purchase 20,000 of these tiny trim washers, but we now have enough to cover 200 cars at a more reasonable price of only $0.35 each. We will be selling packs of 100 in our eBay store discounted to $0.30 each ($30 per pack), and they are also included in all of our TR2- 3B SS interior hardware kits. Our washers are stainless steel (to match the SS screws we use) as opposed to the nickel-plate originals Triumph called “chrome”, and they look/function PERFECTLY!December 15, 2025
In our opinion, brakes are just about the most important system on a car, right up there with steering and suspension. It doesn’t matter how well it runs or how fast it goes if it won’t go where you point it, and if you can’t stop it once it starts moving. We could spend a good hour or more relaying all of the situations we’ve seen or heard about over the years where cars were destroyed because some over-eager car enthusiast thought he should get the car to run as his first priority. But instead we’ll discuss how we handle brake components, focusing on the importance of the parts and the entire system. Yes, you can buy new replacement brake calipers, but we would prefer to rebuild the originals here in-house than to trust our lives to Chinese calipers. We know that these cars will sit for long periods of time which invites hygroscopic action, resulting in rusty pistons and ruined seals. For this reason we always use new stainless steel pistons, which aren’t available in the new Chinese calipers. We also use DOT4 silicone fluid exclusively for the very same reason. And as you can see here, the old internet fobia about “splitting” the calipers is a bunch of hooey as well!December 8, 2025
The little “pins” (studs) sticking out from this TR6 door are not an attempt to create a porcupine ‘art-car’. They are used to refine a previously damaged body panel, and move small areas to a different position so that less filler will be required. Now the filler is only needed if the spot in question is “low”, and in that case a small puller is attached to the stud and the low is pulled up while lightly tapping around it with a body hammer. But what if the area sticks up and is “high”? In that case, the high area must be shrunk down, although most body hacks will pound it down and fill the resulting low (dent) with filler, also called the “cave it and pave it” method. A little fact known only to serious metal men is that thin sheet metal will shrink as it cools after being heated. The hard part is limiting the heat to a very small area. Here, the studs add heat to a tiny spot with pinpoint accuracy and apply that heat briefly when welding the stud. The surrounding high metal will then shrink as it cools, pulling the high spot down close to ‘level’, or slightly below. What if it shrinks too much? It’s easy to raise again by either pulling the pin up as for any normal low, or hammer lightly “on dolly” to squeeze the metal slightly, expanding the low back up to the perfect height. There’s a lot of judgement and experience required for this, and the talented staff in our metal and paint shops are well stocked with both.December 1, 2025
This rusty tail light pocket is from the rear inside corner of a TR6 rear fender. It is never seen unless the car is disassembled, but it is important to repair rust here just as much as on an outside panel that is being prepped for new paint. If not repaired properly to seal this area from dirt and water infiltration, the contaminants allowed into the tail lamp pocket will start (or continue) to rust away (again) and hasten the date of the next repair. Water that gets in through a rusty area like this will also cause electrical trouble with the tail lamp, for which poor old Joseph Lucas will certainly be blamed! Unfortunately, most home restorers and lower tier “restoration” shops will ignore everything like this which will not be seen, but we prefer the “do it right the first time so it never needs to be done again” approach. We know the cars will be pampered from here forward and not driven daily on salty roads (as they were when new), and it’s also the reason that we would never contemplate buying an already “restored” car that wasn’t done here in our shop. There’s no sense paying up for half a job that looks OK today but will likely need to be re-done again much sooner than you’d like.November 24, 2025
Have you ever noticed the ribs or channels, or any other ‘designs’ that are stamped into large flat structural panels in car bodies? Some examples of panels with these on our Triumphs are the floor pans, firewall, and inner trunk panels (just to name a few). The small ridges and indentations are there to add strength and support, not to add asthetics to the design. They are also useful in eliminating vibrations (harmonics) throughout the car, as any flat sheet metal panel will quickly become strong and quiet with the addition of just a few of these small design elements. Whenever you have a rusty piece of body metal which needs to be replaced, it is important to put the strengthening elements back into any replacement panel you need to fabricate. The problem in doing this is that it requires expensive and specialized equipment to create these elements, and few home restorers or collision body shops will have it. Something as simple as this strengthening rib on a firewall panel is the type of details which make the difference between average and exceptional restorations.November 17, 2025
After the lengthy process of restoring dirty, grimy, and rusty car parts, the real fun finally begins when the shiny parts all start to come together again. Hopefully, the fit of all components was checked BEFORE any paint was applied, because finding out now that two pieces don’t fit together correctly creates a frustrating situation. This is especially true at the front of the car, where minor collisions from bigger cars parked ahead of our little TR’s have most likely backed into the “invisible” little Triumph at sometime long ago. More problems can be expected when using reproduction parts or extensively repaired original pieces. In those cases, don’t expect anything to fit correctly, and multiple test fittings must take place so that all required adjustments can be performed well ahead of paint and final assembly. Never assume that a new bumper is going to come out of the box and slide onto the car perfectly on the first try. If the truth were known, it probably wasn’t that easy at the Triumph factory either, and most of the assembly line workers probably had a big hammer at the ready!November 10, 2025
This week we have another one of those “gotcha’s”, where you order a “kit” to upgrade something on your Triumph, and you don’t know to order all the extras that are needed for a first rate job. Here we’re looking at a late TR6 seat frame, and all of the associated parts that are usually required to end up with a good looking and comfortable seat. Most of you will know to order new seat foam, but the stretchy/squishy parts to support the foam are often overlooked until you remove the old covers and foam to see just how bad the foundation is. Rubber doesn’t age well, and the lower rubber diaphragms and backrest straps will generally loose their elasticity over the life of an upholstery cover and foam cushion. Just like building a new house on an old foundation, your new seat covers will last longer and feel much more comfortable if you replace all of these hidden structure items while the seats are apart and you have E-Z access. Even if they look good now, don’t expect old rubber stretchy parts to last as long as your new new seat covers and foam will.November 3, 2025
If you walk into any new car dealership today and ask all of the techs who’ve rebuilt a carburetor to hold up their hand, the number of “takers” will probably be in the minority. Carburetors started to disappear from American cars in the mid 1970’s, when the only way to meet increasing emissions standards was to control the combustion process electronically by computer. That makes mainstream fuel injection now 50 years old, and carburetors are now relegated to the catagory of “antiques”. Because we work only with Triumphs that are also parked in the “antique” catagory, everyone here learns to speak fluent carburetor pretty fast. All of our carburetors are rebuilt here in-house, and we stock a healthy supply of new and used parts so that we can move through the process quickly. There’s nothing worse than disassembling a complex component with many tiny parts, and then have it sit around like an exploded diagram while waiting on needed parts to arrive. Chances are VERY good that something small will go AWOL while waiting on the first batch of bits to arrive!October 20, 2025
This mangy piece of cardboard is the driveshaft tunnel cover used on all TR4A, TR250, and TR6 cars. It became necessary to cover the handbrake cables on these cars when the handbrake lever moved from the floor to the top of the driveshaft tunnel with the introduction of the IRS frame for the TR4A. As you can see from the crushed top and decaying old cardboard, it gets a lot of abuse that the Triumph designers probably didn’t anticipate. (They probably didn’t expect the cars to last for more than a few years, or be driven by old guys who needed to push-off from here to get out of the car either!) This is a good item to replace when installing new carpet, and the new plastic covers are more durable than the cardboard replacements. The problem is in knowing that you need this when ordering your carpet set! They are “hidden” in the parts catalogs and not shown near the carpet. The Moss TR4 catalog shows it on the 4A handbrake page, but does not list a part number for the plastic cover (856-046). The TR250/6 catalog does show the plastic cover p/n, but it’s “hidden” as a text only notation (no illustration), and ONLY on the TR6 Body Panels page (not 250). Now you know so plan ahead if ever ordering carpet!October 13, 2025
Adding an overdrive to a TR which didn’t originally have it is a “relatively” simple task, but there are several related parts which will be necessary if you want it to work! While the front gearbox case is the same (o.d -vs- non-o.d.) and the unit will easily bolt onto the rear of the engine, the rear mounts are only that simple as long as you install an A-type overdrive into a pre-1973 TR6 and a J-type in a 73-76 version. The gearbox mainshaft is the biggest difference internally, so that leaves us with all of the peripheral pieces. Dash or steering column switches and an unseen voltage relay to operate an engagement solenoid, and wiring sub- harnesses to connect them all together. Isolation switches have to be added to the top so the overdrive can only be engaged in certain forward gears, and then there’s the longer speedometer cable and a 90 degree cable adaptor (TR4A-TR6 only) that’s needed to keep your speedometer working. Thankfully, your original driveshaft will still work with an overdrive upgrade! While none of this is rocket science, it won’t be as simple as buying an overdrive gearbox from eBay with plans to ‘throw-it-in’ on a Saturday afternoon. Want to simplify the process even more? Give us a call and let the folks here (who know the ins-and-outs like the back of their hands) do it all for you!October 6, 2025
We are well known among the sidescreen community for rebuilding TR2-TR3B steering boxes, averaging 2 per month over the last 15-16 years, but did you also know that we rebuild all of our own TR4-TR6 steering racks as well? Special bushing reamers are required to rebuild the early steering boxes, and we had to make a couple of our own special tools to be able to work on the steering racks. (Another good excuse to have our own machine shop!) Careful measurements and adjustment of shim packs are required to rebuild the early boxes, and the same task is also repeated with the steering racks. Here you see the setup for measuring pinion end float, and then this float is adjusted by adding or removing shims from the stack. The more things change, the more they stay the same! While we don’t recommend rack and pinion steering conversions for the sidescreen cars (due to incorrect geometry changes), we are equally well versed on the racks for the Triumphs that were designed to use them.

America’s BEST Triumph Shop