© 2026 - Macy’s Garage, Ltd.
Macy’s Garage

STEERING
BOX-1
TR2-3B Steering Box Rebuild - Page 1
This page was one of the first tech pages that we created for our old website many years ago, so now it’s the first to go back up on the new website. The original idea was to show you how to do this at home, but it must have scared most folks away from this job because we have received an average of TWO steering boxes to rebuilt here EVERY MONTH since this was first posted in 2006. The UPS truck brings us steering boxes from hobbyists and professional shops alike, so there is no doubt that we have more experience with these than anyone else on this side of the Atlantic. Steering is just as important to your safety as brakes, so it better be done right! Take a look at what’s involved and if you have any doubts about doing this yourself or you lack the special tools which are needed, then by all means ship your steering box here to be rebuilt quickly and correctly by the experts!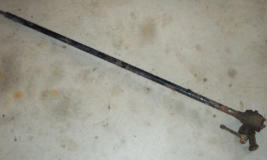
Here is our subject, a one-piece TR3 steering
column and box. The box overhaul is the same
procedure for later cars with the split 2-piece
columns.
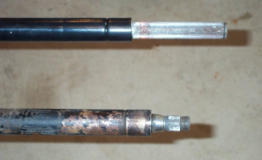
Adjustable wheel columns have a long spline at
the top, as shown in the upper location of this
photo. The standard steering wheels have a
short spline, and the wheels are retained by an
11/16-27 threaded nut. The outer tubes for one
piece columns will measure 51-15/16” from box
to top for adjustable wheels, and 52-9/16” for
standard wheels. Upper column tubes for 2-
piece columns should measure XXX for adj.
wheels, and XXX for std. wheels.
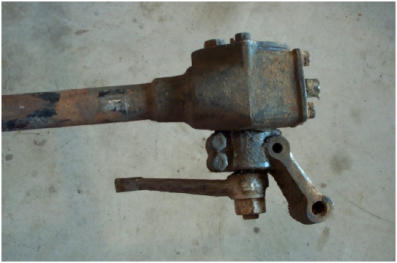
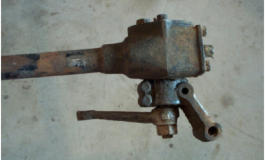
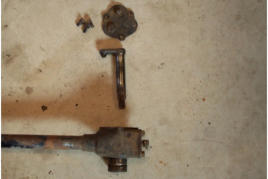
Here is what your box should look like when
removed from the car. Do not try to separate the
drop arm from the box before you get it out of the
car, and you may damage the worm gear inside
using an incorrect puller or “pickle-fork” to try and
drive it off. If you are sending a box here to be
rebuilt, this is how we want to receive them, with
the drop arm and mounting bracket in place.
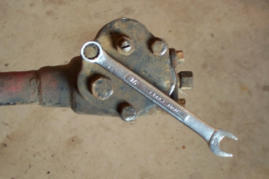
If you are going to rebuild the box yourself,
remove the big nut using a 1-1/16” socket. Don’t
use an impact gun or you may damage the worm
gear, and be sure to straighten the lock tab
washer that’s under the nut first. Hold the drop
arm in a big bench vise, or position it on the floor
as shown.
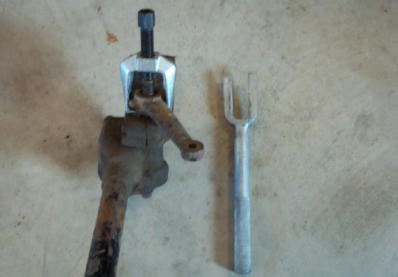
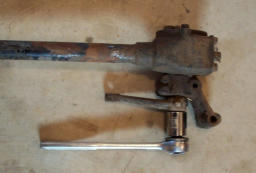
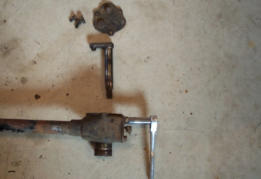
Pull off the drop arm using a Pitman Arm puller
as shown. The “pickle Fork” tool shown on the
right should never be used, as you’ll probably
bend the rocker shaft inside the box and/or
damage (chip) the worm gear. These are the
two most expensive parts inside a steering box,
so be extremely careful here.
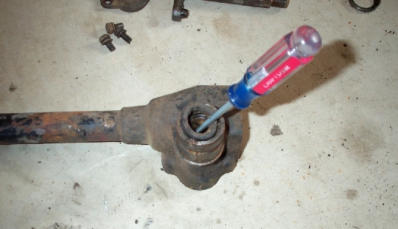
A ½” wrench is used to remove the two bolts
holding the mount casting onto the box. With the
bolts out, slide the mount off of the steering box.
NOTE: When reassembling the steering box,
leave these two bolts slightly loose so you can
twist the mount for the proper position when you
reinstall the box. After the box is back in the car
and everything is aligned, then torque them to 20
ft. lb.
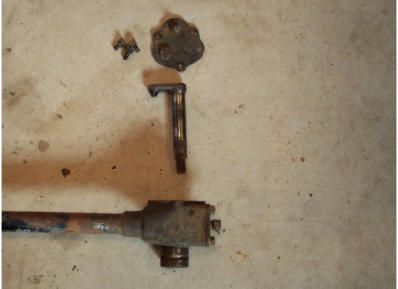
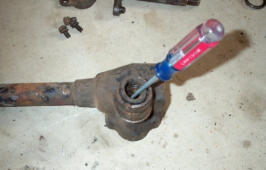
The top cover comes off next by removing the
three outer edge bolts with a ½” wrench.
Remove the top cover and pull out the rocker
shaft.
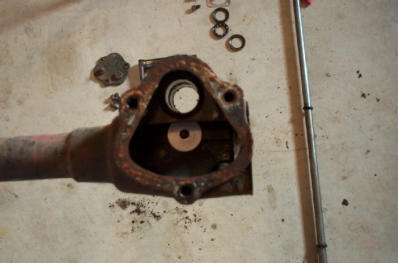
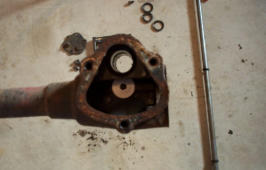
A ½” wrench or socket and ratchet will remove
the four bolts from the end plate at the bottom of
the box. Save all of the shims that you’ll find
between the box and the end plate.
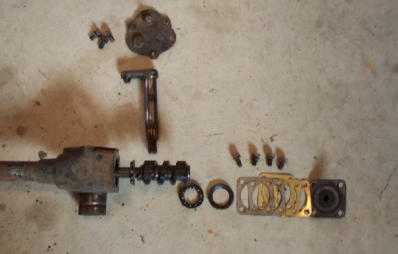
After removing the end plate and shims, you’ll
find the lower bearing and race. Remove them,
and the worm gear and inner column can be
removed through the bottom end plate opening.
The oil seal at the bottom of the box should pop
out easily.
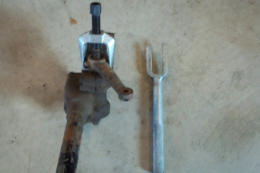
Now here’s the tricky part of disassembly,
removing the rocker shaft bushing. Slip a 1”
O.D. washer through the lubrication slot at the
bottom of the worm gear cavity as shown. This
washer needs to be exactly 1” O.D. Too small
and it will fall through the bushing, and too large
and it won’t pass through the bore and push the
bushing out.


America’s BEST Triumph Shop


© 2026 - Macy’s Garage, Ltd.
Macy’s Garage


America’s BEST Triumph Shop

TR2/3 Steering Box
Rebuild - Page 1
NOTE: Several graphic images and some text has been removed for viewing this lengthy page on mobile devices. Please visit this page on a large screen computer to see them all. This page was one of the first tech pages that we created for our old website many years ago, so now it’s the first to go back up on the new website. The original idea was to show you how to do this at home, but it must have scared most folks away from this job because we have received an average of TWO steering boxes to rebuilt here EVERY MONTH since this was first posted in 2006. The UPS truck brings us steering boxes from hobbiests and professional shops alike, so there is no doubt that we have more experience with these than anyone else on this side of the Atlantic. Steering is just as important to your safety as brakes, so it better be done right! Take a look at what’s involved and if you have any doubts about doing this yourself or you lack the special tools which are needed, then by all means ship your steering box here to be rebuilt quickly and correctly by the experts! Here is what your box should look like when removed from the car. Do not try to separate the drop arm from the box before you get it out of the car, and you may damage the worm gear inside using an incorrect puller or “pickle-fork” to try and drive it off. If you are sending a box here to be rebuilt, this is how we want to receive them, with the drop arm and mounting bracket in place. Pull off the drop arm using a Pitman Arm puller as shown. The “pickle Fork” tool shown on the right should never be used, as you’ll probably bend the rocker shaft inside the box and/or damage (chip) the worm gear. These are the two most expensive parts inside a steering box, so be extremely careful here. Remove the top cover and pull out the rocker shaft. After removing the end plate and shims, you’ll find the lower bearing and race. Remove them, and the worm gear and inner column can be removed throught the bottom end plate opening. The oil seal at the bottom of the box should pop out easily. Now here’s the tricky part of disassembly, removing the rocker shaft bushing. Slip a 1” O.D. washer through the lubrication slot at the bottom of the worm gear cavity as shown. This washer needs to be exactly 1” O.D. Too small and it will fall through the bushing, and too large and it won’t pass through the bore and push the bushing out.